
Ever get half-way through a project and wonder if you had to be half-crazy to have started it in the first place?
Yeah… That was me about a month ago.
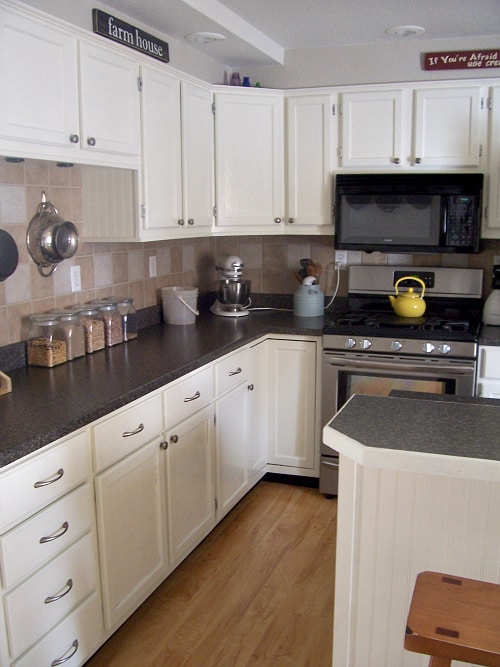
My road to crazy was a gradual one… Thanks to too much time spent on Pinterest, I’ve had my eye on white kitchen cabinets for about a year…
The problem was that I couldn’t exactly justify ripping out my current cabinets and springing for brand new ones. Although I wasn’t a fan of the builder-grade orange oak, they were still in good shape and I didn’t exactly have a couple thousand bucks hanging around for a full kitchen remodel.
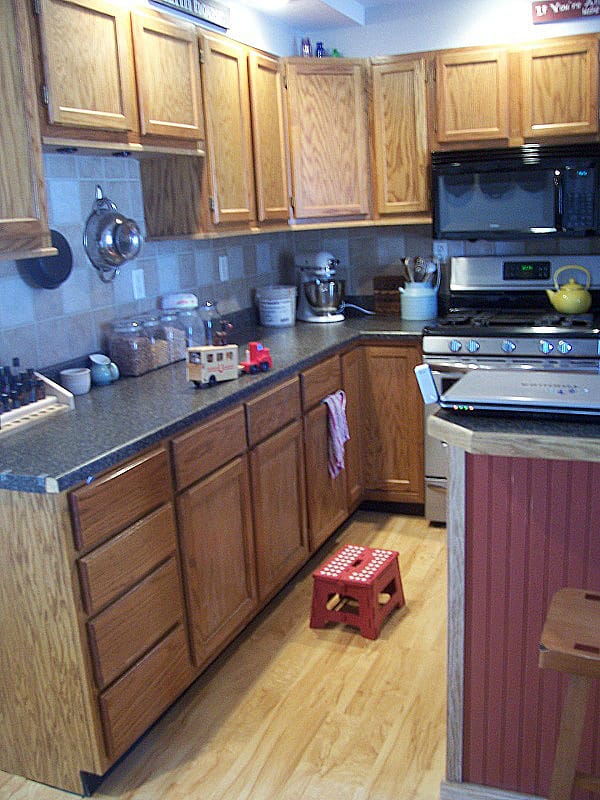
So there I was– with orange cabinets… and a whole bunch of paint brushes in my basement.
You can see where this is going, right?
Hubby wasn’t exactly thrilled with the idea at first– but after I showed him pictures of crisp, farmhouse kitchens with creamy white cabinets, he started to “feel” my vision…
There are a lot of cabinet painting shortcuts online, and although I was tempted by them at first, I decided to avoid them. My kitchen is the most-used room in my home, and I couldn’t risk having paint that would rub off it a year or two…
I decided to follow the process that Young House Love outlined in their cabinet-painting tutorial. They have multiple in-depth posts on the subject- I definitely recommend checking them out. (I think I read the series about 582 times before I started…)
I originally figured that the project would take about two weeks…. *cue hysterical laughing*

It actually ended up taking over two months… I somehow failed to include the fact that I have two small children, a homestead to run, and a blog to maintain into my initial time estimate.
Since Young House Love did such a splendid job on their cabinet-painting series, I won’t go into every detail here, but here is a quick run-down of the process:
How I Painted my Kitchen Cabinets (in a nutshell)
1. First, I removed cabinet doors, hinges, and drawers.
2. I sanded the drawer fronts, doors, and cabinet boxes with 100-grit sandpaper. (An electric sander will be your best friend.)
3. Wipe off sawdust with a damp rag (or use tack cloth).
4. I then applied a liquid de-glosser. This basically coats any leftover polyurethane or finish and makes sure that the paint sticks to it. Some folks just do sanding OR de-glossing– but I did both just to be safe.
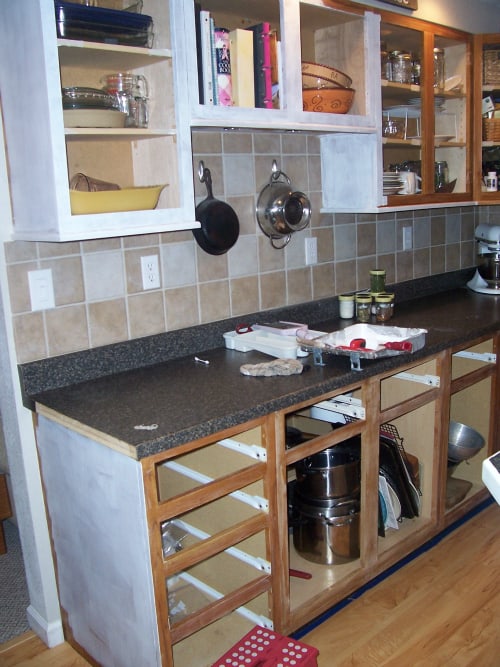
5. Apply two coats of quality primer. Let each coat dry completely according to the manufacturer’s directions. (I used Zinnser primer.)
6. Apply 2-3 coats of quality paint. Let each coat dry completely according to the manufacturer’s directions.
Now– the type of paint you choose is very important– do NOT skimp on quality here! I know that some folks just use regular latex paint, but I had heard great things about Benjamin Moore Advance, so I went with it– and I wasn’t disappointed. (I’m not affiliated with Benjamin Moore in any way– but I’m still singing the praises of this paint!)
It’s basically a latex paint that acts like an oil paint. It’s self-leveling and dries to a very hard, very wipeable finish. (And if you don’t have to use paint-thinner to clean your brushes!) It wasn’t cheap (expect to pay $40-$50 a gallon), but it was worth it since I do NOT want to have to re-do this project in a year or two…
7. I chose to spray paint my old hinges instead of buying new ones… I priced replacements, and it would have ended up costing several hundred dollars for new hardware… We’ll see how the spray paint holds up, but so far– so good. (I used Rustoleum Professional High Performance Enamel)
8. After giving everything a couple more days to dry, we re-hung the doors and attached new knobs and drawer pulls.
A Few Tips I Learned Along the Way:
1. Give yourself lots of time…. LOTS. This isn’t a weekend project– expect to live in chaos for a while.
2. Keep stuff in the cabinets. Since my kitchen had to stay functional during this whole process, it wasn’t really an option to box everything up… (Although maybe if I had, it would have been completed sooner!) Instead, I chose to leave the contents of my cupboards in place… I did have to remove everything and rinse it off after the sanding was complete, but otherwise, I was still able to cook during the remodel. (And hey, my cupboards needed a clean-out anyway…)
3. Use quality brushes and paint. I know, I know– I’m a frugal gal too. But this is one area where you don’t want to skimp– unless you plan on re-doing the project in a couple years. Like I mentioned above, I was very happy with my choice of paint, even though it wasn’t cheap (Benjamin Moore Advance in Acadia White). I also bought quality 2″ paint brushes (like this one) and a small foam roller (like this one) for the process.

4. Follow the directions and let things dry. Read the back of your paint/primer cans and obey. If you rush the drying times, you’ll end up with gummy paint that won’t be as durable.
5. When painting the doors, start with the back side first. This allows your final coat to be the front side, which is the most important in my opinion. And yes, the door-painting part of the project takes for-ev-er……..
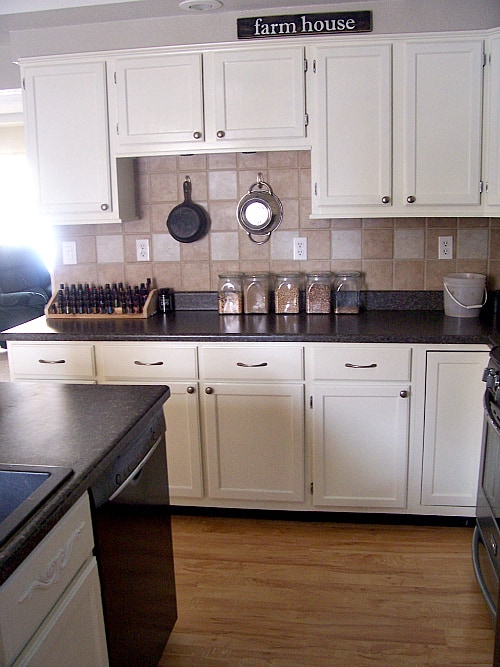
6. Stick with neutral. Before I started this process, I was tempted to choose a fun, trendy color for my cabinets. However, I quickly decided against it since I didn’t want something that would be dated in a year or two. Instead, I chose a timeless, soft white that can really go with any future color scheme. The same goes for the hardware– I found some fun, trendy knobs that I liked at first, but ultimately ended up choosing a simple knob with an antiqued pewter finish. I really don’t want to have to re-do this project any time soon (I think I might have mentioned that once before…)
So… now that it’s all done, was it worth it?
Absolutely! My kitchen is much lighter, brighter, and larger feeling. You can still see a slight bit of the woodgrain in certain light, but for the most part, they look perfect. (Minus a couple little mess-ups that were my fault… but I guess that 100% perfection is rather unrealistic…)
The white is holding up great thus far. Yeah, I have had to wipe food splatters here and there, but the paint literally dries to an enamel-like finish, so everything wipes right off.
The couple hundred bucks I spent for paint, supplies, and hardware sure beats the several thousand I would have spent for brand new cabinets.
But, I’m sure glad it’s done. 😉
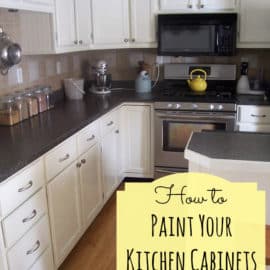
PrintHow to Paint Your Kitchen Cabinets
Ingredients
- Lots of time (not a weekend job)
- 2 quality paint brushes (like this)
- Small foam roller (like this)
- Quality paint (I used Benjamin Moore Advance in Acadia White which is basically a latex paint that acts like an oil paint. It’s self-leveling and dries to a very hard, very wipeable finish and you don’t have to use paint-thinner to clean your brushes!)
- Liquid de-glosser
- Quality primer (I used Zinnser)
- Optional: I chose to spray paint my old hinges instead of buying new ones… (I used Rustoleum Professional High Performance Enamel)
Instructions
- First, remove cabinet doors, hinges, and drawers
- Next, sand the drawer fronts, doors, and cabinet boxes with 100-grit sandpaper (An electric sander will be your best friend)
- Wipe sawdust off with a damp rag
- Apply a liquid de-glosser (This coats any leftover polyurethane or finish and makes sure the paint adheres. Some folks just do sanding OR de-glossing– but I did both to be safe)
- Apply two coats of quality primer
- Let each coat dry completely according to the manufacturer’s directions
- Apply 2-3 coats of quality paint
- Let each coat dry completely according to the manufacturer’s directions
- Optional: spray paint old hinges
Notes
After giving everything a couple more days to dry, we re-hung the doors and attached new knobs and drawer pulls.
This post was shared at Frugal Days Sustainable Ways


Great job! They look fantastic!
I’m spray painting the hinges and door handles in our 5th wheel and it’s taking me forever. I can only imagine how long it would take to paint the cabinetry in a full kitchen….
Yes… it took waaaay longer than expected. But, I’m gonna say it was worth it! 😉
I can not tell you how timely this is. My cupboards are a scarier version of yours and I am too tight to buy a new kitchen, this is sooooo inspiring.
Francesca.
Hope it’s helpful to you if/when you decide to take the plunge! 🙂
LOVE your new white cabinets!!! They look brand new at least. You did a great job. We had pine cabinets when we first built our house 30 something years ago. I decided I wanted a lighter kitchen after a few years. So my husband put kilz on them and painted them an off white. After years they begin to chip and look real bad. He said he was not painting them again. I still wanted them painted. Sooooo, one day I came in from work and water was all over the kitchen floor and in the basement too. We had a filter on our sink that sprung a leak and flooded the kitchen. Welllll, we got new cabinets, new appliances, and a new floor. GOD works in mysterious ways.
Ha– yes He does! Glad you got new stuff, but too bad it had to come as a result of a “flood!” 😉
Good Morning Jill…Love Your Blogs…
I’ve been thinking of painting my kitchen cabs for awhile now. I Love the way they look but a freshening up and (If I get Gutsy) possibly new colors. All of my cabs were made by my brother in law. Bases are oak with a green wash (to see the grain), the tops are farmhouse red and the walls are a golden yellow, counter tops are a butcher block that I bought at a farm auction (was the farmers work bench top) Some doors are leaded glass bought at a yardsale. Love my kitchen, so taking on a new project to change it all, will take some forethought. Thank You for the Great tips and tricks. I’ll keep your blog at hand for when I take the Leap !
Enjoy your Day !
Pssst…I forgot to tell you, Your Kitcher Looks GREAT !!! Well, worth all of your hard work !!!
And Patience !!!!
Thanks Patti! Sounds like you have a lovely kitchen to start with– and it might be a fun project to re-do. Lots of work– but fun. 😉
Ha ha! I am actually knee-deep in this myself! We just bought a small farm, and adding animals to three kids and managing “inside” chores, it feels like I will never be able to finish!! I’m re-encouraged to grab my roller 🙂 I have been using porch paint, which is covering like a smooth eggshell enamel, and it’s only $24 a gallon! I like the durability so far- it’s nice because its made with the intention of people walking on it, and lets be honest, in a house of littles, you never know what to expect!! 🙂 thanks again!
P.s. dairy goats are next!
Oh yes- I bet porch paint would be good too– it’s tough by nature. And hooray for goats! 😉
They look SO GOOD!!! We’ve been contemplating a new kitchen re-do because the cabinets and counters aren’t that great….old and plastic. LOL I was scared to paint them – but since you’ve done it you have given me hope!
Oh yes– there is always hope when you are willing to “invest” some elbow grease! 🙂
Haha, that first sentence sounds VERY familiar! LOVE your new kitchen!
I painted mine about 9 yrs ago in a previous house. I was a HUGE job. Took me 2 MOS as well. I had glass put in a few of the doors. It was worth every crying episode and painful joints. I painted inside and outside, for the back inside corners that I couldnt reach well, I used spray Kiltz and spray paint. I used sherman williams cabinet paint as well. NOTE: I bought the expensive paint brushes recommended, but found that the cheap foam ones worked much better and smoother and I could throw away at the end of the day. I got boxes, turned them on their side and stacked to move all my dishes, foods into. I drew a template of the cabinets placement and numbered my doors so I knew where to return them. I didnt think of spraying knobs, great idea… I absolutely LOVED them when they were complete….you are right, dont skip ANY step. I love your cabinets.
Thanks Sherry! Good to know about the foam brushes– I know I really liked the foam rollers. 🙂
That’s a great tip to use spray Kiltz and spray paint to paint the difficult hard to reach areas inside the cabinets. I”m contemplating just painting my kitchen cabinet doors and now with your tip I may paint the inside of my cabinets too.
Oh wow your kitchen looks completely different! I had to keep looking back at the before photos a d see if all u changed was the paint lol
Beautiful job, Jill! Ah, the memories of revamping our kitchen! How well I remember doing that nearly 15 years ago. The kitchen sink and ceramic tile countertops and back splashes had to go, too — had to smash them up first, along with the substrate (temporary plywood served as countertops, and dishwashing was done in the bathroom). The kitchen never had a dishwasher, so I modified a base cabinet to accept one with wiring and plumbing as needed. Then I built ridiculous-looking workbench/painting/drying apparatus in the backyard for work on the doors and drawers. Fortunately, the late spring weather was perfect for the project, but only because I spray painted everything with an airless sprayer to save time. Kilz primer and two coats of “Bisque” oil-based Alkyd enamel was still looking good when we sold the place 3.5 years ago. Again, great job, Jill, and I wish that paint you used was around back then.
Yes– we put in our dishwasher too. There wasn’t a spot when we purchased it. Remodels are a lot of work, but the end result is so much fun. 😉
It looks great!
Please don’t forget to realize how lucky and blessed you are by being able to do that. You already had beautiful appliances and counters. You already had “real” cabinets. A freshening up was doable.
I live in an old farmstead, on the short-grass prairie, too, but in another state. My house was built in 1906 and I’m pretty sure our cabinets are the original or near the original. We have old plywood hand built ones. The counters look added on. We have an unfinished edge on them. The cabinets are only about ten inches from the counters, which renders counterspace pretty much unusable. I’m personally holding out for a new kitchen. If I should paint mine, it wouldn’t change the plywood cabinets or the ugly counters.
So, yes, your kitchen came beautiful, but know that it did because of of course your hard work and resourcefulness but also because what you started out with was actually really nice.
well said
Yes– I am very thankful that we started out with a “clean slate.”
I’m pretty sure that the cabinets that were here before we purchased the house would have been a complete loss. Thankfully, the man we purchased the house from had gutted it and put in new appliances and these cabinets.
But yes, sometimes you just gotta rip everything out and start over!
Today, I went to the beachfront with my children. I
found a sea shell and gave it to my 4 year old daughter and said “You can hear the ocean if you put this to your ear.” She placed the shell to
her ear and screamed. There was a hermit crab inside and it pinched her ear.
She never wants to go back! LoL I know this is entirely
off topic but I had to tell someone!
my page – Butterflies Designs; Toni,
Your kitchen looks AMAZING! Nice job you guys!
Thanks TJ!
Your kitchen looks fantastic! I have been “thinking” about this project for years. Our cabinets are circa 1979 so invision dark stain. I believe this will be the year of transformation. Great Job!
Ah yes… I grew up in a house with dark 1970’s cabinets. 😉
beautiful! and i can completely relate. we moved into our house in november and its been non-stop half-finished projects…. we approaching two months of our stairway restoration and i’m itching for it to be done! part of the “fun” is the process though, right? 🙂
Indeed it is– even though you think it might drive you crazy sometimes! 😉
Amazing! And even more so because you did all this yourself with a toddler and a baby! Love it.
Yeah… I still can’t believe I did this with a toddler and baby… But at least it’s done now. 😉
Your kitchen looks GORGEOUS! You did a great job!
Thanks Melissa!
I love your new kitchen and was so happy to see this article in my email this morning. I have been wanting to do this for about 4 years to ours. We have good solid wood cupboards, but they are completely flat and have no definition to them. I still have to figure out how to add the definition, but glad to have the refinishing part already handy – and bookmarked.
I’ll have some tips for adding embellishments in one of next week’s posts. 😉
Nice job! So pretty!
You did an Awsome job! It totally changed the look without the big out lay of money, just alot of hard work but in the end it is always worth it and you can say I did it. The only thing I would add is( where your two piece of wood come together on your doors their is a gap) that you can caulk (paintable ) or use a One time spackle that dries hard. Let dry overnight to be safe. Alway remember less is more when filling in, if you can fill in the fist time great, bigger gaps require more and must dry inbetween application or they will sink . Use a wet finger when you smooth caulk ( only with paintable caulk) ,let dry prime spot and touch up with your paint in these spots. I usally do this as I prime.
Thanks for the tip Mcovill!
Your kitchen looks so beautiful! Thanks for sharing the before and after photos :0
you d id a great job thank you for sharing
Your kitchen looks amazing great job. I’ve been trying to convince my carpenter husband to paint our cabinets for years. He made the cupboards 10 years ago when we moved into our home and the finish is out dated now. Maybe when I show him the great results you got he’ll be more convinced to give up the wood grain!!!!
Yes, sometimes it takes a while to convince the hubbies. 😉
WOW!!! Awesome before and after!!
I know of a paint that requires NO sanding, stripping or priming…and it has very low VOC and cleans up with soap and water. I have used it on EVERYTHING…even Formica! It is called Caromal Colours. They sell a textured paint for a more primitive look and Reclaim…for a smooth look. There are lots of pictures on my FB page Little Village Interiors. I LOVE this paint!!!! I use it on plastic, laminate, glass, metal, wood…well almost anything. Your kitchen looks amazing by the way!
Oooh, I’m intrigued. Will definitely have to check that one out. I’m always painting something!
I can’t believe all you did was paint the cabinets! It looks so amazing…like a whole new kitchen : ) Great work!
Yes, it feels like a whole new kitchen too! 😉
Beautiful kitchen!! Are those essential oil bottles on your counter?
Yes they are! That is my collection– I tried keeping them in a case, but I use them 2-3x per day, so I found it’s easier to just have them out on the counter.
Love the little stand!! Where can I find one?
They look GREAT!!! You will have to come help me when we move one day 🙂
You betcha! 😉
This is very inspiring. I’m in the process of repainting my cabinets right now too except we’re painting and then distressing and antiquing them… which was all way more work than I anticipated, but I’m so excited for it to get done so I can get photos up on my blog. It just gets us one step closer to making our house a home!! Thanks for sharing!
PS…. I TOTALLY agree with you on spending the money on good brushes and rollers!
Oh yes– I was totally tempted to antique/distress mine… Who knows- I may still end up doing that in the future. 😉
Wow! Your cabinets look fantastic!! 🙂 I’ve been toying with this idea for a few years, but haven’t been able to strike up the courage yet. You may have just changed my mind. My cabinets are just like yours, so now I can actually show hubby what the change would look like. My mother-in-law painted her cabinets a couple of years ago, but hers were repurposed barn boards that were stained a very dark brown (almost black) color. She applied several coats of a good quality white paint and what a wonderful change it created. So much more brighter now. It’s nice to see our resources re-purposed or re-finished instead of thrown out and replaced. And what a huge cost savings too! Again, your kitchen looks great and very welcoming…great job! 🙂
Thanks so much Sharon! Yes, the brightness is sooo nice! It took me a looong time to work up the courage too– but sure glad I did. 🙂
Personally painted wood makes me wish to hurl but that is just me. I would move in and strip it all or replace it all just saying. You made it look really nice and am glad you shared it and I am sure it will be very easy to take care of. Have heard of the saying that the joy is in the process, in this case was that true? Am sure you are glad it is done and you can enjoy it now.
I did mine a few years ago. I put a couple of coats of clear polyurethane on my finished cabinets. It was an extra precaution because it was such a tough job that I didn’t want to be re-doing it any time soon. My boys were younger and they could deal some damage. 😉 I also got some corner molding and painted and finished it the same way, and attached it to the more exposed end corners. I’m happy to say that after 8 years it still looks fresh.
It cleans up well. I have had to touch up a few drawer faces where the kids skinned it going through. Once I skinned a door face with a knife (I was so mad at myself!) but as far as stains, I splattered some greasy tamale sauce on one once and didn’t notice it until the next evening. It wiped off cleanly. Same with some pomegranate juice. I’m happy with them still. Yours look great!
I love that your cabinets have held up that long! Would you mind sharing what brand of primer, paint, and top coat you used?
Wow, I have been enjoying your blog for a while now, but the transformation of your kitchen has motivated me to comment…your kitchen looks fabulous and makes it look worth the effort! Excellent job…I just may have to paint mine now!
Thanks so much Lise! (And thanks for the comment) 😉
An interesting discussion is worth comment. I believe that you need to publish
more about this subject matter, it may not be a taboo matter but
generally people do not talk about such subjects.
To the next! Cheers!!
Here is my website – medical marijuana Florida
Off topic. Very poor form.
Your kitchen looks like a completely different kitchen! Fantastic! I love your counter top with the white cabinets. I think it was worth the time (of course because I wasn’t helping paint) – great job!
Yes… I think it was worth the time too– Of course, it’s easier to say that now since I’m not in the middle of it!
I think the before & afters are fantastic! Smart to stick to a neutral colour. I love seeing oils on the counter too, I hope to have a rack of that splendor on my kitchen counter soon too:-)
Yes– I tried storing my oils in a case in a drawer, but I use them so often, it was a pain to keep pulling them out! Hubby made the rack. 🙂
Wow!! Your kitchen looks beautiful! I too, have the exact same “builder’s special” cheapo cabinets and have been wanting to paint them forever. I think you are right about the white…I was gonna go for a sagey green and darker on the bottom, but seeing how awesome yours turned out, I think I may do the same. Thanks for the post…now to get motivated…. 🙂
I did this in my first home (a condo where I would have had to pay a huge fee to have a dumpster placed for a full remodel). For me the key was using a very high gloss paint – it made all the drips and splatters easy to wipe off!
Yes– I think the high gloss is very important– the Advance paint that I used is high-gloss by nature and it wipes beautifully. 🙂
Your kitchen looks great. I painted my cabinets about 2 years ago. The project took me longer than 2 months, I had family help 🙂 Really glad I did it though, and I have a better relationship with my daughter in law because of it.
Absolutely beautiful! I have wanted to paint my hideous cabinets since we bought or house, but haven’t been brave enough. Thanks for the inspiration!
You can do it Jerica! 😉
Thank you, thank you, thank you!! I just started this project myself and your tips and steps will really help me out. So far I have been on the same page with you. I am changing my blue cabinets to white ones and I want to paint my hardware also because, like you said, it’s $$$ for new ones.
I’m doing research tonight as I’m going to embark on my own cabinet painting journey in a few weeks 🙂 and I came across your blog. Your kitchen turned out beautiful! Great job! I’m a little nervous…I have 3 kids 4 and under and am planning on doing this myself. The good (? hopefully?) part is that we haven’t moved in yet – we will have a month between closing on our new house and the end of our current lease so I thought it might be nice to tackle the project before we actually move in and have to move food around etc. My big question is how many gallons of primer or paint did you end up using? I’m trying to calculate costs of all materials and I am thinking 2 coats of primer and 2-3 of paint – but how many gallons? If you could get back to me I’d greatly appreciate the tip! Thanks so much!
I would DEFINITELY do it before you move it if you can! I think it’d be much easier. 🙂 For my kitchen, (2 coats of primer, and 2-3 coats of paint), I only used about a 1/2 gallon of each. So, unless your kitchen is massive, you should be fine buying 1 gallon of each to start out. Hope that helps!
Thanks so much! It’s not a huge kitchen, but it does have a little island in the middle. I’ll start out with one gallon of each – thanks so very much for your help and quick reply!
OH! I just looked closer at your photos – and noticed you have an island also. We were thinking of adding beadboard to ours – is that what you did? Was it hard to do? I know you can buy it pre-primed, which makes me think it couldn’t be too hard… 🙂
Nope- It wasn’t hard at all (Ok, well– I didn’t do it– my hubby did– but it didn’t *seem* to be hard, ha!)
We actually built the island from scratch and then lined the frame with the beadboard, but I think it would be fairly simple to cover an existing island with beadboard too. 🙂
Thanks for sharing your cabinet painting tips. I think many people don’t realize how long the process actually takes. Maybe this post can serve as a warning to those who are getting ready to paint on a short deadline.
Yes– it was way more time consuming than I ever thought, but still worth it! 🙂
Hi there! We are moving into a house and the cabinets are a gray blue but I have my heart set on white. I know you said a few coats of primer which was advance acadia white, but can you tell me what the nane of the color is of the paint you used after..or is it the same name? Thanks a bunch!
Hi Sarah!
I actually used Zinnser primer (just plain white), and then followed up with the Benjamin Moore Advance Acadia White, which is the name of the actual paint. Good luck! 🙂
Ok awesome!! Thank you so much for the info! Oh and one last question. Is this whie paint more of an off white or white? Thanks again for your help!!
Sarah
Well, compared to “pure” whites at the paint store, it’s definitely an off-white. But not necessarily a “cream” color… But now that it’s on my cabinets, it comes across as a pretty crisp white. How’s that for being as clear as mud? 😉
Great job. I’ve been procrastinating painting my cabinets but now feel inspired.
A question: what color rustoleum did you use for hinges, I can’t tell from photos.
Thanks,
Jerry Brack
Beautiful!… your story gives me hope that perhaps my kitchen of box store stock cabinets still in decent shape can be transfixed into something beautiful as well. I would love to invest in new cabinets and a complete removal but like you I hate to waste them and it is a lot of money to do so. The question I have is I notice on the ends of your cabinets you have bead board. I’ve often wondered how unattractive those “fake wood panels” were going to look painted a creamy white. I guess the fake grain look dresses them up and I had given the bead board some thought. Then I saw your pictures and you’d done this too! Under our countertop I can see how to make that change but am wonder….above your sick on the outside of the cabinets you added that touch there too. How difficult is that to do? Not sure if I trust to start tearing the frame of the cabinets apart even just to replace that much.
You can do it Renee!
I actually did a paintable beadboard wallpaper on the ends of my cabinet boxes! It’s amazing stuff! You can read more about it here— https://www.theprairiehomestead.com/?p=4826
The paneling around the island base is real wood, but the wallpaper looks awesome for the rest of the applications. 🙂
Nicely done! My husband and I are about to do the same. I have a question. Benjamin Moore Advance comes in Satin or Semi Gloss finish, Which one did you use? Satin is a little flat and Semi Gloss has some shine to it.
I could only get my Advance in High Gloss– but I’m glad– since it makes it easier to wipe off! I’d definitely go with the semi-gloss if it were me. 😉
I came across your blog tonight while doing some research for my upcoming cabinet paint job. I have the same oak cabinets just in a different color. What I am wondering is with the self leveling paint can you still see the grain marks on your cabinets or did the paint help to get rid of them.
Lisa
Hey Lisa- I can still see a bit of the grain in certain lighting, but it doesn’t bother me too much. 🙂
Hi Jill! They came out great- I was curious, did you paint inside the cabinets or just the front and back of the doors and the frame?
Your kitchen turned out beautiful! I hate my kitchen because it’s dark and dingy, and not very inspirational for turning out family meals or anything crafty. Its layout is almost identical to yours except for your bar. Looking at yours makes me realize I can have the same pretty kitchen, and with minimal work and money. A few gallons of good paint, some quality supplies, and some (okay, lots of) elbow grease sure beats paying for new cabinets. Thank you so much for providing the list of requirements, and for the motivation! May I make a suggestion? My mother (may she rest in peace) taught me to line the “noisy” lower cabinets with carpet remnants or inexpensive squares. Pulling out the pan you need from a stack of pans, or putting away a cookie sheet is so much quieter with carpeted cabinets 🙂
Love the quiet cabinet idea!
Your kitchen was beautiful before, and now looks even better! We have older cabinets with strange wainscoting in the middle and the knobs in the middle. We can SO paint them and move the knobs to the right place and it will really help the look of our kitchen. Thank you for this great tutorial.
We are getting ready to paint with this same paint only in satin finish. I’m curious, did you sand between coats? My husband is skeptical about it drying without brush marks unless we sand it.
Seeing how great your kitchen gets me excited to start!
I didn’t sand between coats– there are some slight brush marks if you look in certain light, but it doesn’t really bug me. 🙂
Can you remember about how many gallons of paint and primer it took for you to do your cabinets?
Thanks!
It was less than a gallon of each. 🙂
you did a beautiful job!
i will remember that paint for when i get healthy enough to start painting my rooms again.
What a blessing =)
What color of the Rustoleum Professional High Performance Enamel did you use? Thanks
I did something similar, I painted them creamy white then distressed them and painted them with an antique stain, they turned out great. But as you said its a huge project.
Love the distressing idea!
These look great! I want to redo mine which are a medium wood color. The drawback is that the wood goes all the way to the ceiling and I have crown molding which not only goes around the kitchen but the dining room too. That’s a lot to paint. And then there’s the color. I would love to have white, but my counter tops are beige and the wall paper is a beige background so I’m not really sure how that would look. And if I paint them a beige color then it might look like beige threw up all over my kitchen/dining room. I’m open for suggestions.
Great job, what a transformation! I so want to do this but I’m curious about the sides of the cabinets, are yours wood or a laminate? I have that laminate that is glued on to the sides and am not sure what to do about that. From the photo I can’t really tell what yours was.
Thanks,
Elle
Ours were wood–but they were really ugly oak. I put some textured beadboard wallpaper on the cabinet ends and that helped a bunch.
Thanks VERY MUCH!! My cabinets look just like yours did originally…and they are in good shape as well so I can’t see buying new ones. I’ve been scared to take the plunge and do this, but you make it sound very doable! I’m putting it on my list for this spring!! 🙂
Best of luck! It’s a big project, but very rewarding. 🙂
I have to say, I’ve had all my supplies in the garage to do this job for almost 4 years now…I’ve been scared to try…but you’ve inspired me Jill.
You can do it! 🙂
Great job! Our cabinets are about 80-90 years old – original to our house, but the county doesn’t know how old it is. Back then, like now, you could build what you wanted on your property and never inform the county of anything! So all we have is guesses based on the memories of the few people still in this area.
Anyway, I pained the cabinets in ours a muted green and a canvas white for the doors. It matched the great room, den, mud room and laundry room and really made the house flow. With the addition of frequent visits from grandkids I noticed that the doors are ALWAYS filthy and it made me nuts. I finally broke down and started painting all of the cabinets and doors a dark brown that mimics a wood color. I’ve got the base on one wall done and love it. I’ve not been brave enough to tackle the uppers yet.
Yours look great. I’m glad you went with the high end paint. I have no doubt that’s the difference between your white finish and what I had. Mine was not easy to clean at all! I shouldn’t have skimped on paint!
I wrote a comment from my cell phone but it sent me an error message.
Rather than try again, I went to the building where the computer is, and was amazed at how many more comments there are. Isn’t it nice to KNOW you did a great job?
My comment was that I was happy to see you did not repaint the, perhaps antique, shelf, but let the wear show.
Yep! I love old, worn things. 🙂
In my original message I also had a question, but could not remember it.
So admired your work once again and noticed, again, the workable display unit you have for your essential oils. Do you have a blog giving instructions for it? I really like the way, I think the shelves are high enough to show the names of oils. If you don’t have a blog, will you write one?
Hi Lee– actually, my husband made that for me. He did a great job! 🙂 Maybe I can coerce him into helping me write a blog post on it in the future. 🙂
Has the white paint yellowed at all over time? I want to use the same paint but am concerned about the yellowing effect I have heard this paint can have after awhile. thanks!
Nope– mine doesn’t seem to have yellowed at all!
Love this post–it was so very helpful to me in doing my cabinets, thank you! I had to laugh because your “before” cabinets were almost identical to mine. So glad that golden/orange oak is gone!
I also used Benjamin Moore Advance and ‘m wondering how it’s holding up for you? Are you cleaning with anything specific? I’m afraid to scrub too hard and remove paint!
Thank you!
YAY for no more orange oak! Mine is holding up good so far– and I wipe it a lot. There are a few corners here and there in super high-traffic areas that need a bit of touch up, but so far, I’ve been super impressed!
Awesome! Glad to hear it! Thanks so much. And, agreed, hooray for no more orange oak!
Thanks so much!!! I am fortunate in that I have purchased all new doors alrdy white so I just have to paint the boxes. How long does ittake the primer to dry each coat? I am a bit daunted by thank stars i do not have to do tje doors. I am going to use your instructions foe the boxes 🙂 thanks again !!
It’s a good idea to just follow the suggested drying times for whatever primer you are using– and as tempting as it may be, don’t rush it! 🙂
Jill, I purchased this, my first home, back in 2009. I had to laugh about your orange cupboards since mine are even more orange than yours! Mine also enclosed the empty space above the cupboards to the ceiling with an ugly plywood (stained orange) slider panel; which I finally removed last summer to reveal various old paint/wallpaper jobs. Needless to say, that shut me down in a big fast hurry!
Back in 2010, I took all the 1960’s handle pulls off and bought new copper pulls thinking that was a great solution. I promptly put a few new ones on, but still wasn’t satisfied. A wood’s teacher told me to sand the cupboards down and stain them a lighter color, but that seemed like too much work at the time.
Having seen your results and don’t have to go back to teaching high school art until the middle of August, I’m ready to start painting! All my appliances are white, Formica is light cream with darker cream organic pattern, with a crimson red accent wall. I am thinking of painting above the cupboards red. Do you think painting the cupboards white would make the appliance fade into the room too much? Or should I choose a neutral beige tone?
Fiona
Jill, did you use advance semi gloss or satin?
I believe she used high gloss.
When do you use the brush and when do you use the roller?
Brush for the grooves & edges, roller for the flat portions
Any experience or advice with Benjamin Moore Advance being used in a paint sprayer? Wondering if it will save me time or end up being a disaster since the paint would need to be thinned. Thank you!
I just came across your “How To Paint Your Kitchen Cabinets”. I enjoyed reading the article. I would like white cabinet also. The question I have is: what color paint did you use on the walls? I really don’t want to use a accent wall color if I don’t have to. In the picture yours looks white. What does what does on white really look like?
I will keep as a reference.
hi really nice post alot of good information thanks for sharing 😉
Wooden interior for the kitchen is best interior because the wooden interior is like a royal look. I love the wooden interior. You share the great design for kitchen interior. Great blog. Thanks!
Definitely needed this information now. Thank you for posting and give me what I need to know.
This helped me understand some good ways to get started. Thank you.
I just had to reach out and tell you how impressed I am with your post on how to paint kitchen cabinets. I’ve been contemplating tackling this project myself, and your detailed instructions and helpful tips are going to be a lifesaver!
The journey you took from contemplating white cabinets to actually painting them is incredibly relatable. It’s not easy to justify the expense of new cabinets, but with the right techniques, painting can give them a whole new look.
Following the steps you outlined, from prepping the cabinets to choosing quality paint, gives me the confidence to take on this project with success. I appreciate that you mentioned using Benjamin Moore Advance paint, as I’ve heard great things about its durability and ease of use.
The before and after photos of your kitchen cabinets speak volumes. The transformation is stunning, and the light and bright feel it brings to the space is truly amazing. It’s also reassuring to hear that the paint is holding up well and is easy to clean.