
PRESSURE CANNING.
It’s the #1 thing that strikes fear into the heart of new homesteaders…
Stories of Great Aunt Wanda blowing up her kitchen with a pressure canner abound… which has resulted in a whole lot of us who are slightly petrified at the thought of using a hissing, pressurizing “bomb” to preserve food in our kitchens.
And it’s understandable– if used incorrectly, pressure canners can indeed malfunction. And the results are often…. um… explosive.
BUT. Before you close out of this post and swear to never touch a pressure canner as long as you live, hear me out…
Because not only is pressure canning far safer than you’ve likely been led to believe, there are a bunch of benefits that make it a skill well-worth learning.
(And if it makes you feel any better, I’ve been pressure canning for 9 years with a grand total of ZERO explosions…)
(If you are new to any sort of canning at all, then you’ll definitely want to check out the How to Can tutorial– complete with tons of pictures. You can also check out my super awesome Canning Made Easy course and ebook.)
Is Pressure Canning Really Safe?
Yes! I am here to reassure you that, with a few precautions, pressure canning is absolutely nothing to worry about! Today’s pressure canners have two, if not three, safety valves. This way, if the primary vent ever somehow gets plugged, there’s still another route for the pressure to escape safely.
Why Bother with a Pressure Canner?
Water bath canning or boiling-water processing works great for high-acid foods like most fruits, jams, tomatoes, or pickles. The theory is that the acid helps to preserve the foods and prevent spoilage at the lower temps produced by the boiling water.
However, for low-acid foods (think beets, green beans, meats, potatoes), it is crucial that you use a pressure canner, since it reaches much higher temperatures and therefore preserves the food safely without the added “insurance” of the acid. (And nope. You can’t skip this step and just use a water bath canner instead. If you do, you run the risk of botulism in your canned foods, which is the deadliest form of food poisoning.)
Why I Love Pressure Canning:
1. More Freezer Space
I usually freeze a lot of my garden produce, as well as many make-ahead meal components. Combine that with our home-raised beef, I’m always running out of freezer space– even with my extra chest freezer.
I also love having a food supply that isn’t dependent on the grid– in the case of an emergency power outage, most of my frozen food would be a loss.
2. Homemade “Convenience” Foods.
The thought of being able to have ready-to-go, wholesome food at my disposal that doesn’t require defrosting or freezer space is pretty much magical.
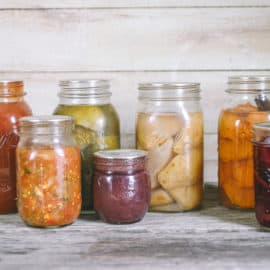
With my pressure canner, I can preserve chunks of beef, pinto or navy beans, and chicken or beef broth to be stored at room temperature– not to mention pre-made suppers like homemade beef stew and chili.
Types of Pressure Canners
There are three main kinds of pressure canners available on the market today:
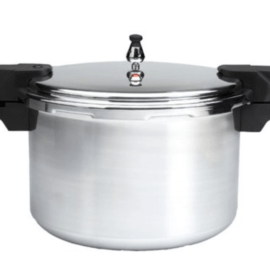
1. Dial Gauge Canners
 (This Presto canner is a dial gauge canner.)
These canners have a dial pressure gauge on top of the lid to tell you when the pressure has reached the appropriate level. The dial gauge must be checked every year by the manufacturer or your local County Extension Office to make sure the reading is accurate. Otherwise, you risk processing your foods at too-low pressure (can cause spoilage or botulism) or too-high pressure (aka: possible explosions…)
2. Weighted Gauge Canners
(This Mirro brand canner is an example of a weighted gauge canner)
These canners don’t have gauges, but instead have removable, weighted regulators that are used to determine pressure. You can adjust the pressure in the canner by added more or less weights to the lid.
3. Combo Gauge Canner
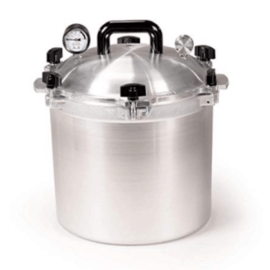
These canners not only have a dial gauge on top of the lid, they also have a removable, weighted regulator as well. This regulator weight usually has three settings: 5, 10, and 15 pounds. The weight is what you use to determine pressure– the dial is just a back-up in this case.
 (Close up of the weighted gauge from my All-American. Notice the 3 settings of pressure: 5, 10, and 15 pounds)
The Best Pressure Canner
Naturally, there’s debate on this topic, but I personally prefer All-American pressure canners and have used one exclusively for 9 years.
Here’s why:
- After reading many user reviews of the All-American canner on Amazon, I found that there were very few unsatisfied customers. This trend stayed the same with my followers on Facebook, as well as anyone else I have talked to.
- The All-American canner has no rubber gasket– that means there is one less thing to maintain and replace.
- All-American canners have weighted gauges– I definitely prefer that over the dial gauge, since I won’t have to take it to be checked for accuracy every single year.
- They are made in the USA.
- They have 6 bolts to securely hold the lid.
- Although this is not the cheapest pressure canner on the market, I don’t mind paying a little extra for something I know that will last for years and years. As some of my readers mentioned, this is something you could definitely pass down to your children and grandchildren. It’s a quality piece of equipment. I’ve had my canner for 9 years and it looks as good as the day I pulled it out of the box.
- I have the 21 1/2 quart Canner (Model 921). The 921 model will hold 19 pints or 7 quarts. This isn’t their biggest model, but 7 quarts is what my water bath canner holds, and I’m comfortable with that size.
(Please note- I am not affliated with All-American in any way. I just like ’em…)
Parts of a Pressure Canner
In this post, I’ll be focusing on combo-gauge canners, since that’s what I have.
Naturally, all manufacturers will be slightly different, so it’s very important to read the instruction manual for your particular canner. Fortunately, the majority of the parts will usually be the same.

There are 2 gauges on the All-American canner: a dial gauge and a weighted gauge.
The weighted gauge sits on top of the vent pipe.

Many pressure canners have a rubber gasket that fits between the lid and bottom, but All-American canners like mine do not.
Instead, my canner has a metal-to-metal seal. I prefer this since rubber gaskets are subject to cracking and breaking and have to be replaced. The only maintenance that the metal-to-metal seal requires is a light oiling (use olive oil) every 2-3 uses.


When you place the lid on the base, be sure that it is properly lined up. My model has a small arrow on the lid, and a groove on the rim of the base to show you the proper alignment. (I think some models have 2 arrows, but it doesn’t really matter.)
Another feature I like about my All-American is the added security of the six wing nuts that fasten the lid onto the base.
It’s very important that you tighten two opposite wing nuts at the same time when you go to attach the lid to the base. If you only tighten one at a time, the lid can become unevenly attached to the base. This can result in loss of pressure and an unsuccessful canning adventure.

I drew some diagonal lines on this photo to help illustrate the whole “diagonal tightening” concept.
Oh, and that little black rubber dot you see to the left of the handle? That’s the overpressure plug. There’s not much you need to know about that, other than it’s an added safety feature *just in case* the pressure in the canner ever becomes too high. (If that happens, it will pop out).
Just make sure it’s not worn or cracked, and clean it if it ever gets a build up of food or grease.
The inside of the canner is pretty boring– it’s just a big ol’ aluminum pot.

Mine discolored like this the very first time I used it, and that’s normal. (The photo makes it look crusty, but it’s not. The surface is still smooth, just “seasoned”…)
Now, the pot can become “pitted” if not probably cared for, so you do want to make sure that you thoroughly wash and dry it after every use.
My canner came with 2 racks. One always goes on the bottom (never place jars directly on the bottom of the canner itself) and one goes in the middle if you are stacking pint jars.

Simply place the rack with the rim facing down before adding any jars to your canner.
Pressure Canner Directions:
NOTE: I won’t be covering the basic techniques of safely putting the food into the jars in this post. Check out my In-Depth Canning Tutorial for all that info (or my Canning Made Easy Course).
(This tutorial will cover how to use a weighted gauge All-American Pressure Canner. However, most other canners will follow a similiar technique.)
1. Make sure the canning jars are clean and hot.
This can be accomplished by placing them in a pot of hot water, allowing them to sit in a sinkful of hot water, or by running them through a quick cycle in the dishwasher. One of the neat parts of pressure canning is that you don’t have to sterilize the jars like you do with a water bath canner. The high heat of the pressure canning process takes care of that. However, you do want to heat them up to prevent breaking and cracking when you place the hot food inside.
2. Fill the canner with 2-3 inches of water and set it on the burner.
It is VITAL that you do NOT run out of water during the canning process, as it can seriously damage the canner. However, unlike the water bath canning method, you do not have to completely cover the jars with water.
3. Place a rack in the bottom of the canner.
If you have a rack like I do, be sure to place it rim-side down. Then, place your filled and sealed canning jars on top of that. If you are using pint jars, you can stack them in your canner with the second rack in between the two layers. Depending on what you are canning and the recipe, you’ll probably have hot jars with hot contents, so use your handy-dandy jar tongs if you have them.

4. Place the lid on the canner.
My All-American canner has six wing nuts that I must tighten in order to create a proper seal (always tighten two opposite wing nuts at the same time). However, different canner brands will have a variety of close mechanisms.
5. Start heating the canner.
Turn the stove burner on high heat. Make sure that your weighted gauge is NOT on the lid of the canner at this point.

6. Once the pressure vent starts releasing steam, set your timer for 10 minutes.
Allow the canner to “exhaust” for a full 10 minutes before you do anything else. You’ll know when the steam starts to escape, because it will begin to sputter and hiss and usually some water droplets will appear on the outside. This venting period is a good time to take a deep breath and clean up the kitchen a bit.
7. Check your canning recipe for two numbers:
- First, you need to look for how many pounds of pressure that the particular food needs to be processed at. Usually, the recipe will specify between 5, 10, and 15 pounds. (These are the three settings on your weighted gauge.) If you are at a high altitude like me, (over 6,000 feet…) you will need to adjust accordingly. My All-American manual recommends that, regardless of what the recipe says, always use 15 pounds of pressure when processing foods at 2,000+ feet above sea level.
- Secondly, look for how long you need to process that particular food. My beets took 30 minutes, while things like meat or stew will usually require over an hour of processing time.
8. Place the weighted gauge at the proper setting over the top of the pressure vent.
Once the venting period is complete, use a oven mitt to place the weighted gauge on the canner. Be careful— that steam is hot!

9. Wait for the pressure to build in the canner.
This is where the dial gauge comes in handy– you can watch the pressure slowly build and know when you’re getting close.
10. Count the Jiggles.
Once the canner reaches the proper pressure (15 pounds in my case), the weighted gauge will begin to jiggle and rattle. This is when you set your timer for the actual food processing time.
Now comes the part of the process that takes a little practice, but it’s not difficult. You want to hear a jiggle from the weighted gauge around 1-4 times per minute. This tells you that the pressure is staying at the correct level. You DO NOT want the gauge to constantly jiggle through-out the timed period– this would indicate that the pressure in the canner is too high.
I usually end up standing by the stove for a while and counting.
Too many jiggles? Reduce the heat.
Not enough jiggles? Increase the heat.
I’ve found that if I keep my burner at low, it’s just about perfect. (I have a gas stove that burns pretty hot…)
Once you get your jiggles regulated, you don’t have to stand there and stare at the canner the entire time. Feel free to clean up the kitchen or check your email, or whatever. Just try not to leave the canner completely unattended. (i.e. don’t go outside to the barn and forget that you are canning!)
11. When the processing time is complete, turn off the burner.
Do not move the canner– just allow it to cool down on its own. (This will take a while.) Now it’s safe to run outside to do barn chores or whatever else you may need to do.
12. Once the dial gauge reads zero, it’s safe to slowly remove the weighted gauge.
Use your oven mitt again, as it’s still usually pretty hot. As long as the pressure in the canner is at zero and the weighted gauge is removed, you are safe to remove the lid. Just make sure to crack it away from your face so you don’t end up with a nasty steam burn.
13. Remove the jars of food.
Allow them to cool completely before checking their seals or placing them into the pantry. Just like water bath canning, you’ll usually hear the “pop!” of the sealing lids fairly quickly.
14. After the canner cools completely, give it a gentle wash and dry thoroughly.
If you haven’t oiled it in a while, apply a thin film of olive oil to the metal-to-metal seal.
Can You Pressure Can in an Instant Pot?
No, please don’t! I love my Instant Pot for lots of things, but canning isn’t one of them!
Instant Pots or other pressure cookers are very different than pressure canners. You cannot regulate the pressure/temperature accurately enough and therefore they are unsafe to use for canning.
Where to Find Pressure Canning Recipes?
It’s extremely important to use tested, approved recipes any time you can to ensure the food is free from dangerous bacteria and spoilage.
The Ball Blue Book is one of my favorite resources, as is the National Center for Home Food Preservation.
Here are a few of my personal favorites:
- How to Pressure Can Meat
- How to Can Beef Stew
- How to Can Broth or Stock
- How to Can Pinto or Navy Beans
- How to Can Chili Peppers
Listen to the Old Fashioned On Purpose podcast episode #12 on the topic Five Canning Mistakes You Can’t Afford To Make HERE.
Try my favorite lids for canning, learn more about FOR JARS lids here: http://theprairiehomestead.com/forjars (use code PURPOSE10 for 10% off)
Can You Come Teach Me How to Can?
I wish! However, since flying all over the country teaching canning classes isn’t going to fit into my schedule this time of year, I have the next best thing!
I’ve created a very simple canning eBook that will tell you EVERYTHING you need to know to get started canning on your homestead. It covers equipment, safety, water bath canning, pressure canning, and everything in between.


Hey Jill,
I just purchased and used my 921 All American Model last weekend. Boy, was I nervous last Sunday after putting my 16 pint jars in (it says it will hold 19 but if you are using wide mouth it didn’t seem to hold 19. I didn’t feel comfortable putting in more than 16. I don’t like my jars sitting too close to each other.) Regardless, it worked flawlessly, just as the directions promised. Love it. Now my leftover beef stew will be canned instead of frozen!
Love your website, by-the-way.
This is great! I’ve been water bath canning the past two years and I would love to try pressure canning next season 🙂 I’m looking forward to the rest of the posts!
I am really looking foward to your series. I have canned pinto and kidney beans once with a friend but scared to fly solo. I made a huge batch of chicken tortilla soup tonight and would love to can the leftovers as well as future soups. Like you, we are tired of buying when we’d rather prepare and can our own.
I am pretty excited to see this series! I just got a 41 1/2 qt all america pressure canner from good will for $5!!! It is an older model that doesn’t have the weighted gauge but I was able to order the parts for my canner to get it up and running (or at least it will be when the parts arrive). I have never pressured canned anything in my life (I just started water bath canning this year) and I ma excited to learn and hopefully free up some freezer space!
Holy cow Kirstin– I’m pretty sure that is the find of the century! Way to go! That awesome that you were able to find all the parts, too. Another bonus to buying quality products from American made companies. 😉
That is the deal if the century for sure,I received mine from a family member 🙂 I am very lucky,getting more comfortable with it.
Wow! Now that’s a find! Congrats to you!
I am in the market for a pressure canner but I would like something electric. My stove is wood burning and makes the house super hot during the summer. I try to use electric cookers or the bbq. Does anyone have experience with electric canners?
At the beginning of canning you mention to turn the heat on high heat then later you mention for your gas stove you keep the eye on low heat? How do I know what temp to set the eye on? Thank you so much
The electric or gas burner will probably need to be set on low heat once the canner comes up to the pressure recommended for your location’s altitude. You need to watch the pressure gauge or listen to/watch the weight jiggle.
If your recommended pressure is 10 lbs (mine is 13), then once you get to that pressure, turn the flame/burner down. It really depends on your stove as to how much you turn it down. I have a glasstop (not recommended for use with a heavy pressure canner, but I do it anyway). I end up with the heat turned to nearly the lowest possible setting and that keeps me at around 13-15lbs. pressure. You can go over the recommended pressure, but if you dip below it, it’s recommended that you start the processing time over, so watch closely until you get used to how your canner and stove interact with one another.
My son has a propane burner that he does his canning outside
I’m not familiar with any electric options for pressure or water-bath canning besides buying a hotplate. My friend cans on her back porch on her camp chef stove. That way her house doesn’t get too hot.
The presto has the dial and the weighted gauge as well. I tend to go by the dial as I am at sea level and the weight rocks at 15lbs which is a bit higher than is necessary for what I can. I also bought it as a first time canner. It is great but you are right, there are parts that require regular maintenance and replacing.
I love my pressure cooker/canner. I’ve been using mine for 13 years. It has the rubber gasket which I’ve never replaced, but I have had to replace the pressure relief valve. Old models didn’t have pressure relief valves, hence the sometimes explosions. All newer models do and are completely safe. They just make noise as your weighted regulator jiggles, letting you know the pressure is correct. I cook my fresh green beans in my pressure cooker as well. Only takes 3 minutes! Have fun.
Melissa, some of the older models do and did have the pressure relief valve. My husband’s great-grandmother had one go off on her, and it stuck to the ceiling, along with the beans or whatever it was that she was canning. =) Besides out 3 canners, we also have 3 pressure cookers.
To all out there who can or want to learn to can, you can cook dried beans in a pressure cooker, but please remember to soak them overnight or to bring them to a boil (with lid off), for 5 minutes, turn off fire and let sit for an hour. Place lid on cooker, bring up to pressure for however minutes your cooker calls for. Different sizes / different times.
Jill, I have several canners, one is weighted and the other two are a dial gauge ones. We have two that are antiques. One has the bolt closure, but top parts of the bolts are gone. We haven’t used it as of yet, but have used the other one. The one I bought is a 17 quart, but the others are much bigger. I love canning food. It tastes oh so much better than the junk you buy at the stores. And no preservatives! I also like freezing produce, but I prefer to keep the freezer for meats and things like that. I will say to anyone that is wanting to try canning, and is scared, to try it. Just be careful and follow the directions on your canner and/or in your canning book. I don’t think that there is anything that you can’t can, and this includes meats. I am wanting to do this soon. As in when they put roast (which I did can this past fall), and chicken, even ground beef can be canned. Haven’t tried the chicken or ground beef yet, but plan to soon. Love home canned everything. I didn’t learn to can until about 40 something years old. I am now 60, and have never had any type of accident. Not saying that I won’t. I just take precautions as needed. You won’t regret learning to can!
Deborah, thanks for the tip on dried beans. I haven’t cooked them in the pressure cooker yet. My mom can’s beef, stewed beef mostly, and uses it in stews and casseroles throughout the year. I even pressure cook my salsa following the tomato canning guidelines. Yummy!
Melissa, I would be very interested in your mom’s “exact” recipe and “how-to” on canning her beef. I’ve just received my All-American Canner and just now reading on how to use it. I love “The Prairie Homesteading” and her instructions for what she does have online. They are step-by-step, which is exactly what someone like me needs. Hopefully, you can find a way to share your mom’s recipes with us. P-l-e-a-s-e-!
PS: The one thing I’m unsure about when pressure canning my cooked foods: Will it make my vegetables in cooked soups OVERCOOKED and mushy?
I think it would depend on the recipe you are following to start with. 🙂 Sometimes people start off with raw veggies–it just depends.
I do beef stew and vegetable beef soup I use left over pot roast and add raw veggies
Awesome advice Deborah! 🙂
I know your post is old but I found you during a google search for canning stock and let me tell you, I got a pressure canner for xmas its still sitting in the box, why you ask? Lol because I been super scared to use it. However, the way you just broke down how to use it i now feel confident enough to try it. Thank you so much!
Very first canning tonight!!! Was soooo scared! I My canner only held 5 pint jars! Anti was waiting for that thingy to come out and it never did! I put the jiggly thing on there. I was scared because SO much steam was coming out.
I did corn that I cooked already. I cooked 30 minutes with 10pounds of pressure. Is that right??? Ty
I love pressure canned everything. It tastes so close to fresh, that I can’t tell the difference except in the time it takes to cook. One thing that I do is to bring my canned items to a full boil and lower the heat and let them cook for at least 5 minutes. Um Um Good! I have been known to pressure can and/or water bath can leftover soups and stews. No waste! We rarely eat jams or jellies, but I love making them, too.
This is sooooo cool. I am what you would call an amateur. I need to start canning old school before I even think about pressure canning. Someday though…someday! Hopefully I’ll be up to par in a few years. 🙂
By the way…my hubby’s gonna make be a honeybee compost bin thanks to your barnhop post two weeks ago. I can’t wait!!!! : )
That’s awesome Noel! Yes, I think water bath canning is a great way to start- although pressure canning isn’t too very different. Good luck!
I don’t have the ring to put between the layers of pint jars also
I will be using half pints what can I use
When will part 2 foe –“how to use a pressure cooker ” , come out?
Thanks
Pat
Hi Pat,
Part 2 will be out next week- probably Wed. or Thurs!
Thank you! I am so excited to find this (via Pinterest) as I am currently considering purchasing a pressure canner. I look forward to the rest of your series!
Awesome! And you’re in luck- I just posted Part Two this morning! 🙂
I have a dial gauge and weighted canner. The dial gauge is about 30 to 40 years old, and I can still get parts for it from Amazon. The weighted one I found at Walmart, and it’s also a Presto. I just started using it this year, and so far, I’ve been happy with it. I use mine for the same reasons you outlined.
Yes, it seems that for the most part, replacement parts are pretty easy to find… That’s a good thing! 🙂
I have 2 pressure cookers, I love them both Mirro 6 qt & Mirro 12 qt. I have used them for the better part of 30 yrs. Both for cooking and canning. However the gaskets are now worn on both and the replacements DO NOT FIT. I am very disappointed. When I purchase another it will be gasket free.
Bummer about the replacements! 🙁 That’s a shame that the company couldn’t provide better options.
Hi all
I have been wanting to do more pressure canning for the same reason that Jill states…not wanting to be dependent on the grid! Here in earthquake country that could be anytime at all. I just finished canning some of my homemade minestrone, only to find out it couldn’t be made with any oil or I risked spoilage. I ended up having to freeze all of it according to another forum I joined. I have been researching and researching as to how to safely pressure can my homemade recipes and leftovers. Does anyone have any advice about this?
I have an electric, glass-top stove. The manufacturer states the max weight it can take is 50 pounds. What do you think the weight of one of these pressure canners is with water and filled jars?
Hmmm… Can’t say for sure, but it’s pretty darn heavy. I know that manufacturers say NOT to use glass-top stoves for any sort of canning– water bath or otherwise. However, I *cough* broke that rule when I had a glass-top myself. I used it for a lot of water bath canning, but never any pressure canning. So, I guess proceed at your own risk. 😉
I have a glass to stove and have used my pressure canner on it,as long as your vessel has a FLAT bottom you can yse it,that is what I found after much research on the internet.
Very good to know– thanks Karin!
I use my pressure canner all the time on my glass top stove. We canned on our glass top when I was growing up on the farm many years ago. We never have had any problems. I would like to find some recipes to put up meats and ready made stuff that don’t have to be put in the freezer (in case power goes out). Love the web site. Just subscribed would like to learn more about this grain soaking.
Yes, I used to can on my glass-top all the time too when I had it… Even though it was a “no-no”… 😉
Hello, I’m new to canning and had a question. Do you still need to use lemon or lime juice in a fruit preserve canning recipe if you are using a pressure canner?
Hi Angelica– I would say no, unless it’s for flavor or maintaining the color of the fruit item. It won’t be needed to help with the acidity part.
I’m a newbie at canning and just finished my first batch of canned chicken. My question is that 2 of the jars came out a much lighter color than the other 6. Does this have to do with the fat content? Or did I do something wrong??? I used some thin sliced chicken breasts and the small chicken tenderloins.
Hmmm.. good question Lynn. I’m not sure why it would do that. (I have yet to can meat– although it’s on my list) As long as the food smells ok after you open it (and make sure the jars have sealed), I think you’d be ok.
The discolorization could be caused by the use of iodized salt, instead of canning salt.
Hi I am new to the prairie homestead. I was wondering if anyone has an older model sears pressure cooker model 620.46281. I just purchased it locally and it did not come with an owners manual. I thought I would be able to get it on line and it is nowhere to be found. I even tried Sears and Kenmore. It has a jiggler on top and a rubber plug with a stainless piece in the center. I can not get an instruction manual online anywhere. If anyone has one or knows of one please let me know.
email: chick.check8@yahoo.com
thanks,
Christine Check
I love your bean canning post. I had been pre-cooking and freezing, but I still resort to store-bought canned occasionally because of the convenience. I have never canned with a pressure cooker before. I didn’t get all the way through your instructional posts yet, but can I use an electric pressure cooker for canning?
Hmmmm… I don’t have an electric pressure cooker, so I can’t say for sure. I’m guessing there might not be enough room for all the jars, though?
As long as the pressure canner will reach the pressure required it will be ok.
But always wait to take out the jars. I was impatient about 50 years ago and took out the jars so I could do another batch.
The jars had enough pressure build up and the covers blew off. This was apple sauce and it ruined the ceiling and of course one thing led to another and my impatience led to a remodeled Kitchen,
Can you use this to pressure cook? To make bone broth?
Hello! I’ve got an older-style All American 921 and it does not have the weight gauge, just a vent valve and I’m not sure how to assure the correct pounds/pressure. I purchase at a garage sale without the manual. Can you please direct me to a source to understand how to use it? Thanks a million! Catherine
Hmmm… I’d definitely give the company a call and see if they can point you in the right direction! 🙂
Jill,
I’ve just discovered your wonderful website and I absolutely LOVE it! Thanks for all of your real-life tips and real recipes that everyday people can really use…every day. This week I will be trying out your Bierock and Refried Beans recipes. Also, I will be canning some beans in my new All American Canner using your step-by-step instructions. Excited to get busy cooking.
Way to go Missy! Enjoy the beans and bierocks! 🙂
I put 7 pints of chicken (raw chicken) in the pressure cooker, waited the 10 minutes for the venting and put the vent weight on and got it to the 10 I needed to cook at and it cooked about 15 minutes – and then without thinking I took the weight off thinking I had done it wrong and waited for the pressure to go to zero (even took it off the stove). When it got to zero I began the whole process over again with the venting for 10 minutes and then the weight on and cooked for the desired length of time. I don’t know if the jars have exploded or whatever, but I remember now that taking the weight off to soon does something to the pressure in the jars you are cooking. Is there any chance (if the jars and lids have not blown off when I open the cooker) that the chicken is useful or safe for anything? I have now finished the cooking and all my lids popped but still don’t know if it is safe because of my mistake in cooking.
I have this same canner now but unsure if I can use it on a glass top stove. Thoughts?
Is there a difference between a pressure cooker & a pressure canner?
I wanted to leave a short note saying Thank You. I am a 61 year old lady living in Orange County, Ca. suburbia. I get many happy thoughts and ideas from reading your blog. Even if I do small things, I am making progress. The gardening WILL happen. canning is something else. Also live with 2 younger sisters in the family home, the house is theirs and I rent from them. IF I can talk a sister into saving produce, If I have enough produce to can, I’m going to try. But I also want to give produce to the local food bank. Might not be any left for canning, we’ll see.
Thanks for reading this , lol, I get chatty.
Barb
You are SO very welcome Barb! I’m honored to have you as a reader–thanks for your sweet comment!
I havve canned eveything for years; venison, beef, turkey, trout, hamburger, corn, beans (dry and green), wheat, soups (split pea, turkey vegetable with noodles, potato (creams soups aren’t very good), tomatoes, salsa, pickles (dilled cukes and beans) beets, eggs), relishes, all kinds of fruit, jams and jellies, zucchini bread (done in large mouth pints in oven). I love to do it and try to find direction from professional sources, but if I can’t find help that way, I get on the internet or talk to lots of canners, I store lots of wheat but realized that if our power source went out for very long, we would be very happy to be able to open a jar of cooked wheat for breakfast with a little honey and cinnamon added. When I called our local extension office, they didn’t advise me canning wheat and suggested that I not do it. My sister had a recipe which was quite old, so I went ahead and tried it. It is wonderful! I gota 20 lb. case of boneless, skinless chicken yesterday for $.99/lb. and got 20 pints from that that I pressured in my canner. Be aware, however, that pressure canning can be very addictive.
Addictive <---- yes it is!
I just bought a Mirro Pressure Canner and I am trying to be thrifty and make and store my own soups and stuff. What I have not found in the manual is how much water do I use? I remember the ex used to water bathe hers so am I to cover the whole jar in water or do I need less. I also am using 12-250ml jars so how long do I can them for?
Thanks for your help.
stephen
I have an all american too, but mine has a release valve, not the weight.how do you use this type.i have had this for a long time, and have never used it .
My mom has the weighted kind. I’ve not canned using a pressure canner without her, but have used in to can venison etc. because it makes it so much more tender and easier to manage.
Anyway, Ed, my mom says: “You place the weight on according to what you’re canning. The weight has 3 settings, 5, 10 & 15lbs, and you generally will end up using the 10-pound setting for most items being canned.”
In my experience, the weight allows some of the pressure to be released and will hiss and steam to sustain the pressure you desire…
I just bought an All-Americian pressure canner and I love it . Was wondering has anyone done strawberries whole in their canner , if so did you just add strawberries and sugar water .
Joanne
Can an Instant Pot be used for canning?
need to know the price
I just ordered the All American from amazon, 25qt for around $250.
Love your website Jill. I’m a goat milker myself but I keep coming back for all of your great recipes and tips! Some day- when I can convince hubby we need 40 more acres- I intend to have a dairy cow for the sole purpose of homemade butter!
All American reminds you to have your pressure gauge checked by your local county agent once a year. Just a tickler that it’s that time folks!
Ever since living in Idaho, I’ve wanted an All American canner. 33 years later Santa brought one. Love it, but need to ask y’all: several of my canned foods have an off-putting taste. Doubly so for anything starting with raw chicken. Anyone here ever had this happen? It’s sort of chemically taste? Use everyday chicken from the store, and well water. Only thing different when canning is to use Morton canning salt instead of kosher (store brand) salt.
Chili turns out great! Chicken? kinda yuck.
I’ve been canning jams, fruit and pickles for many years, using a water bath, but never anything needing a pressure canner. Many years ago, my grandmother gifted me with her well used All American 921 and I’ve been a bit intimidated about using it. Well, I’m going to do it! I have an appointment to take it for inspection this week and have a date with a friend to use it the following week. Wish me luck!
Can I use an electric pressure cooker (Instant Pot type) to can?
Thank You!!!
For years, I’ve done hot water bath canning with my grandma’s tomato salsa recipe and it came out great. I also have an All American 921 (and an almost new 915 I recently bought at an auction… For $20!)
I’ve only used the 921 once and it didn’t go so well.
I did a hot pack with pork, but my “recipe” was just a few things I thought would taste good, so it went into the jars. I was wrong. A loss of a few meals, but a learning tool as well. Since, I’ve been a little gun-shy and not wanting my wife to ask more questions about my skills… or lack of them.
But today, I’m doing a raw pack of chicken to have some excess during these CoVid days. In researching, I ran across this page and found it to be one of the best laid out, informative, yet very easy to use pages ever! Your step-by-step guide and photos makes this very user-friendly and takes the guesswork out of it. I’ve never been afraid of the “danger” of pressure cookers, but have put off this new trial for way too long. Thank you!
I’m hoping to keep the 921 out for a few weeks and experiment with veggies and other things that won’t clutter up the freezer! I’m also going to replace the original petcock on the 915 with the newer vent pipe and weight.
Again, thank you for a fantastic website.
Grandpa D
Sure did help me. I had no idea where to start. Thank you.
I have always had the weight wiggle and tick constantly. You say 1-4 times per minute? No wonder I blow lids all the time. I have a granite ware 20 qt. Most seal but there is often sauce on the outside of jars.
Is this accurate?
Have pressure canned successfully for about 40 yrs and have never had this happen. We had a power outage of several hours last night about 30 minutes into my 90 minute required time on sweet potatoes. As it was late, I shut off stove to prevent a restart during the night, watched pressure go to zero and went to bed. Jars are sealed this morning of course, but how do I proceed to properly process this batch?
I’ve been canning for over 30 years but just got an All American this season. Canned whole tomatoes last week without an issue. Just took a batch of vegetable soup out and the lids are all scorched. I’ve never heard of this before. Anyone know what caused this and / or how to prevent it. Looks like all the jars sealed.
Terry, I just got an All American. I can’t seem to even up the space all the way around between the lid and the bottom. I have oiled it and fastened the wing nuts opposite each other as directed. But always I have two places opposite each other that leak first drops of water and then steam and then the gauge stops rising. What do you use to measure to be sure the space is the same all the way around. I’ve tried several things but evidently haven’t found the right one yet.
Thanks for your great blog! It’s very nice and well done.
I wanted your readers to know that Presto actually sells a 3 piece weight to cover the vent to function more like the combination canner you use and set to 5, 10 or 15 lb. They can buy that to get the functionality you mention if they already own a Presto and can’t afford the other model.
Your directions are great! My experience, however, is that leaving the canner on an electric standard coil burner (rather than gas) after processing time expires will lead to over cooking. These burners, unlike gas, will retain the heat and continue to cook for quite a while after being turned off. To avoid that I gently slide my 21 qt old National off the burner and then, as you’ve directed, let the pressure naturally reduce to zero.
Question for all of you, can you use a pressure canner on an electric glass top stove? Or a side burner on the grill? That’s all I have to use and my hubby’s mother’s old canner….
Can I use a pressure canner on a glass cooktop stove?
Hello. I am new to pressure canning and need some advice. I have an older Mirro pressure canner, and used it to can several quarts of green beans. I followed the directions in the manual, but am now seeing online that many people recommend letting the canner vent steam for 10 minutes before putting the jiggler on. I did not do this. I placed the jiggler on right away, and once it started jiggling consistantly, then I set the timer and turned the burner down so that it continued to jiggle a few times each minute for the length of the processing time.
Are my beans not safe to eat because I did not let my canner vent for 10 minutes prior? Actually how often does the jiggler need to jiggle each minute to maintain pressure?
Thanks for sharing your wisdom on this.
I have been pressure canning for a few years now and also have an All American (given to me by my Mom when she stopped canning). I actually used it for water bath canning for a few years before I was brave enough to actually presssure can. I used a print off of the manual for the first time I used it (the original manual is long gone), but your tutorial is my go-to for anytime I need a refresher. I only pressure can 2 or 3 times a year, so I often forget the basic steps. Thanks for sharing your knowledge!
Thank you for this tutorial, I love all the information you’re sharing! I have a question about how much water to use… It calls for 2-3 inches of water: Is that without jars in place and starting at the very bottom of the canner (as opposed to starting at the rack)?
-I did this and started to put my jars in (I used 7 quart sized) and it ended up pushing the water up pretty high. So I ended up taking out enough water so that once the jars were in the water went up to about halfway or a little less. Where should the water sit once the jars are in? I’m hoping I won’t run out of water! I’ve searched the internet for this, but can’t find an answer when using the all-american pressure canner that you have.
Thank you!
A little caveat might be helpful. I have the presto weighted rocker pressure canner. I’m using it for the first time today and in the instruction manual they link to a helpful video of what proper rocking looks like and sounds like for what I am using. It is way more than 1-4 times per minute. It is constant! Not too fast, not too slow. The video was super helpful. I would suggest everyone consult their owners manual for their specific product, if you don’t have a copy then you most likely can find it online. Because what my instructions are for my canner is wildly different than what i imagined a 1-4 times a minute rock. However this article was super helpful in general! I am glad i read it in conjunction with my owners manual.