Oh gardening… We’ve definitely had our ups and downs, haven’t we?
From basically planting a lawn in my garden plot by using poorly composted horse manure five years ago, to poisoning my garden last year with tainted hay mulch, I’ve had some absolutely spectacular garden fails. Animal husbandry definitely seems to be more of my thing, but I’ve never been know to quit after falling flat on my face, so onward I march.
Now that the deep mulch chapter of my gardening journey is officially closed (sniff sniff), and it’s time to write a new chapter: raised beds.
Yes indeed. I have jumped on the raised bed bandwagon.
We’ve toyed with this idea for years, but it always got pushed to the back burner. After last year’s garden fail, our choice was to take measures to cleanse our existing plot or try something else entirely. We wanted to expand the garden and make changes anyway, so we decided to start from scratch. *gulp*
Our old plot was pretty small and there was a big tree growing in the middle of it. We wanted to double the size, level the ground, and remove the tree. (Confession: we had a whopping argument over the tree. I wanted to keep it, but ultimately it would have totally been in the way. Just don’t tell the Prairie Husband I said that… ) After many rousing discussions and research, we eventually settled on raised beds. Here’s the scoop:
Choosing Raised Beds: Why and Why Not
Raised Beds are Handy Because:
- They allow the soil to warm up sooner in the spring (this is a definite benefit for us in cold ol’ Wyoming)
- You can more easily control the soil amendments/composition
- They keep things organized and tidy (This was my #1 reason for wanting beds, believe it or not…)
- They can cut down on weeding
- High beds are easier on your back and prevent you from crawling around on the ground as much.
- High beds discourage chickens, dogs, kids and random humans from walking on your soil, which helps to prevent compaction
- They allow for better drainage (We didn’t necessarily need this, but it’s handy if you live in a water-logged area)
- They can provide a really cool aesthetic to your yard/garden area. (At least I think so)
Raised Beds can be a Pain Because…
- Materials for constructing beds can be costly
- It takes time/labor to build beds
- They can dry out more quickly (we plan to combat this with a drip system and small amounts of non-poison mulch…)
This post is not meant to be a sales pitch to get everyone in the world to put in raised beds–they definitely aren’t the right fit for some people. And I know lots of people have different sorts of beds that work beautifully, there is absolutely more than one way to get the job done when it comes to beds. But I’m loving how these look and since I’ve been getting so many questions, I figured I might as well write up the process. Because hey– I’m a blogger and that’s what I do.
Building Raised Beds
There are bazillions of different material options for raised beds, and there are plenty of folks who made this less complicated that we did.
Prairie Husband is a stickler for building things out of quality materials that last, so needless to say, my idea of using old pallets and scrap lumber to construct the beds was quickly vetoed. (The man has serious pallet-prejudice.)
Wood is the most common material for raised beds and we seriously considered it. However, we ultimately went with steel because:
a) If you use cheap, untreated lumber, expect to replace the beds every few years (We are NOT fans of constantly rebuilding stuff. Been there, done that.)
b) Using treated lumber can potentially cause icky chemicals to leach into your soil
c) Long-lasting, natural lumber that isn’t treated (think cedar or redwood) is outrageously expensive if you’re building more than a few beds.
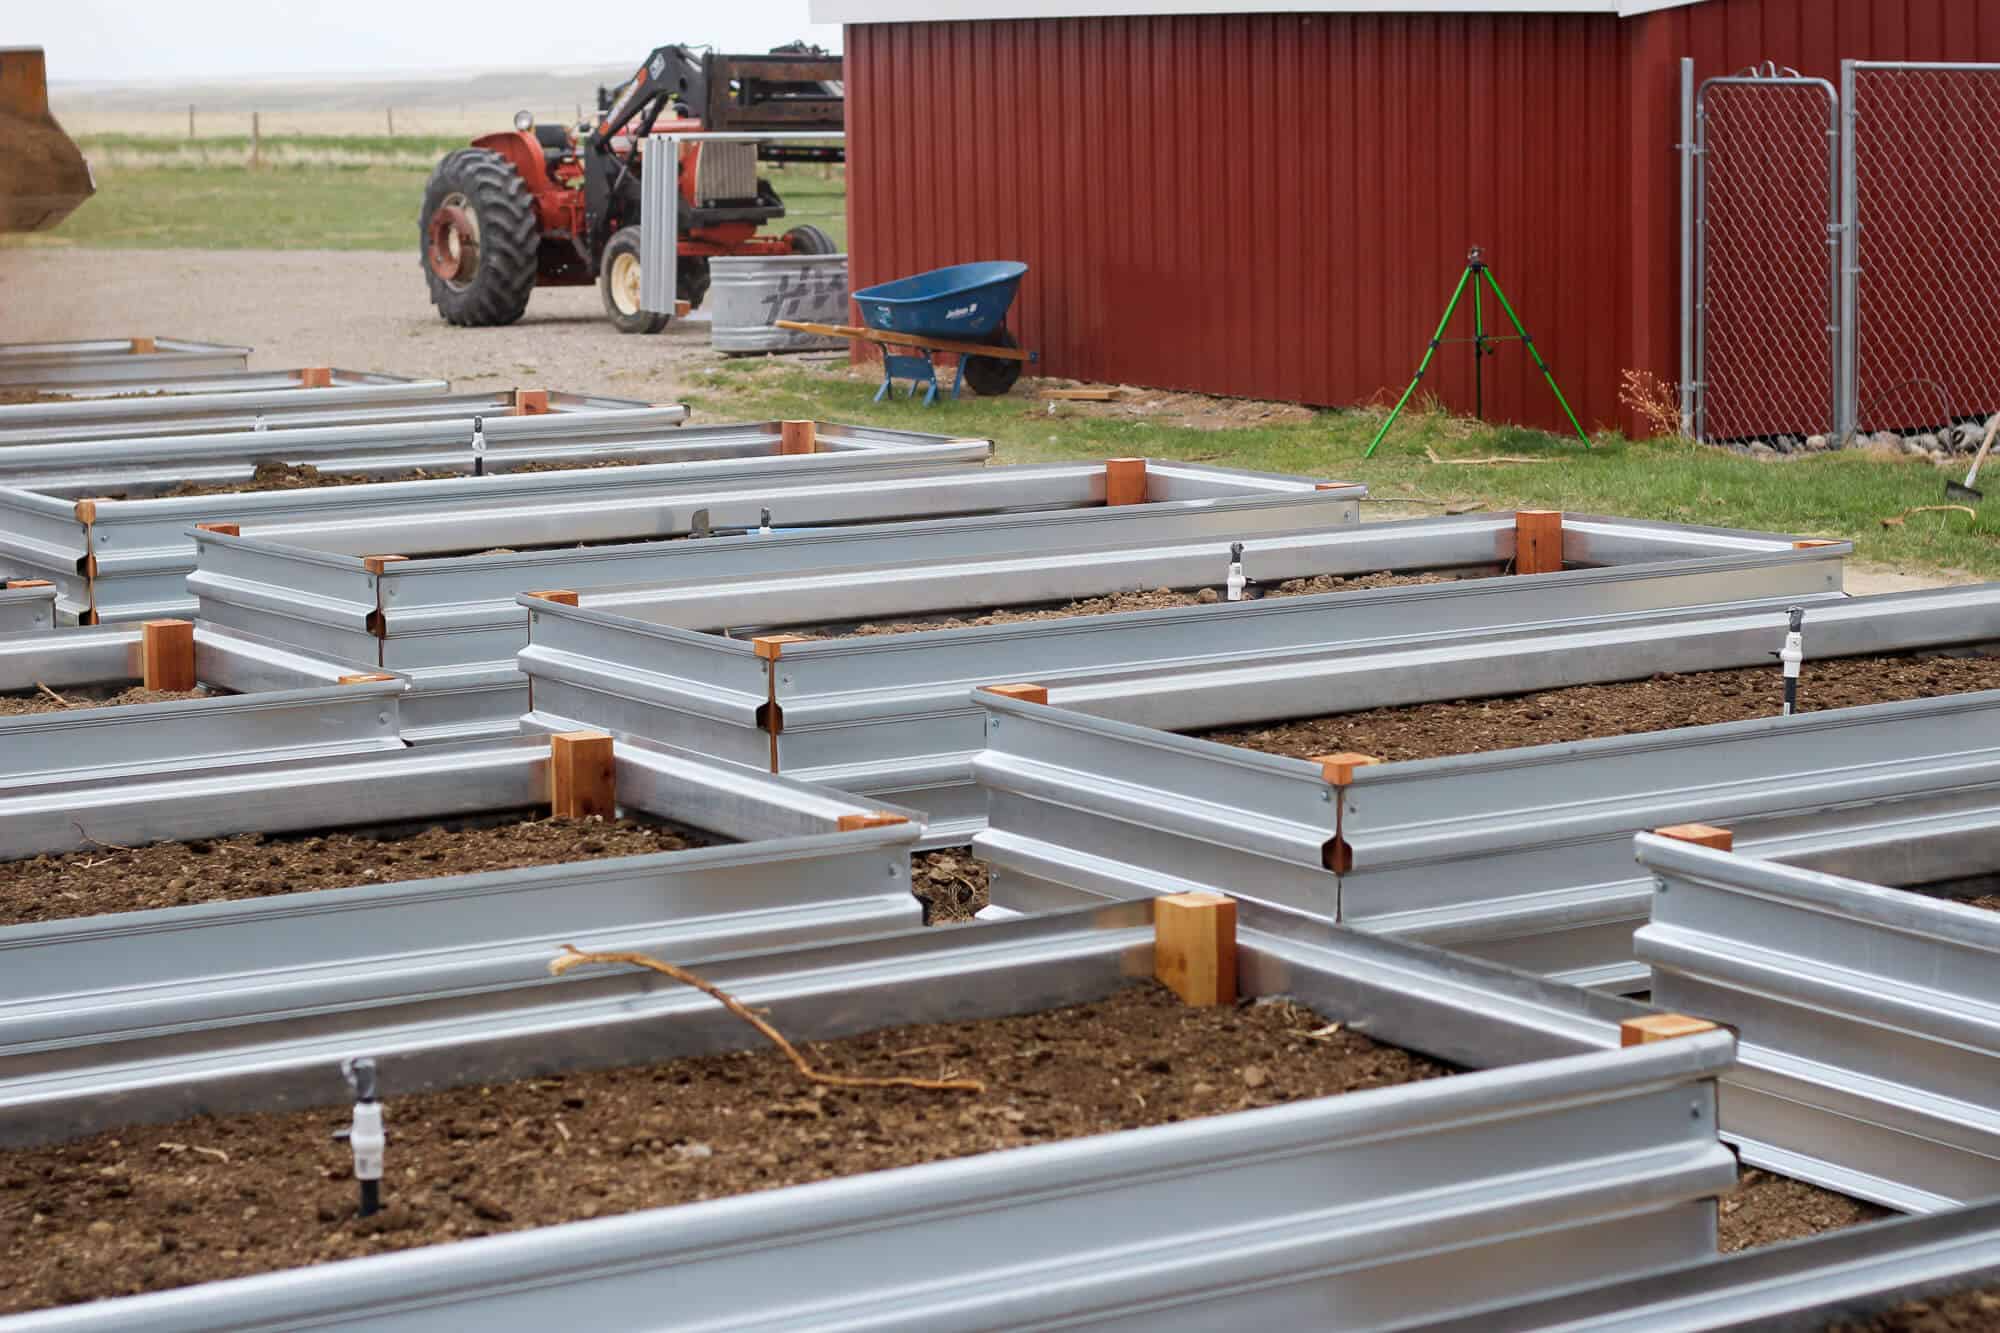
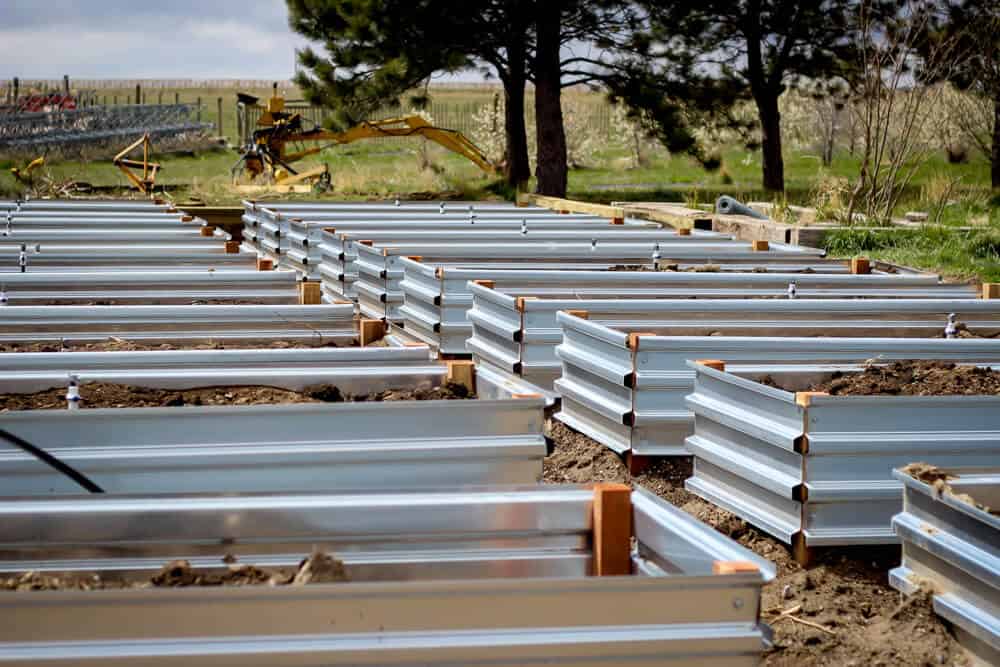
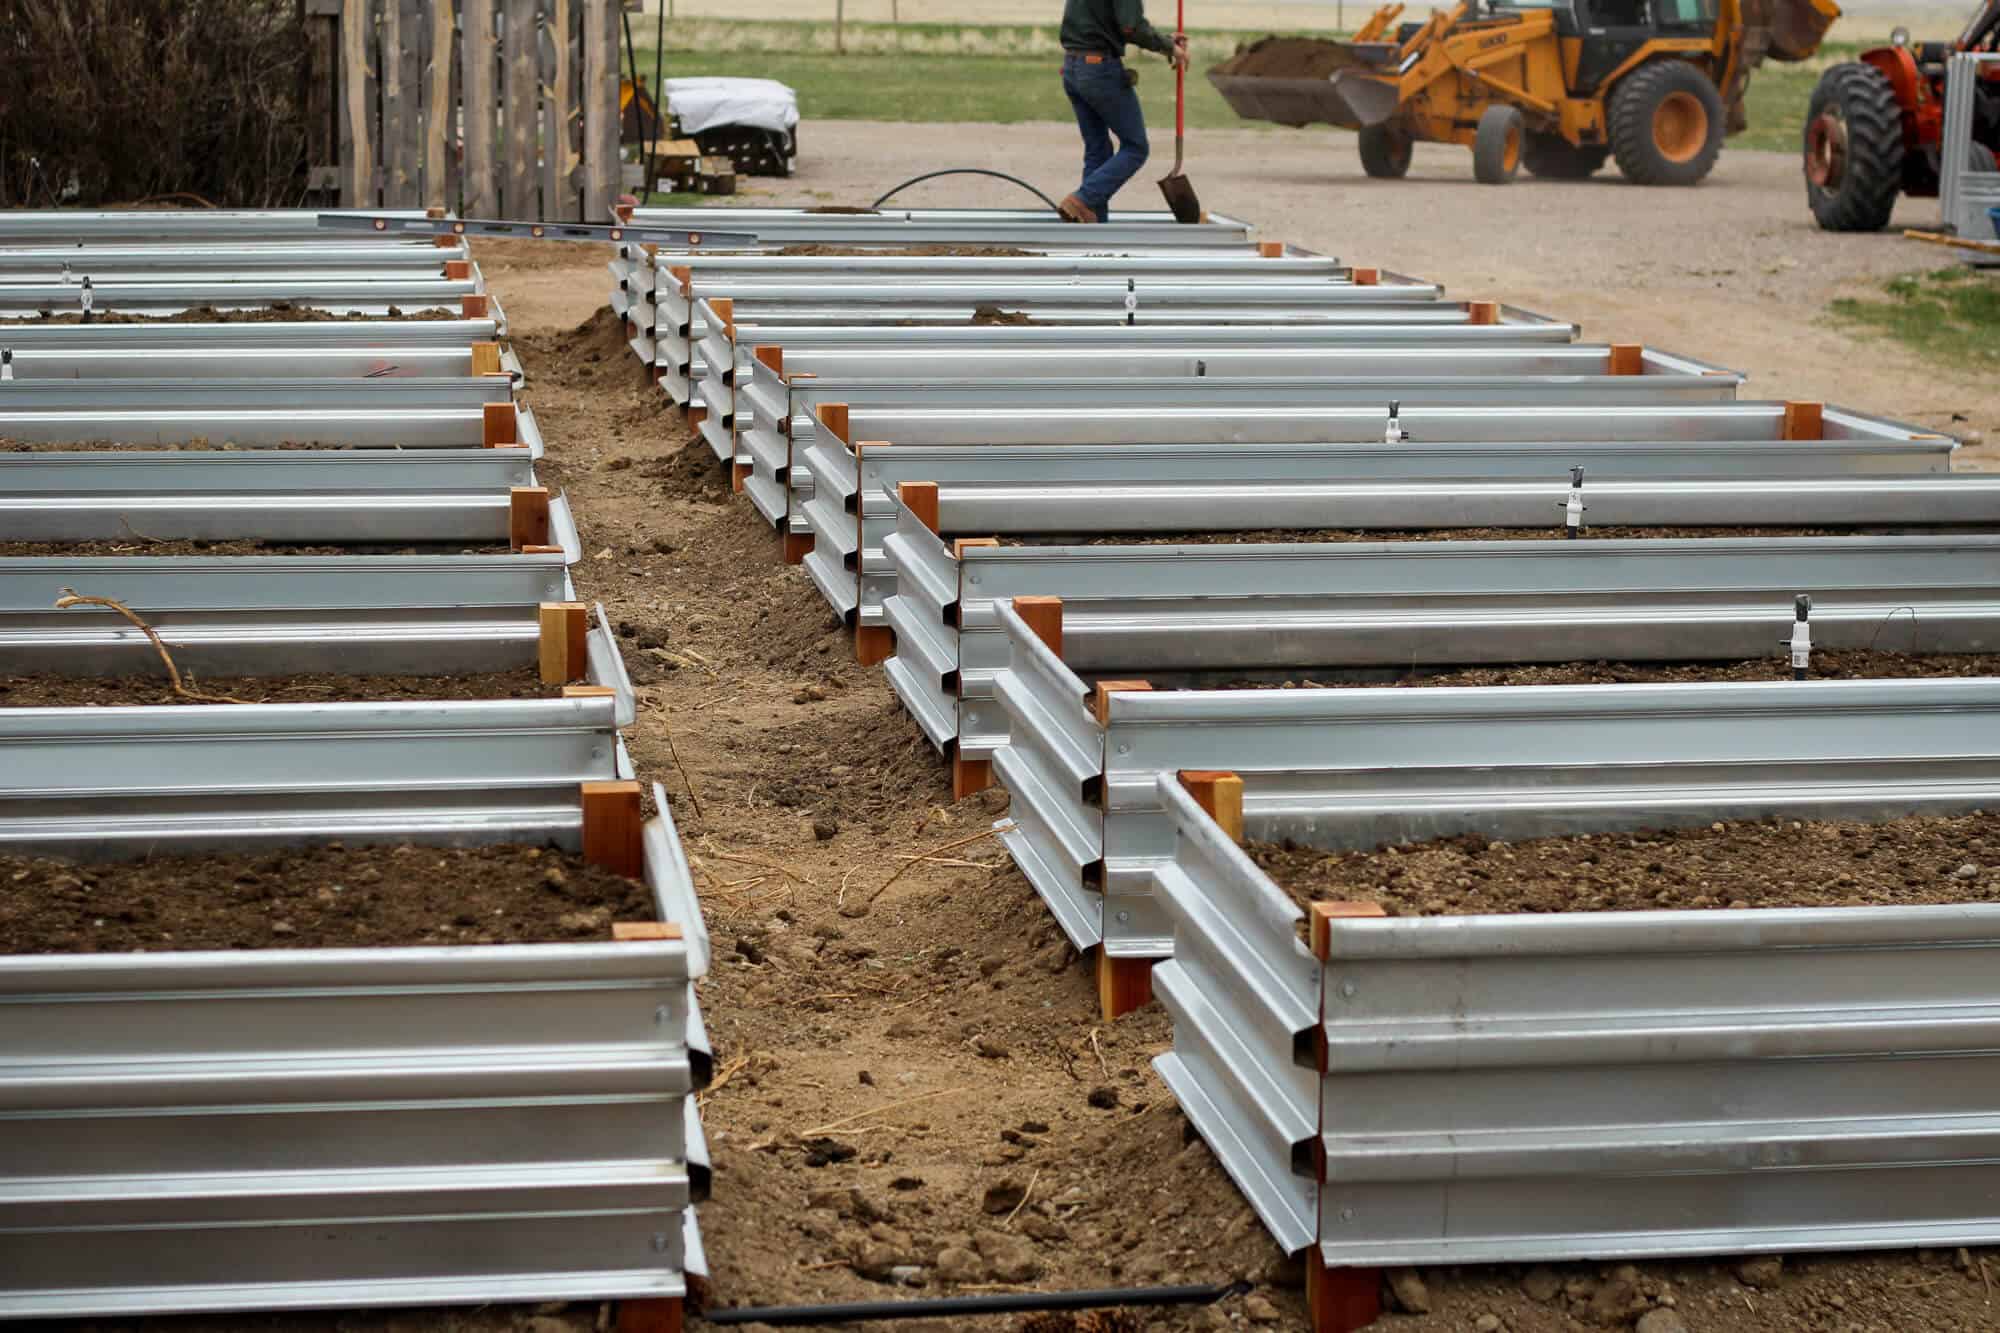
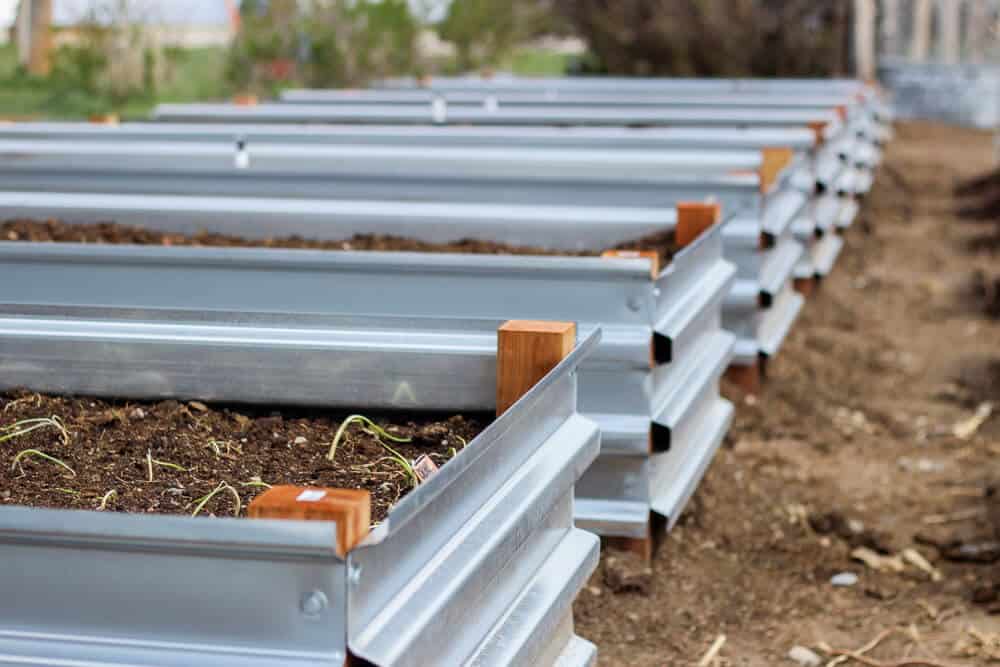
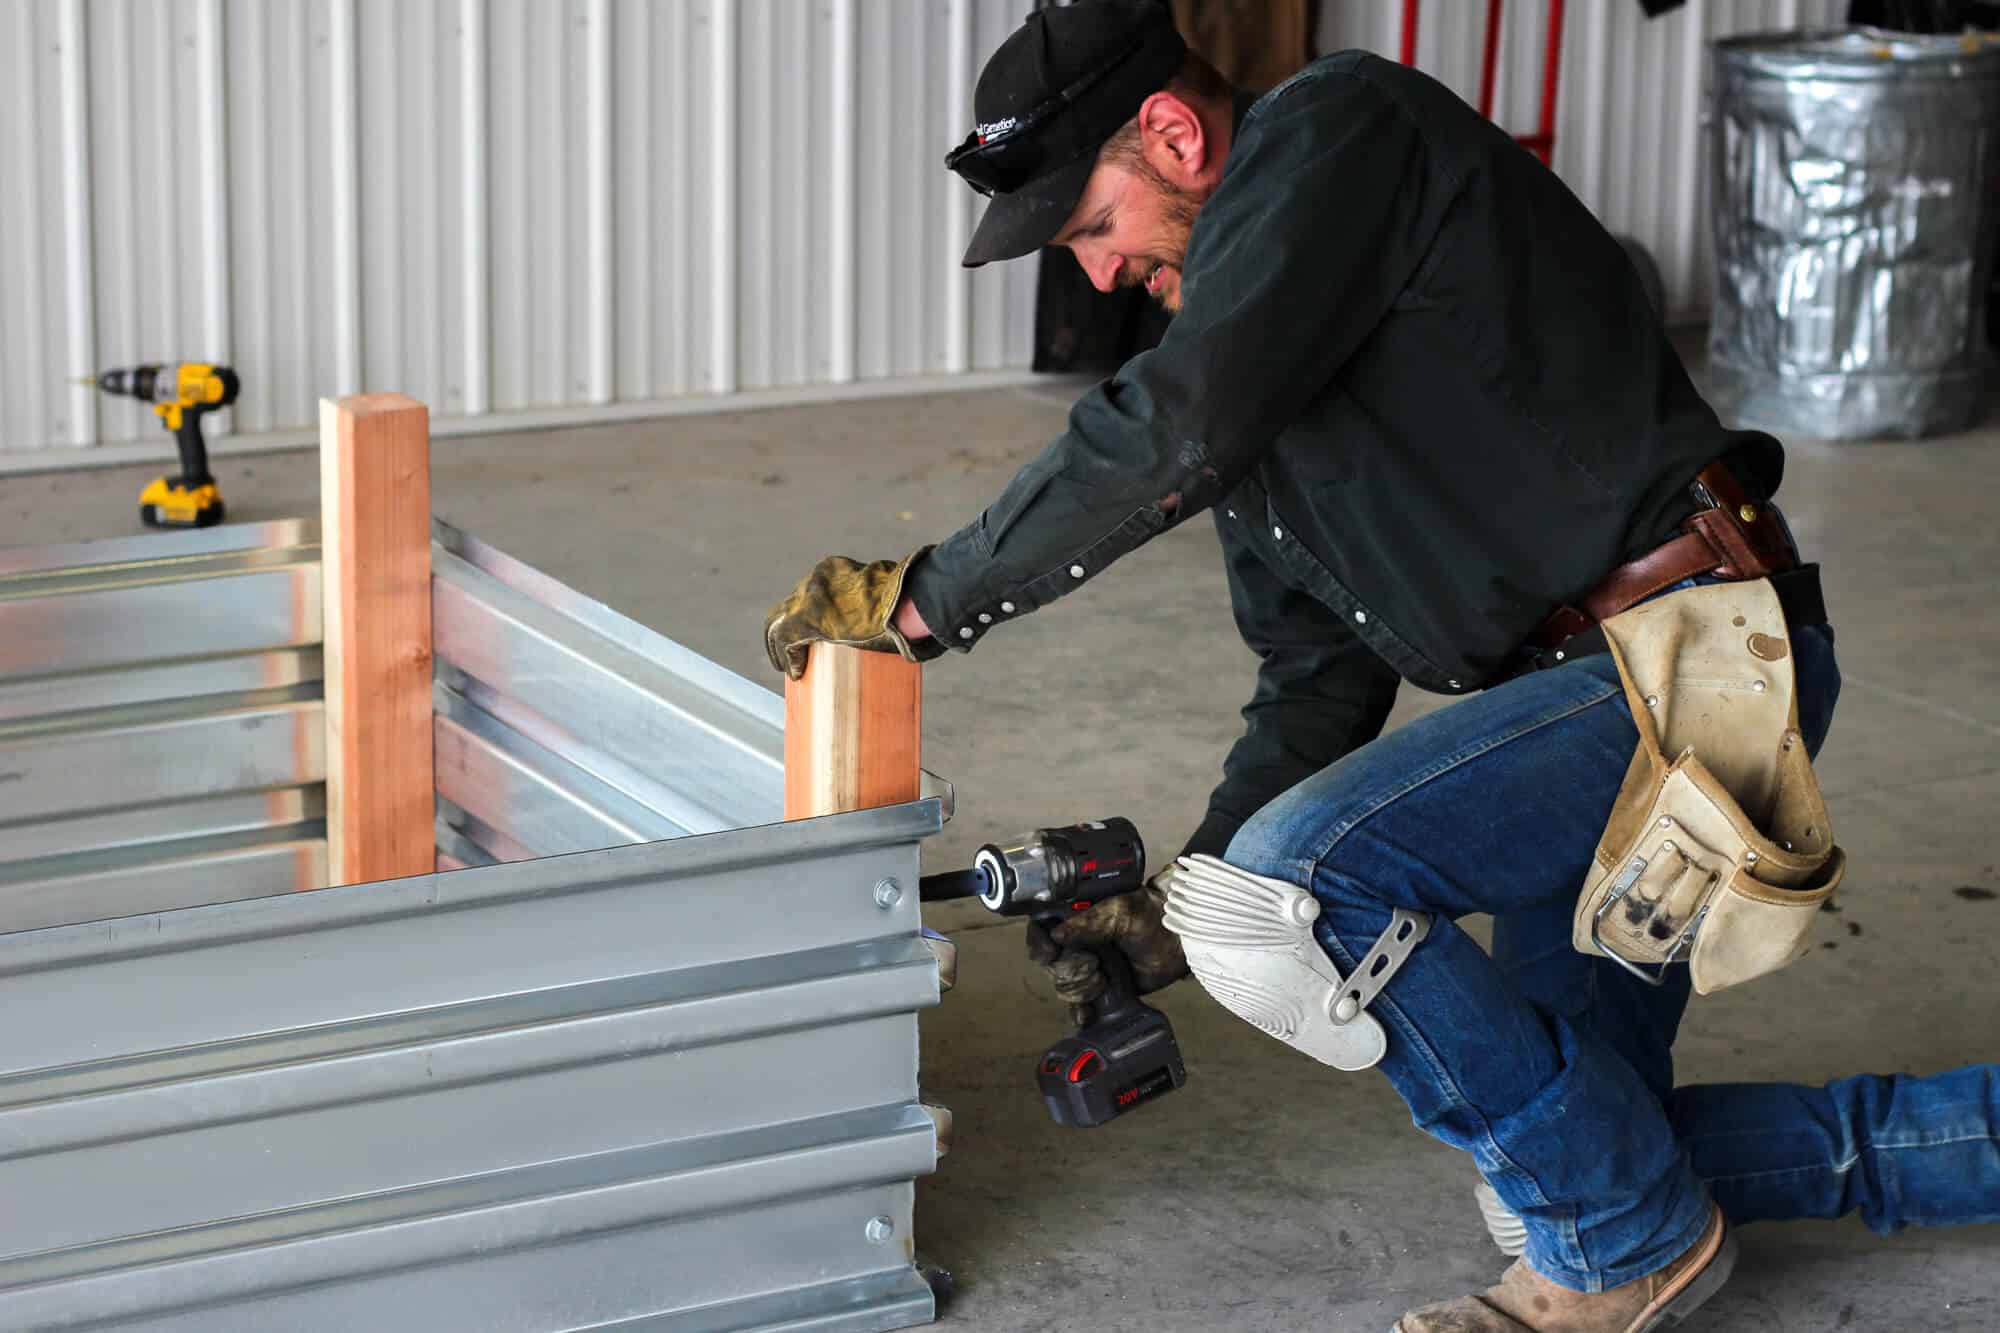
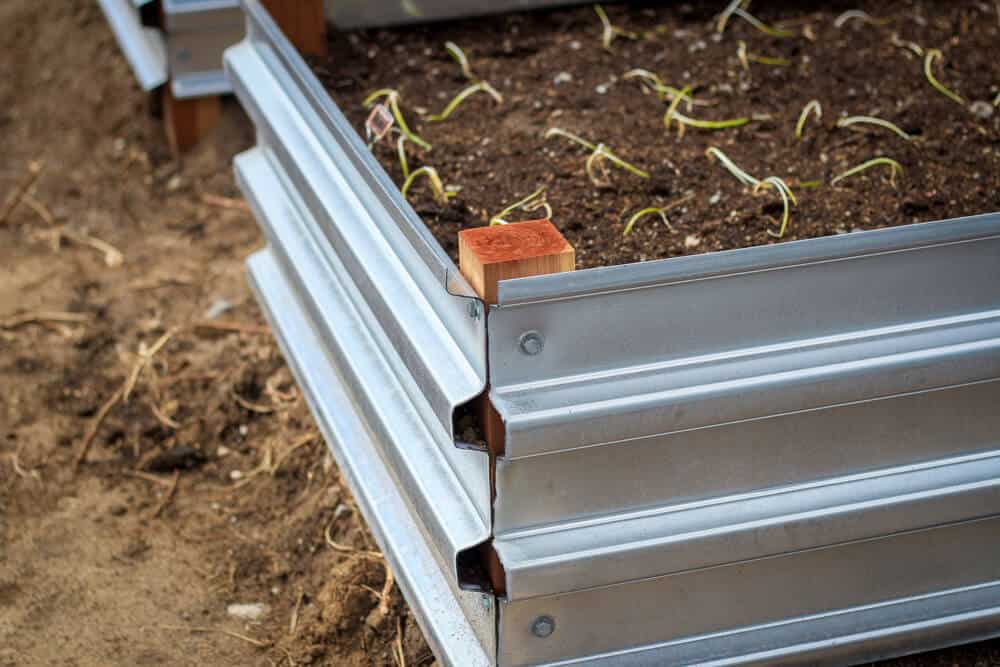
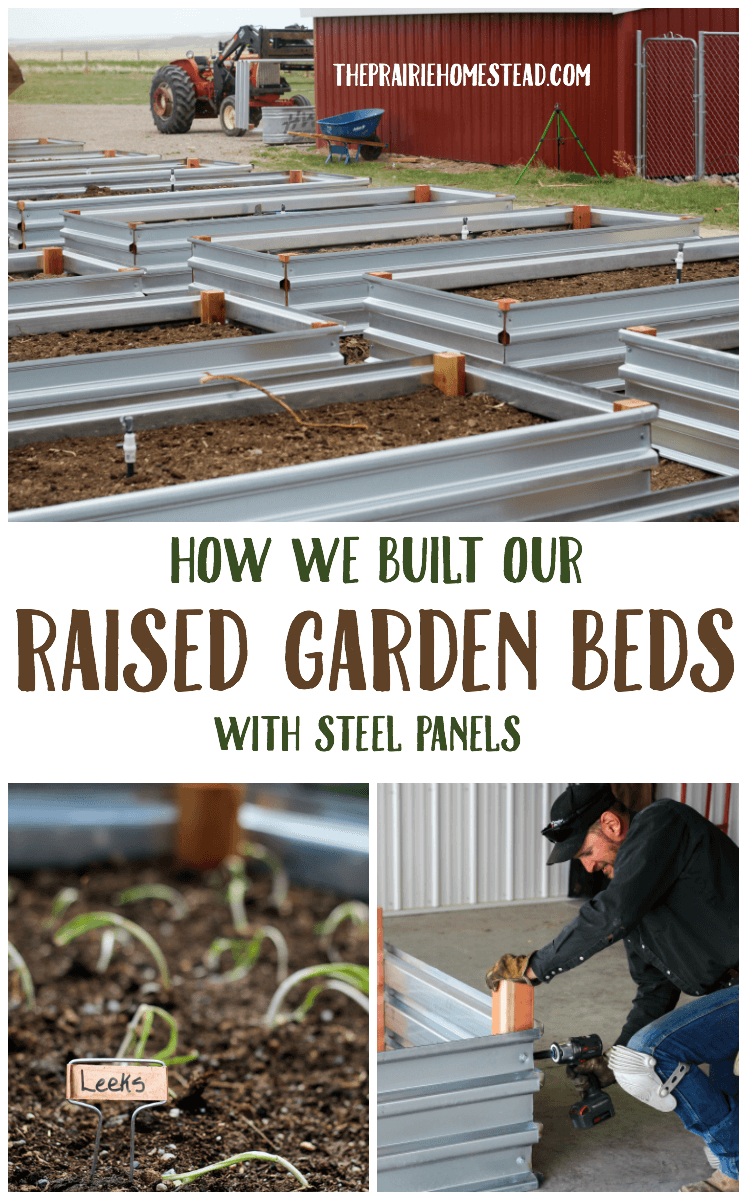
Therefore, we opted to use steel panels and 4×4 redwood posts for the corners. These babies should pretty much last until Armageddon.
I’ve seen photos of other gardens built with the thinner galvanized panels and we did consider those. However, because those panels are thinner, you must build an entire wooden frame to support them so they don’t bow out. That equals more cost in purchasing lumber (and labor in building the frames), so we decided to use extremely heavy-duty steel bridge decking panels instead. Each panel was $150 and we purchased them from a neighbor who uses them to build livestock wind breaks. They are not available at normal places like Lowes or Home Depot, so if you’re looking for them, I’d check steel suppliers or building companies. Overkill? Maybe. But that’s just how we roll.
Each bed is 4’x10′ and there are 20 beds total. The metal panels on each one are 18″ high. The completed beds are a bit taller when you consider the wooden legs, but that also depends on how deeply they are set into the ground. We plan to fill in the walkways with wood chip mulch, which will raise the height of the walkways a bit.
One steel panel can made 1.5 beds. Once you factor in cost of the panels and the cost of the redwood posts, each bed was around $100. That’s more expensive than constructing beds of similar size out of regular lumber, but less expensive that constructing the same beds out of redwood or cedar. Not to mention, these will last much longer than beds built out of traditional lumber.
Construction was pretty simple. Prairie Husband cut the panels with a plasma cutter, and then screwed them to the 4x4s. That was pretty much it.
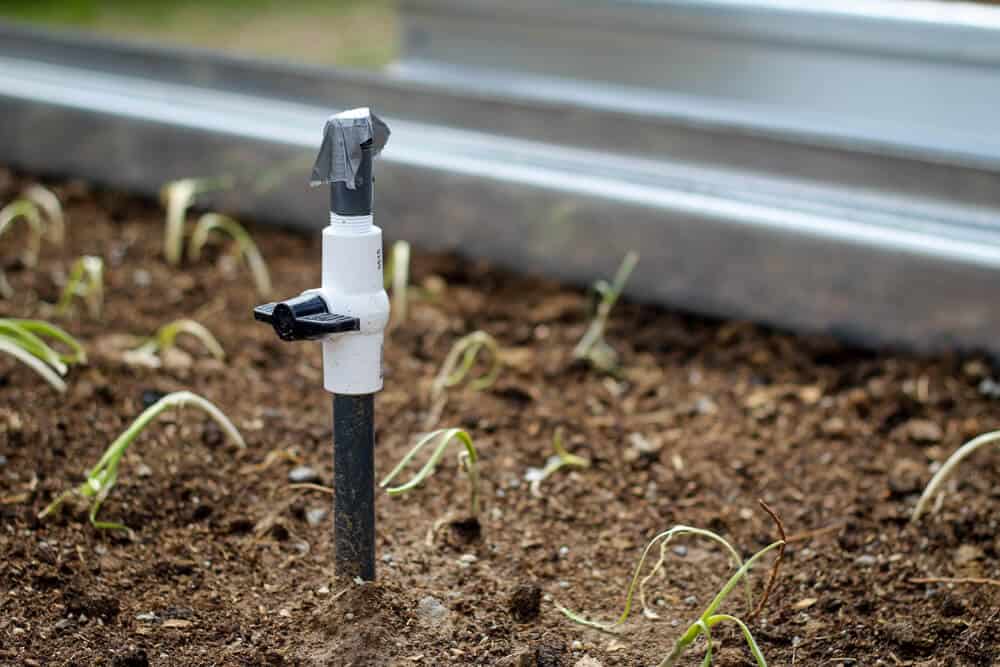
After leveling the garden plot, we (and by we, I mean Prairie Husband…) set the beds in a row, ran sprinkler line into each one for the drip system, and filled them with soil (using the tractor, of course).
The soil we used was a mix of some leftover topsoil from various yard projects and the soil that was removed in the leveling process. I also added one wheelbarrow-load of well-aged compost to each bed.

Honestly, the part of this process I’m most nervous about is the soil– I might end up sending it in to be tested and then amending as needed. I imagine it’ll be a process to get it just right. I plan on adding more compost to it each year to replenish nutrients.
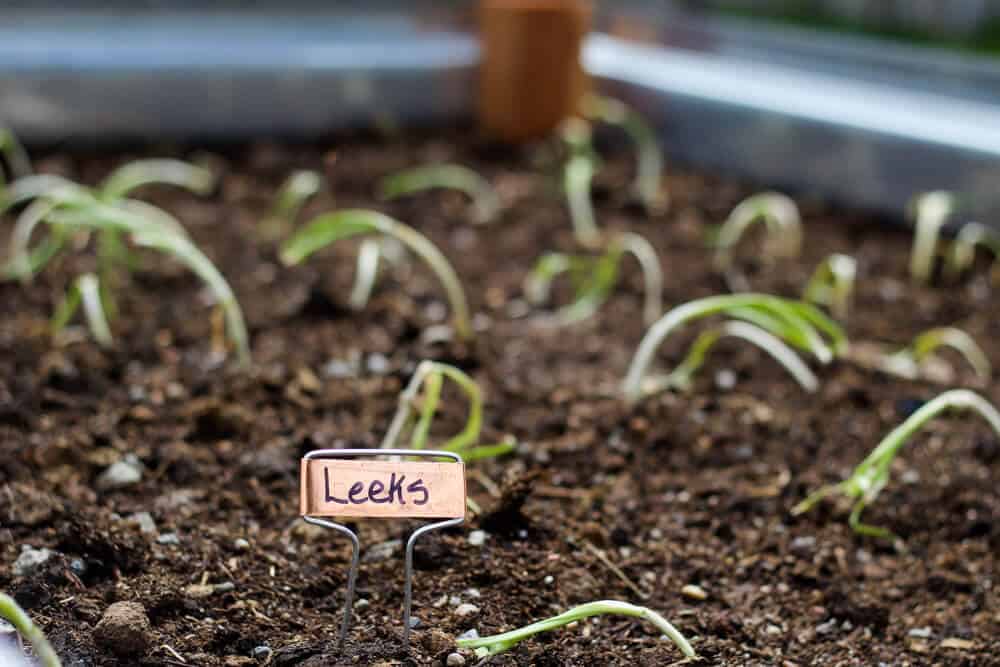
We’re nowhere near done, but I like how it’s shaping up so far. We’ll be building a fence around the perimeter, filling the walkways with wood chip mulch, and finishing up the drip system. Oh yeah, and planting everything. No big deal, right?
A Video Tour of the Finished Beds!
To answer a few questions that came up on Facebook when I posted a picture of the beds:
- No, I am not worried about the metal leaching into the soil. I don’t think steel really leaches…
- Will the metal get hot during summer days? Maybe? Probably a little? But I don’t work during the heat of the day usually anyway. I am highly doubtful it’ll scorch any plants. There’s too much soil in there for that to happen. If you live in a crazy-hot climate (we don’t), it could potentially be an issue you would want to consider.
- The edges of the steel aren’t as sharp as they look– we’ll probably still finish the top with another redwood board, though.
- Will they rust? Probably eventually. But I think it’ll take a while. Nothing lasts forever, but I am convinced these will be more durable than most any other building material out there. (Unless you want to pour beds out of concrete….)
I’ll continue to update you on the progress as the garden continues to take shape, and expect more raised bed posts as I figure out what does/doesn’t work.
If you’re a raised bed veteran, I’d love for you to share your best tips in the comments!
Listen to the Old Fashioned On Purpose podcast episode #3 on the topic Why We Chose To Garden In Raised Beds HERE, and listen to episode #15 on How We Build Our Raised Beds HERE.


That’s a lot of raised beds and I bet you can hardly wait to see them growing veggies at full capacity. I like the look of the metal but my biggest concern would be the heat against the metal. It can be difficult to maintain moisture with this style of raised bed especially if they’re sitting in the direct sunlight. Might not be as big of an issue in your neck of the woods, worse case you have to water more often. This can be stress for the plants so you might want to track it during July and August so you can make adjustments later. You could plant a row of sunflowers inside your fence line to help detour the heat. I make my own llama fertilizer tea for my beds – works great in addition to other awesome things I do. Good luck and hope you have a great planting season.
I think your garden is going to be fabulous!! Can’t wait to hear how it goes. You live where it’s cool so I wouldn’t be too worried about the metal cooking your plants.
Great work! Looks fantastic & will be a blessing to grow in!
Happy gardening!
– Candi
In Colorado we have no worries about to much heat on a raised bed garden. I’m sure Wyoming won’t have an issue with it.
Would you tell me/us the name of the company that makes the steel?
Hi, it is very good steel raised beds
Did the metal get too hot. My Hubby replaced his John Deere tractor rims and I’m thinking of using them as 2 rounds beds as my 3 tier wooden garden is rotting out. Read some where that you should insulate the metal on the inside. I’m looking for ideals before next spring. Your’s looks amazing.
We live in a similar climate in NE California, 4,500 feet high, low humidity and temps from -25 to 100 degrees. We are using a metal raised bed for our asparagus, It works great!
You’re garden beds look just like mine. The plants will grow really well. We have a hydrant across the driveway so plenty of water here. You will love them! I want to expand and make more here in Kawartha Lakes. Enjoy!
I was wondering if you had any issues with critters getting into the outside corners. I am looking to do something very similar to your raised beds but am still planning it all out. Yours look fantastic and thank you for sharing your journey
What type of screws did you use?
I work with this same kind of materials about every day, i never thought about using this materials for something like this and i thought what a great idea.
The metal is not going to hurt the plants and besides it wont be that much heat, that is going to evaporate water. Dirt will be like insulation barriers.
Cement blocks work well for raised beds using mushroom compost mixed with top soil
I use the weed barrier to cover the bed to retain moisture as well as preventing weed growth.
I’ve been doing raised beds for years, but I live in in hot and humid zone 10 in FL so most of my experience won’t apply to you 😉 However, you are right, there is less room for error in raised bed soil than in ground. I would definitely mulch, maybe even wood chip mulch on top. I have found wood chip to last so much longer and cut down on watering while better protecting plants. Just make sure not to mix the wood chips in with the soil as it will lock up the nitrogen in the soil as the mulch essentially composts in place. Earth worms love wood chips though and it doesn’t take long for the garden to equalize. Plant your plants close together. I have found the plants to grow better if they are very closely planted vs. spread out in the raised bed system due to better micro climate effects and water conservation from evaporation.
Before planting, I STRONGLY recommend mixing in a microbe rich fertilizer like Jobe’s organic or Espoma Organic. It makes ALL the difference while the garden beds are establishing to help the microbes establish to feed the plants, and to overcome any minor nutrient deficiencies in the soil. Mixing it in is better than top dressing. It is also pretty cheap on Amazon and hardware stores. I think about one 3lb or 4lb bag per bed would be great and really get your plants off on the right foot.
Good luck!
Your raised beds are beautiful. Very nice work. I have raised beds too but ours are made from cedar and boards hav to be replaced daily often.
Happy gardening!
You might consider cutting some hose and sticking it on the top edges so your kids don’t end up with sheet metal cuts. Id get some clear tubing or brown hose so it’s not to ugly. They look very nice but I agree the heat and therefore drying is an issue here in California I have raised beds and they do need more water because of that loss. I think if I make a new one I might create some kind of inner linear to act as insulation.
The swimming pool noodles that kids love would be perfect to place over the edges of the metal. And they are not that expensive. I hope your beds work. There is no way we could use them Texas. I can’t even stand to touch the plastic or stone flower pots during the afternoon. And watering is a 2 to 3 times daily affair for potted plants and those we put in a raised area. I gave up. It was cheaper to buy produce and vegies.
Do not use swimming pool noodles in a garden location. They will leach toxic materials into your soil.
These look great!
My question is: Do you lose soil or water from the gaps where the panels come together at the posts? The profile of the steel panels appears to leave large gaps that lumber or cinder blocks would not have. Thanks!
Once the soil is settled, it doesn’t seem to flow out of the “cracks” in my log beds, which are four logs placed together but not physically attached. I put some cardboard in the corners when filling but that has long since rotted away.
Yes, I have done the same with newspaper. I was curious what Jill used as the gaps at the corners of her metal bed sides definitely have a large opening for dirt to escape.
The gaps don’t seem to be a problem– dirt isn’t coming out
Jill I’m wondering if you know what gauge the metal panels are. I’ve been looking at ordering from a roofing company and they have 22g. I’m trying to decide if that’s strong or not enough. Hard when I can’t go see it in person. Thanks.
I am looking into the material you used, but it is asking for. Gauge and thickness. Do you remember what you used?
Nope! No soil loss so far
Wowza, these beds look great. I bet it’s exciting to walk out to your yard and just feel their potential not to mention the satisfaction of building them yourselves. I can’t wait to see how these flourish this season. I love learning through your experiences, thank you for sharing.
Come next spring, I would live to see your seed starting operation for such a large garden.
Anna
Love the priare husband title. I’m going to have to come up with a title my wife can call me. Steel sounds perfect for all your reasons. I wonder if a shallow water wicking tank can be set in the bottom. Making a wicking bed hybrid bed. May help with moisture. Good luck.
What do you use to attach steel to wood? (Exactly)
Building now so guidance greatly appreciated!!
I don’t know if it is readily available in Wyoming, but consider using pine needles to mulch. Since your garden tragedy (I’m not kidding; that must have been so demoralizing!) I’ve been very leery of mulching with hay or straw so I’ve researched other options. Apparently when the needles are dead/break down they don’t add very much acid to the soil and you could always use a bit of lime if you needed. Plus I can’t imagine they have any chemicals sprayed on them, aaaaand you wouldn’t have the issues with them binding up the nitrogen like with wood chips. I’m intending on trying needles this year so I would love any input from others who may have tried it before!
I mulched my strawberries and blueberries with pine needles and it’s worked great. I just raked up my own needles and piled them on the soil. They stay in place, suppress the weeds as well as the wood chip mulches and keep the strawberries off the soil. They don’t mix into the soil as easily so are easier to “part” and plant seeds into. I am considering switching over to pine needles in more areas, but I am going to read about it more first.
I bet pine needles would be great mulch! Unfortunately, they aren’t super easy to find around here. :/
We’re using pine shavings. Used a little over a bale for each 24×4 bed. Light colored, so less heat retention. Holds moisture well. Easy to add more where needed.
Where did you get the coconut mulch? I live in NW Florida so my garden faces the challenges that yours does. I also have leftover roofing panels and want to try raised beds. We have lots of concrete blocks so I might build a supporting frame with them and line with the panels.
Well, that post didn’t go where it was supposed to. (Computers have it in for me.) Someone mentioned coconut mulch in the comments.
If you can get it, rice straw is a great mulching material, and isn’t problematic in the way straws/hays derived from grasses or wheat can be.
I did not notice it in the answers above,so here is a pointer I have had great success with. Don’t turn the beds every year. Simply add a layer of compost on top and add another layer of wood chips. as they compost down they keep your soil healthy and balanced. If you turn the soil, you will lose nutrient that could be going to the plants to the nitrogen production process. And the plants will flourish in an aged,mature environment.
Agree Robin! Just planning to layer compost– no turning for mine. 🙂
Did you leave enough space in between for the wheelbarrow?? ?
Another tip would be to rotate the plants yearly. Mom could grow virtually anything but, the only plants she didn’t rotate were her asparagus bed, winter onion bed and the yard long beans (black beans) that she planted on the fence line. But, everything else was switched yearly.
And her methods worked. She fell in 2003 after picking and canning one canner of yellow squash. She ha major surgery to replace her elbow, upper arm and shoulder with titanium so, I was at her house daily and I canned and froze 800 quarts of food. I also sold 500 lbs to others who wanted it. That helped pay her hospital bill. She was known as the lady with the green thumb!
This was our plan also. Just add more shaving. Don’t turn soil. Put in established potted plants to minimize soil disruption.
We use “Mel’s Mix” from the Square Foot Gardening book in our raised beds with great success. He uses 5 different kinds of compost, vermiculite and peat moss. I know some people don’t like peat but the vermiculite does help with water retention. I think you will love you new beds.
My husband and I built these type of beds last year using left over panels from an old barn, although not in such a large quantity as yours. We live in central Texas so combat the sun scorching issues we positioned them so they only receive 6hrs of sun a day and we made a metal trellis of sorts to connect over the outer edge of beds. We planted cucumbers and squash on one end and let them grow crazy. They provided more shade and bonus was that it was super easy to pluck cucumbers throughout the summer. We combined coconut mulch with goat manure we pulled out of the barn and everything grew beautifully through late July early August, which is pretty good considering how horribly hot it gets around here at the end of summer.
I’ve also learned to do “full shade” plants in partial shade here in the Deep South.
I meant “full sun” plants in partial shade.
Glad to know they are working for you– even in hot ol’ TX!
I live in east Texas. We have lots of red ants. I was told not to bother with raised beds because the ants would take over. Do you find them a bigger problem in raised beds?
We have some raised beds here in South Carolina. Fire ants are a huge problem for us! They LOVE the raised garden beds and unfortunately putting out chemical ant killer, is the lonely way to keep them under control. And I say keep them under control, instead of, getting rid of them, because there is no “getting rid of them”! We also made a big mistake at the beginning, by putting in unfiltered soil and have been fighting weeds ever since. They also take much more water here in the hot south, even with mulch. We have six raised beds and I still try to work with them, but I’m not in love with them! LOL But, different things work for different people in different places!
Would a flame weeder work for fire ants? We don’t have them in ny but it might be worth a try.
Would chickens get rid of the fire ants?
We use cayenne pepper to control fire ants. Works pretty effectively. You can sprinkle it on the soil directly (obviously, reapply after rains or when you see new fire ants) or mixed with blue dawn dish soap and water and sprayed on the plants.
Another option for costly raised beds, is cedar fence planks. They cost $1.58/board at Lowes. Just cut off the ends right below the bevel. They’re great for 4.5×4.5 beds and run under $20 for cedar beds. And option for moisture retention in the soil is to layer in polymer crystals. They’re nominal in cost and hold 300x their size in water. It keeps feeding water back at root level. When you notice them shrinking, add more water. They do eventually break down (3-5yrs) but, they add nitrogen to the soil when they do.
I wonder if the polymer crystals deter the fire ants.
I find pouring boiling water, spraying chemicals and digging/stirring up the piles encourages them to move on. I don’t want chemicals in the beds. Hate those things.
*meant to type spraying vinegar, NOT chemicals
Diatomaceous earth may help with your food problem. Its natural and come in food grade.
Diatomaceous earth ended the carpenter ant problem we had coming in and around our house. They crawl across it and die. I wasn’t sure that it would kill off the colony because they seemed to die so quickly but they all disappeared. We had tried some ant poison (from a professional pest control) and traps but didn’t seem to do anything. Maybe it was the combination. But the diatomaceous earth worked amazingly well.
We use diatomaceous earth on ants in our raised beds as well – sure don’t trust anything else. We love raised bed gardening; we do have to water a little more right after planting because we’re in the hot south. It’s worth it to us to use raised beds because there’s almost NO weeding. Whoop Whoop!
Hey Dee Dee! Three cheers for less weeding!!
We don’t have ant issues here at all
We use a borax sugar solution in jam jars to make poison ant traps. A jar with the lid slightly ajar and tucked into the corner of a raised bed once ants appear kills off the buggers quick.
I am definitely going to try this, thanks!
Wow, this really looks interesting
They look real good, Jill.
Now you just have to keep adding compost every season and soon you’ll have the best soil there.
This worm castings is reng too: https://www.amazon.com/Unco-Industries-WWSB30LB-Builder-Castings/dp/B00V4RI88Y/ref=sr_1_1?s=lawn-garden&ie=UTF8&qid=1493632934&sr=1-1&keywords=worm+castings
You should ask your husband to think about an innovative way to turn a few of them into cold frames so you can extend your season a bit.
*great
Thanks for the link! And I totally agree about the cold frames!
You try hoops to start em out as cold frames.
I wonder/ hope you can help.
I bought 2 4 x 6x 2 galvanized raised planters. We assembled as instructed but I see bowing on the sides and the soil is trickling out the corners where the panels connect. There is no wood frame. There were no instructions to use landscape fabric in the corners.
I am afraid with a rain, these raised beds are going to bow so badly they will burst.
Should I caulk the corners. Or
Put landscape fabric inside ( the soil is already in there – and what to do about the bowing-
Should I put rebar posts at the side seams to prevent further
Bowing!
Hope you can help!
They look beautiful! What are you planting?!!
I am a big fan of raised beds. I keep them around all my small fruit trees. I have built them out of lots of things. My favorite so far is either regular red bricks or bricks I poured out of concrete because I couldn’t get enough regular bricks. The concrete bricks are much longer, some I made 2 feet long. I have planted things like carrots and multiplying onions in the beds with the fruit trees. Of course kitchen scraps get thrown in them, like egg shells or onions. I did cut some old rusty roofing in half and use that for some edging. Those are my least favorite beds. They just don’t hold up well and don’t look good to me, even though I painted them.
Of course, my beds are not dedicated beds in a dedicated area. I just have random beds spread out all over the place because that’s what our land allowed. Some have rocks piled up as a border. That didn’t work well, long term. Some are right in front of the house and function like flowerbeds and look like flower beds, complete with plastic picket fence border from Walmart. But I use them to plant food in. I do mix in some flowers, just for fun. Just as with a regular flowerbed, I have to weed it, if I don’t keep enough leaves on it to mulch out the weeds.
The problems I’ve run into here in southern Mississippi is mostly the weeds. I grew up in Oklahoma, and we didn’t have the weed problems that Mississippi has. Vines seem to love raised beds. Draining too much hasn’t been an issue, even as hot as it is here. The compost is the perfect sponge to hold just enough water.
I actually have quit calling them “raised beds.” I now call them “mulch beds.” That’s what I do: I pile on the mulch and let it rot, then when I plant something, I pull back the top layer of mulch and plant in the rich dirt below. If you think about it, that’s what happens naturally in the wild. Leaves fall and rot right there, and build rich compost. A seed will find its way down into that rich dirt and sprout. The difference here is, I have grass growing between them. Most of my beds are no more than 12 inches tall. If we had more wind, I suppose that I may need them taller, but the ground gets used up, and even though I am constantly piling on more leaves, the level seems to get down toward the bottom, and I don’t want to reach down in more than 12 inches.
A side note. I also raise chickens. Lots of chickens. I raise them out under some of my fruit trees. I have small moveable pens setting on sides of the raised beds around one pear tree and one apple tree. So I suppose you can figure out how those trees get fertilized. Before anyone fusses at me for the chicken poop being too hot for the trees, I’ll tell you this: I have yet to burn anything up with chicken poop, including these fruit trees.
As far as the heat on metal being an issue, I have a suggestion. This isn’t going to please the fan of all things rustic, who love the look of the galvanized metal. But because I live in the Deep South, I have learned the effect of paint on heat. I use lots of chicken tractors. If the roof is galvanized, it gets really hot in the heat. If it is glossy white, it isn’t hot at all. Of course, you may also need to know how to use flat black paint, in the case of something like a solar dehydrator or winter greenhouse, because flat black absorbs the heat better. Glossy white repels the heat.
Great tips here– thanks for sharing your knowledge with us Anita!
How did you make your moveable chick pens?
If you have lots of weeds try felt in the bottom of your raised beds.. no weeds 🙂
I installed a deep mulch garden in addition to raised beds. There are pros and cons to both. This is the first season for the deep mulch garden, and I am still learning, but like it a lot. A bit more weeding, but the hay works well to suppress weeds. The raised beds DEFINITELY require more water, though are a little better when mulched. I have raised beds made of different materials, and they have different water requirements. The steel ones need the most, then the natural cedar board beds, and the least the log beds we made using felled trees from various wind and ice storms. Yes, they rot and will have to be replaced eventually, but I think this adds nutrients and retains water. We will have a continuing source of logs, so this is a good option. I have not noticed any more heat stress in the steel beds compared to the others, and we have frequent 100 degree summer days. Our neighbors mow a big field of ours for the hay, and our payment is two round bales each year to keep our deep mulch garden going. There is no spraying on our property, so I feel safe there. Our plants are growing well in ALL the beds. They all work. Happy gardening to all!
Look forward to seeing how your beds work out. We have serious gopher issues…they would not be able to get through metal haha if you put mesh bottoms. Evaporation will be at issue unless you keep a good eye on these beds and have serious aged mulch and soil additives. You might want to add as much worm castings as you can afford to your existing mix to nourish soil. This year I am adding rock dust (azomite) and mycorriza (spelling) bacteria, (ordered from amazon) the beneficial fungus beak down mineral and help roots and plant communicate and grow for our benefit. Thanks for sharing let me know if you do the above as well we can compare garden notes…haha
Gophers (and moles, sometimes) can be a serious problem with raised beds, if not taken into account beforehand. I like the idea of using heavier gauge steel for the sides and the design of these in general, but would need to find a way to secure mesh to the sides of the beds to prevent clever gophers from finding an opening to sneak through. Not sure how to do that with this design unless a bottom frame is added to the build.
I put about 4 layers of landscape/weed cloth on the ground before putting the raised beds on top. So far no gophers in the beds (going on six years) but they are tall beds, so not like some tempting carrot roots are just above the weed cloth at all. In fact, for tall beds I now recommend filling the bottom half with gravel or something else, then weed mat/landscape cloth, and then just the top 12-18 inches with quality soil.
Use a heavy gauge 1/2″ X 1/2″ galvanized hardware cloth in the bottom of your beds – you could even double it up. Here in KC Mo Mernard’s has rolls 4′ X 25′ for $45.00
Love the beds Jill
I have raised beds that are several years old and in need of replacing. What are the dimensions of the steel panels? my original beds are 12×4 and like the size, minimized waste by using 2 16ft boards per bed.
Happy gardening,
Kaye
I loved my raised bed garden, it was so easy to take care of. We moved recently and I am deciding where I want my new raised bed garden, our back yard has a slight slope in the optimal spot. So for now my garden is in earth boxes on our patio. Just a simple kitchen garden, mostly tomatoes…for canning. And of course garlic and herbs! It’s amazing how much garlic you can grow in a 4×8 raised bed. Can you guess? 600 bulbs! Then my daughter braided and sold them. She was 15 at the time and was saving for her first car insurance payment.
600!! Wow!!!
Wow! They look beautiful! My first thought was how hot to the touch they’ll be once the summer sun begins to beat down on them. I imagine you’ll have to have quilts handy to cover the edges as you garden. What are your thoughts on that? I could be wrong?
I have a single raised bed thus far and you are correct the sides are decomposing after just a few years of use, as well as some of the screws are backing out– so I’ve got added maintenance on top of the sides wearing out.
I’m not sure which is best, but I look forward to hearing more about yours!
Luv your site and newsletter–
Katherine
Looks great! If you’re worried about the rough edge of the top you could try swim noodles. You can find them in stores like Walmart as pool supplies. Kids use them as toys. They are about 5ft long 3-4 in diameter some type of foam material and you can slit them lengthwise halfway through and fit them on top.
we had poured concrete raised beds (2′ tall x 3′ wide x 16′ long – made from standard foundation forms) where we last lived – a lot of set up work, a lot of concrete, and – a lot of money but they are definitely permanent. i really like the appearance of the steel deck panels – what size are your beds? google is supposed to be my friend – so, where did you buy your panels – that would give me, and others an idea how to search for local sources? thank you for an informative ongoing source for encouraging others to become more self-sufficient. I especially appreciate the fact that you are willing to report failures as well as successes.
Wow–I bet concrete would be a lot of work– but definitely long-lasting. You can find the all the dimensions and info on where we bought the panels in the post 🙂
You probably know this but you can also use cover crops in your raised beds as well to add to the soil’s health. Some will help combat soil pests and some diseases if you have any problems (example: mustard tilled in when it has begun to flower). The beds look really cool and I admire you for your persistence and perseverance!
Yes, I’ve looked at cover crop ideas– just haven’t tried it yet!
I have used cover crops in my raised beds with success. One thing about putting soil (rather than a planting mix) in our beds was that the soil eventually compacted into really hard stuff. Our soil is more like river bottom soil, which may be different than yours. The downside of planting mix is it takes a couple years to get it to the texture and fertility I like, but with our home grown compost and cover crops over the winter that went well. I also did a deep mulch on some of the raised beds, just not as deep as on the ground.
We have two areas of deep mulched soil, the rest in raised beds. We have successfully raised corn in the raised beds, so I think it’s a good way to go. In all our plantings in the beds, you can grow things closer than the usual row plantings. Rotating crops is easier that way too.
Never thought about using metal panels for the beds… I think we may try that next season on the beds that need replacement boards. One thing we did was to let the paths between beds stay grassy, rather than wood or bark chips. The downside is having to keep them mowed. If we were to do it over, I think we would dig down to make the pathways lower than the beds and fill with bark chips. Easier to pull out the weeds and grass that way.
Enjoy those raised beds! It makes gardening a lot easier ?
Hm, the question mark was supposed to be a smiley
Hi Jill 🙂
I am from Montana and I have a friend who uses buckwheat for a cover crop and it appeared to grow well. Not too mention you can also eat it 🙂
We had problems with tree roots growing up into our beds, so we’ve gotten several of them redone by placing old tin on concrete blocks for the bottoms. Still use the wooden sides, but some of them are needing replacing. It has been a blessing to have the raised beds and fresh lettuce and kale. They are not real pretty to look at. I do have covered hoops on them. The regular garden has been damaged by all the recent rains and part of our dirt has washed out.
Appreciate all the helpful information from you and in all the comments.
That sounds like a smart idea Carol!
Hi Jill,
Your raised beds are so good looking, it almost seems a shame to plant something in them. I’ll bet the Prairie Husband could dado some hardwood stock for edge protection, if you are worried about cuts.
Here in Vermont we are blessed with hemlock trees. Full 2 inch by 12 inch boards are about the same cost as PT lumber, which dimensions smaller due to planing. The new ACQ treatment doesn’t add a lot of rot resistance to the wood, anyway.
No-till gardening by layering compost goes back decades to a woman named Ruth Stout (I think) who got tired of waiting for a lazy guy with a plow to show up and till her garden. The rest, as they say, was history.
Those beds look beautiful, Jill. I have loved following all your gardening adventures through the years. I have had raised beds for a few years now (in Southern California), built of redwood. So far, they are holding up. And yes, original set up was expensive. Last winter, I planted a cover crop for the first time, getting my tips from the couple who blog at Old World Garden. This spring, after turning the cover crop into the soil, I planted my seeds and seedlings, and all appears to be growing beautifully thus far…keeping my fingers crossed! And I have used the square foot gardening method for a few years now. The maximizing of planting works well for me. Looking forward to your gardening progression.
That is awesome! I have always been interested in the Square Foot method– glad it works for you!
I have cinder block raised beds. Three blocks high, so I don’t have to bend to far or get on my knees. I am a backyard gardener. I plan on video taping the whole process this next fall when we plant. We live in the Phoenix, AZ. area so it is hard to grow in the summer.
Love yal’L’s raised beds Jill! We live in central Texas, VERY HOT! We have 8 raised beds out of various materials. We started 4 yrs ago with plain wood, those have to be replaced now. A few out of post, and lastly my garden cave man used cinder block! That’s the material he really likes best, will last eons, he builds them high enough for me to sit on, and they don’t look half bad! Best to you guys!
Do you just stack the blocks or do you mortar them in?
Hi there. I’ve come to a similar conclusion regarding construction of raised beds using metal rather than wood. Your idea of using a thicker panel sounds really good. If its worth doing, then its worth over doing. Right? I’m about to start calling around for a source of a thicker panel. Do you happen to know hte thickness of those that you used. The panels at Home Depot are .015 and pretty flimsy.
I absolutely love the idea of raised beds. Unfortunately where we live in Florida it is often dry and hot. Raised beds heat up your soil and help it drain, two things we definitely don’t want. I think people should think about their climate first before jumping on the raised bed wagon. Just my 2 cents! 🙂
I’m up in the Florida panhandle and I’m about to experiment with a 4X4′ raised bed made with cinder blocks and lined with the metal panels (to help with moisture retention, since the blocks are porous–although moist blocks will keep the bed cooler. Maybe I should try it both ways.) If you’ll comment on this comment in a month or so, I can let you know how it’s working.
Idk we are in North FL and raised beds always have worked beautifully for us over the years. Though I’ve never grown any other way, so I guess I can’t compare it to any other method. You do need to monitor water for sure, but not nearly as bad as say a container method. Also shade cloth really does help with both pests and scorching!
We’re attempting to do some black plastic over the soil this season to help with moisture retainment and weeds / nutrients. A little nervous I’m just going to cook my veggies but fingers crossed!!!
There are other colors than black plastic. Check out some of the seed catalogs for it.
I am doing raised beds because my lawn has so much nut grass in it. Not sure if this will really work for that though. I laid newspaper down first, then compost. When the plants get a little growth I will put down wood chip. I am wondering about planting directly into straight compost. I have looked all over the internet and many people say it is fine and they do it and it comes out great. Then there are those who say not to do it because it will burn your plants. I have already planted in it and somethings are growing and some things are not. Some things have turned yellow and are growing very slowly.
In northern California (2600 ft elevation in the Sierra) I’ve made raised beds with old decking lumber (stacked 2 x 6), 4 x 8 x 16 cinder blocks, and old redwood 2 x 12. I follow the Mittleider method, so those boxes are filled with 75/25 % mix of sawdust and sand, and I fertilize about every 10 days or so. I’ve built sturdy structures above them, and use 170-weight polyethylene baling twine to grow vertically. The twine doesn’t strangle stems, and lasts forever. We have a problem with gophers, so I laid 1/2 inch hardware ‘cloth’ on the bottom before construction, then cardboard, then the sawdust and sand. We get all the sawdust we want for free from a local lumber/logging company, and the coarse sand is inexpensive and permanent. I have made my irrigation from 3/4 inch sched. 40 PVC pipe, drilled with #57 bit, every 4 inches, and set about 2-3 inches above the sawdust. I water for 2 minutes every morning (timer), and the sawdust holds the moisture quite well. Having a Mediterranean climate, our gardening season gets no rain whatsoever. We’ve had great results using this method; the sawdust does eventually break down to be more ‘soil-like’, and my fertilizer mix has lasted 3 years from one 25 lb bag, with one 4’x8′ bed, two 20’x3′ beds, and one 28’x 18″ bed. Look into it; they have good ideas. Is it building great soil through composting, cover crops, etc.? No, but covering our heavy red clay with free wood chips has cut down on weeds, added organic matter, and prevented compaction, thereby building soil for future non-raised beds.
You could get metal stays used for pipe and screw them two, one above the other a few pairs down each side. Get pvc pipe that fits those stays. Aim for 1/2″ maybe and long enough to go through a pair on one side to a pair on the other to create a “wagon” hoop above the bed and do that for the other pairs. Use a breathable fabric or plastic to pull over the hoops to create a frost protector or shade. Not sure what to use for securing it to the metal. Maybe high powered magnets sewn into the fabric/plastic and letting them attach to the metal.
Your beds look amazing!! Also, I am jealous of your drip system.
About 15 years ago we build raised beds out of cedar…spent the money. Now there is very little of that wood left…time has done its thing. They are now slightly raised/domed beds with no frame. I make my own compost out of kitchen scraps, garden pullings, seedless weeds and amend my soil with that. Because in NY we have nasty little voles that like to suck plants down into holes, I’ve had to forego the heavy mulch as they just love it. I set up a low hoop house/cold frame (think small) and the voles thought they were vacationing in the tropics while they dined on my greens.
Amend your soil with a couple of inches of well composted manure from your cows. My garden is mostly weed free. The cardinal rule is NEVER EVER let a weed go to seed. The only time I’ve had too many weeds is when I used composted horse manure so I avoid that.
Love your steel framed beds. In time they might acquire a nice rusted steel patina but they look great either way. I was thinking I should do those until I saw the price tag and all the compost I would have to add to fill them up…but great idea. If I had bad soil, I would go that route but time, leaf mulch, blood meal/bone meal, earthworms has gifted me with pretty good soil.
Enjoy your adventure.
These look very nice, however, as in the post from Texas, for us folks here in Northern CA the metal would absorb too much heat from the unrelenting sun (although I love summer, the plants cooking in a metal lined bed would not appreciate it much). I also wanted to point out that we have a gofer issue and therefore line the bottom of our raised redwood beds with heavy duty hardware cloth which is stapled onto the bottom of the redwood boards. If one were to build one of your neat-looking metal beds then an additional board would most likely be needed at the bottom of the bed in order to attach this hardware cloth. Do you have another way of attaching the hardware cloth to your metal beds?
Did you ever come up with a solution? We have metal beds and are trying to decide if we need to attach them or bend them to fit inside, or just leave them underneath the bed extending out beyond the beds by 4 inches on each side.
I’d say whichever way will be most flush and unable for a gopher to get in/through. I just used 4 layers of landscape cloth and it’s holding up so far for the past 6 years, but I’ve heard they will chew through it if there’s something good on the other side!
Enjoyed this post as we are about to do some raised bed building in our backyard for this year’s garden. Wish us luck!!
Your raised beds look awesome! We’ve had raised garden beds for several years and I love them! We built ours out of treated lumber and before filling them with soil, we lined the beds with thick black plastic, bottom and sides, in hopes that would help with the leaching problem. They are 4 ft x 12 ft and 18 in high. When my husband built them he also put a 4 x 6 along the top of the rails so I could kneel or sit and work on the beds. The first couple of years we put wood chip mulch on the paths around the beds but I found that when I would till the dirt in the beds some of it would fly out and eventually there would be lots of dirt in the wood chips and over the years it got pretty messy when wet. Last year I raked up all the wood mulch, laid down a layer of newspaper and tossed straw on top of that. It worked pretty well as far as few weeds and a nice area for walking. If it needed refreshing, I just threw a little more straw where needed. It’s extra work to rake up the straw and newspaper each year and put down new but I end up with nice material for my compost pile and it’s a lot cheaper than buying wood mulch every year or so.
You can also cushion the metal edges with pool noodles.
I must be blind as I have read this article numerous times and still cannot find the link for steel panels! Can anyone direct me??? Thank you!!
Jill didn’t put a link in for the steel panels; she wrote, “each panel was $150 and we purchased them from a neighbor who uses them to build livestock wind breaks. They are not available at normal places like Lowes or Home Depot, so if you’re looking for them, I’d check steel suppliers or building companies.” She didn’t give the dimensions of each steel panel, but said one panel would build 1.5 beds (of 4′ x 10′ x 18″). I’d like to know the dimensions, so I could plan on getting the most out of 1 panel. Jill?
I live in Phoenix…I love how your beds look but wonder about the heat on the metal. It would probably cook everything or I should say score!! I was wondering how to test your soil, where you take it. My son just worked with a lot of wood chips and ended up getting Farmers Lung…it’s been really bad! Love reading all your great post!!
Jill,
Can you tell me what the gauge on the steel decking is?
Spring is a coming!!
😉
Kaye
I have had raised beds with wooden frames in the past and agree they should be made of the best material you can use. We had to take them down this past fall to make room for a new building on our property so will be building new raised beds this year. They will be made of metal and thinking of adding wheels (so they will be more like long containers). We have a smaller lot and this will let us to move the beds around. That will save space and allow easier shade adjustments. Thanks for your great article!
I loved my raised beds, but moved last year and have to start over with the garden. The best beds I used were made out of recycled milk bottles, (OrcaBoard) but the company went out of business. They looked as good the day I moved as they had about 10 years earlier when I installed them.
I also had cedar, sealed, and they were rotting where they were under the pebbles I had in the paths within 5 or so years after installing.
I would be concerned about the heat, as others have mentioned. On the plus side, the stones I had in the paths of my raised beds protected my garden from late or early frosts, so the metal might provide that benefit in the spring and fall.
I’d also be concerned about the sharp corners, particularly. I’d put wood on the outside corners just to protect from getting injured on the sharp metal on the edges.
I would also be concerned about how close the beds are. It isn’t a big problem if you are planting onions or carrots or something that stays in the bed. It will be a problem if they are planted with sweet potatoes, non-determinate tomatoes or melons etc. (and I grew up as much as possible!) My previous garden had the beds 2.5′-3′ apart, and my next one will be mostly 4′ between beds. It is no fun trying to get into the walkways when they are covered with vines/produce.
Good luck with it. I loved my garden and look forward to building better this time.
I have used raised beds for years at 4500′ in AZ. I use this methodhttp://www.latimes.com/style/la-hm-nodig12-2008jun12-story.html and haven’t had any issues, but I’m sure non chemically treated hay and straw are becoming scarce. My only suggestion is more room between raised beds if you’ll be growing squash and pumpkin. Using the above method they grow like crazy and I can hardly walk between the beds. Love the panels. An FYI for those building from 2x12s is to use lag bolts instead of screws to attach the untreated lumber to the 4x4s. If I did raised beds again, I’d go 24” high with either the 2x12s or with cinder blocks, or use your panel method. If the funds were there, I’d even go 36″ high then I could just sit on a stool and garden.???
I like your raised beds a lot. Just a little envious of the beds and a prairie (get her done) husband! I have gardened in raised beds for about 12 years in NW Florida Zone 8 – hot and humid springs and summers. I mulch with pine straw and sometimes wood chips to conserve moisture from heat evaporation and to cut down on weeds. I agree with other reviewers that fertilizing is even more important in raised beds. I generally use Epsoma Garden-tone and Tomato-tone. I have tried many other fertilizers over the years, but get the best results with Epsoma. Another benefit of Epsoma is that it is hard to over-fertilize with it, which was a problem for me. I usually over-fertilized and burnt my plants or under-fertilized because I was afraid of my tendency to over-fertilizer. Either way, I had poorer harvests. No such worries with Epsoma!
I also have a question regarding the gauge steel the metal panels are? Please provide that information if you know it.
thank you,
Dotti Terhune
In Santa Barbara I used non-bordered deep beds, 5′ by 20′. Full disclosure, I had, literally, fourteen-foot-deep topsoil, goat and chicken and rabbit manures…All gardeners in lesser places may stop drooling at any time…I found that even with strict non-stepping, compaction occurred over time. Now I “garden’ just two beds in my apartment complex in Davis, Ca. All subsoil, heavy clay, otherwise known as “concrete”. I just spent a couple of hundred dollars on one of Meadow Creature’s Broadforks. 14″ of aeration, with some serious work. I plan to have a homestead again, or I wouldn’t have spent the $ but the broadfork looks like the perfect deep bed re-aeration and compost-inclusion tool. I border three hundred pounds and most of that is still muscle, so consider, ladies, their shorter version.
You can find a panel at McCoys(here in Texas) that is used for bulkheads. They are very thick metal. Brother in law built a couple with scraps he got from a friend who does bulkheads and added 2×12 along top as a bench. They look good and will last for centuries. Veggies grow well with crop rotation and adding compost.
Would you be so kind as to share a link or resource on how Prairie Husband installed to drip system? Thanks!
Try winter sowing.
http://georgeweigel.net/favorite-past-garden-columns/winter-sowing-seeds
I saw your raised beds last year. We have an 18 bed community garden in our town. The wood for the raised beds is 8 years old and needs replaced. Would love to try yours. Are the edges safe?
Could you please supply a little more detail about the original steel panel: width, length, gauge of steel and profile.
I am guessing 4.5′ x 14′ to get 1.5 beds, but that is with no waste.
This will help me locate the same panel you used. Thanks!!!!
Curious what gauge the steel panels were? I’m contemplating using this method for a raised bed but I don’t want my sides bowing out under the pressure of the soil….
I have read through I believe all the comments and I haven’t found what we use for raised beds so here goes nothing. We use old refrigerators and freezers, I believe it’s the cheapest way to go and we have great success so far. We haven’t tried corn or potatoes but I think potatoes would do just fine. I have movies I have shared on FB of my raised beds. We have a system to get them ready that really isn’t that hard or expensive. If anyone wants to find out how we get the freezers and refrigerators ready just ask me and I will be heavy to share how we do it. We also have a raised bed out of blocks and two out of wood. I still like the refrigerators and freezers best. There up high enough where we don’t have to bend.
Glad you specified that you used STEEL for your raised beds, because it really looks like galvanized. I recently read an article that stated that galvanized leaches bad chemicals into one’s garden (was looking at planting something in a galvanized tub). Also found out that hammering a galvanized nail into a tree (to mount a birdhouse, sun-catcher, etc) will kill the tree!
I’ve been really thinking about hay/mulch gardening … what happened? I thought that was working … sounds good … maybe too good to be true????
Hello, I’m a little late to the party. . . I’m a neighbor, I live in Montana. . . Howdy :).
I found you on IG thru Lisa at Farmhouseonboone. . . shes a doll. . .
Anyway, about your raised beds. . . have you ever heard of soybean meal? And the benefits of it? There is a lot on the web if you want to read up on it, but in a nutshell. . . the microbes that live in soil (worms too) LOVE soybean meal. And it’s those critters that make the soil so rich and full of goodness. I but it at the feed store, its about 12 dollars for a 55# bag and a little goes a long way. (1 # per 2000 sq ft, I think). You CANNOT over do it. . . (so no epic garden fail to be feared)if you spread to heavy, it will stink while it decomposes, but thats not a bad thing, and again good for the soil. You don’t have to mix it in, just sprinkle it in your beds and work it in with your hands. I use it on my lawn, flowers/trees and veggie beds. I would guess in raised beds you would only have to do it spring and late summer, I do it monthly as I don’t have raised beds.
I hope you see this comment, and if you do, and have any questions, just ask away. . . 🙂
I am addicted to your blog. . . It’s like a really good book.
Simply, Debi
Realsimplestyle on IG.
http://real-simple-style.com/
I’ve been trying to sign up to have your Raised Bed Guide emailed to me for weeks, but for some reason I’m not receiving it. It’s not in my spam folder, either. Is there a way I could get this?
We have wooden raised beds for our organic gardens, but like your idea of using galvanized roofing panels – lighter weight, longer lasting. Great idea!
One thing we would change, is putting the wooden posts on the outside of the bed rather than on the inside. For wooden raised beds, we found that the posts rot much faster when inside the bed. We do not use pressure treated wood since we do not want that in contact with the food we are growing. On our website, you can see how we put the posts on the outside of the bed. Doing this, they do not rot. https://www.ctgrapes.org/vegetables.html
Cedar will rot if made of the sapwood. If made of heartwood, it will not rot. Much of the cedar lumber I see is made of sapwood or sapwood with some heartwood, so it will not last that long in contact with soil.
My other concern is Lead is used in Zinc baths during galvanization, resulting a 0.5 to 2% lead content of the zinc coating. I have seen a lot of opinions on this but no data. Most discuss leaching of zinc. But few discuss leaching of lead and cadmium. I am searching for data that give a definite answer to this?
If safe, galvanized roof panels are a great, light weight, long lasting, alternative to non-pressurized wood which rots quickly. However, if they introduce toxic levels of lead and cadmium into the produce, it could cause brain damage.
I have seen a lot of “opinions” on this but no data. I am searching for data that give a definite answer to this.
Article clearly says steel panels which may rust over time. Don’t use galvanized…
Do you know what gauge the steel is?
One place I looked at has 28 gauge which was obviously too thin…I can get 22 gauge but have to order it and gave no way of knowing if it’ll be “right”. Can you help out by letting me know what you used
Hi Jill, Im curious if you have problems with ants in your garden beds? I replaced wooden beds with metal beds this past fall. This year I am over ran with huge ant nests. Ive never had a problem until now. If so how do you get rid of them? Ive tried Borax, BT, vinegar. No luck so far. And they are full of eggs too. Help?
You could try sprinkling d Diatomaceous earth or peppermint oil to either kill or dissuade, ants respectively. To kill the queen and next we use Terro from the hardware store.
We’re in Colorado just outside of Denver, and with our sloping backyard and clay soil, we went with raised beds a few years ago. We didn’t want to use any type of wood since all woods will eventually rot over time and have to be replaced — hubby is in construction also and only builds things once! 😉 Treated lumber was a no-no for obvious reasons (and even it will eventually rot anyway), so we went with composite decking. We found dinged and damaged pieces at Lowe’s and Home Depot that were highly discounted, and we used 2×2 posts out of the same composite material so that nothing in the beds used a material that would rot over time. We lined the bottoms and sides of each bed box with weed barrier fabric to keep the soil from leaking out between the boards but still allow drainage. Since our soil is so bad we went to our local nursery that carries a raised bed mix and added some extra compost to it. Each bed is roughly 50 sq. feet. We have a tiny yard and put the beds in different areas of the yard near the fence or shed so that we could build pvc frames for hail netting and be able to anchor the frame to something. (We get pretty nasty hailstorms here along the Front Range, so hail netting is a must for us.)
I watched the video and read a bunch of comments, but didn’t see this question: How far apart did you put your beds (end to end AND the sides) and why did you choose that distance? Are you happy with it or would you place them differently if you did it again?
Our experience suggests 3-4′ between all beds so that there is room to get a wheelbarrow, or bend over, etc.
Has anyone actually found the type of metal of metal Jill uses? I’ve been looking for a couple of years now and have had no luck locating any.
Why not use plastic
BINDWEED: On the Azure Standard website, they mention spraying bindweed with BORON and having great success.