I’m really good at messing things up.
Lest you think the Prairie Homestead girl has it all together and things always run smoothly, let me be the first to assure you, they most certainly do not.
I’ve had more than my share of flops over the last six years of homesteading, including horrendously awful dehydrated eggs, a hugelkultur bed that refused to grow anything the first year (not even weeds), goats that annihilated my very expensive trees (multiple times), and the list goes on… And on…
But last year, I happened upon something that actually worked. And it worked darn well.
For those of you who’ve been following me for a while, you’ve heard me singing the praises of the deep mulch gardening method. I stumbled upon it last year and nervously decided to take the plunge. I had nothing to lose, considering my garden was completely overtaken by massive amounts of weeds, and I was getting ready to throw up my hands and add gardening to my list of massive FAILS anyway.
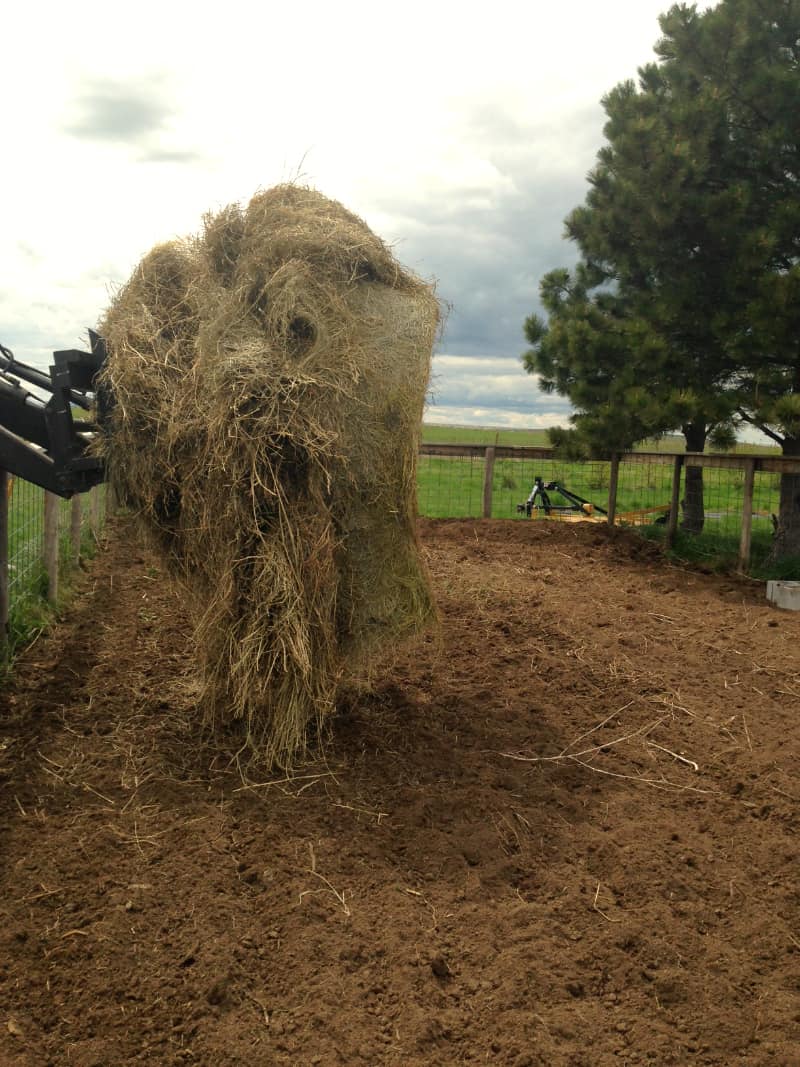
So I tossed some hay (Ok… not some… it was actually a LOT of hay) on the garden, held my breath, said a prayer, and waited to see what happened.
You can see my fantastic results in this post, but needless to say, I was hooked.
After last year’s amazing harvest, I was dead-set on repeating the method again this year. So I covered my garden with a fresh layer of hay last fall, and began to scheme for this year’s growing season.

And then the doubts started creeping in…
“So now that you’ve told the whole world how much you like the method, what if it doesn’t work in subsequent years?”
“What if the ground is as hard as a rock next year?”
“What if year #2 is a total flop and you have to scrape off allllll that hay and start over?”
Oh boy… what did I get myself into?
I nervously waited for planting time and hoped and prayed I hadn’t led you all astray.
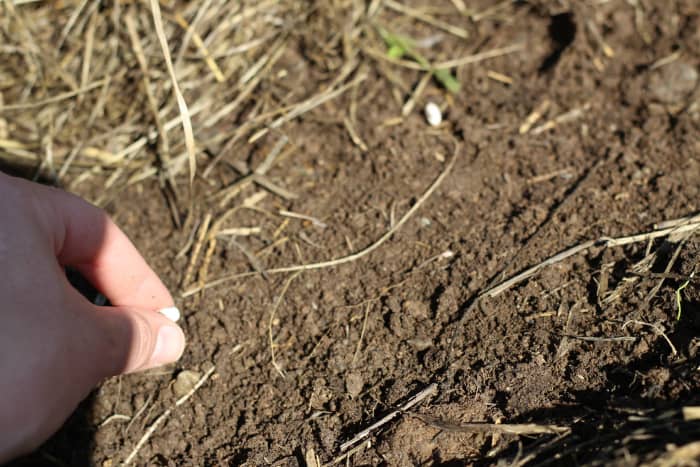
After our monsoon rains finally stopped, I dutifully grabbed my bucket of seeds, threw the pitchfork over my shoulder, and headed out to the garden.
I pulled the hay aside, took a deep breath, closed my eyes, and plunged my pitchfork into the earth…
*gulp*
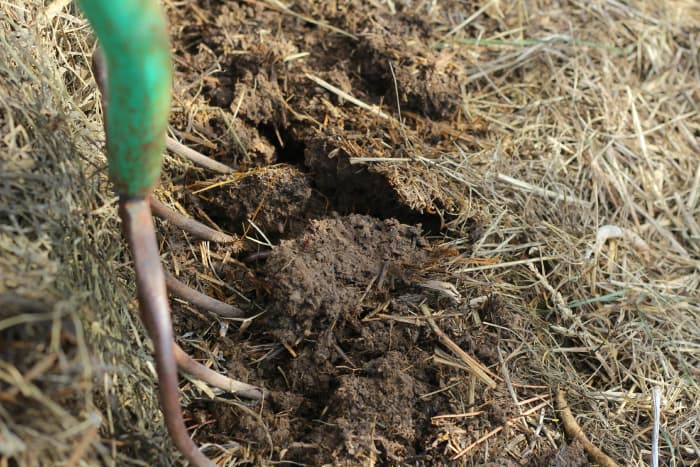
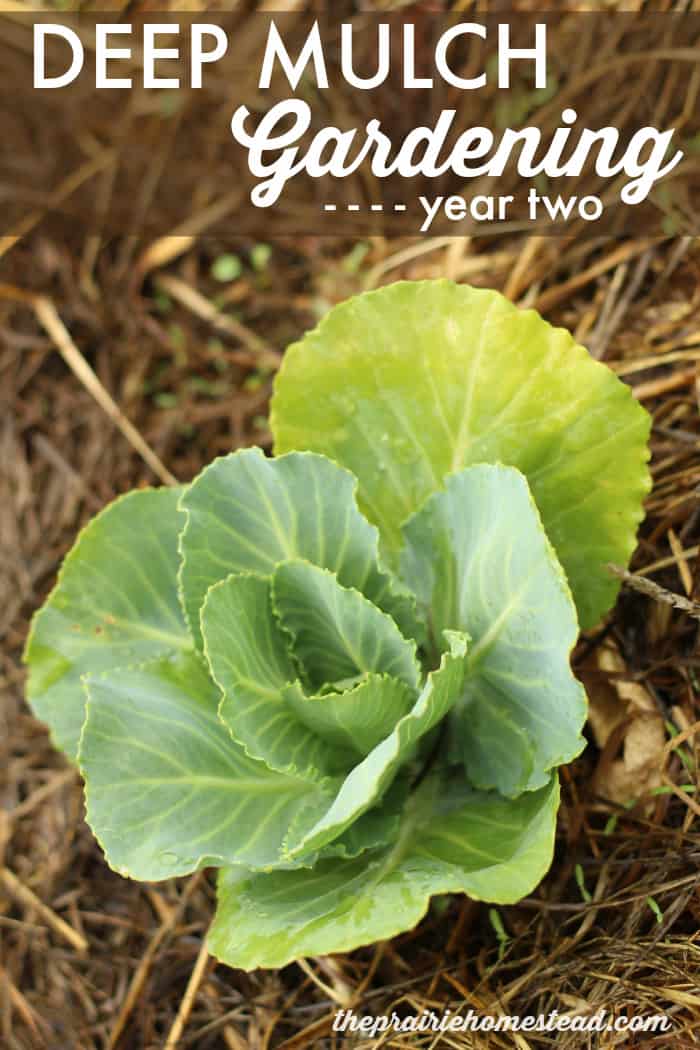
When I finally raised one eyelid, I stood there with a gaping mouth.
On the end of my pitchfork was the richest, moistest, most worm-filled dirt I had ever seen.
Hallelujah!

After I did a small happy dance, I proceed to plant every bit of my garden, without a rototiller in sight.
When I posted a pic of the soil on my Instagram account, I got lots of questions, so here are all the down-and-dirty details about round two of my deep mulch garden adventure—>
**IMPORTANT: If you are planning on using deep mulch, please make sure you are ONLY using hay or straw that has NOT been sprayed with herbicides of any kind! Read my sad story about herbicide contamination here.**
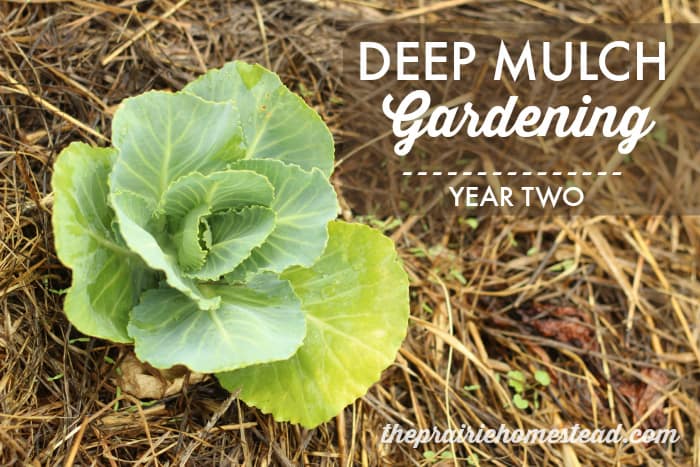
Deep Mulch Gardening: Round Two
My biggest fear I faced was the ground becoming rock-hard after winter’s worth of weather, winds, and snow.
Last fall, I had made sure to cover every square inch of the garden plot with a generous layer of mulch, but I had no idea what it would look like when I uncovered it this year.
In my previous traditional gardening efforts, by the time planting rolled around each spring, the exposed ground would be dry, crusty, and hard, with a complete carpet of weeds covering the whole thing.
Task #1 was always to drag out the rototiller, work the soil, and plant as fast as I could before the weeds start coming back.
This year?
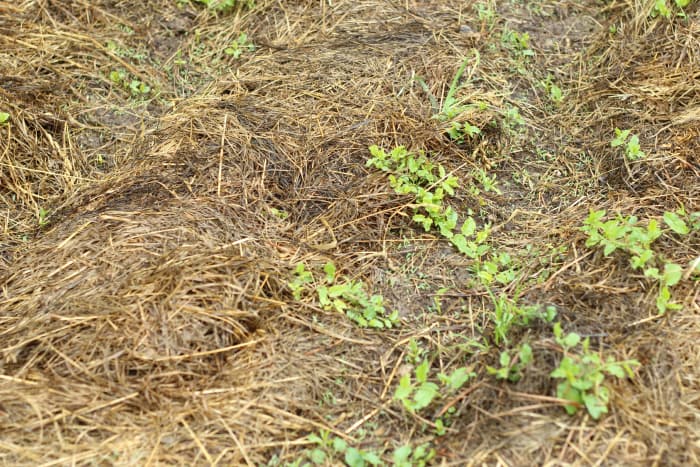
I had a few stubborn weeds popping up through the hay mulch as I waited for planting season to arrive, mostly wear I had allowed the mulch layer to become too thin, but that’s it.
And as I mentioned above, the traditionally dry, crusty soil was instead, moist, dark, and rich.
However, the most shocking part to me was the sheer number of worms I found as I dug. We’ve had *some* worms in the past, but this year, nearly every single time I dug into the earth I would pull up at least one worm. It ‘s crazy, I tell ya. Crazy!
How I Planted This Year
This year’s planting efforts closely mirrored what I did last year:

1. First, I pulled back the hay to form rows where I wanted them
2. While the soil was still very moist and soft, thanks to the mulch, I still stuck my pitchfork into the soil and turned it/shook it a bit– just to prepare it a bit for the seeds. It took me about three minutes to work an entire row with my pitchfork, and it was far from back-breaking. 🙂
3. I planted the seeds in the soil. (I used my hand to break up any big clumps I found, and to smooth the surface out a bit, as needed). As the seedlings come up, I will pull the mulch around them.
Did I mention I didn’t need my rototiller for the first time in six years?! I want to scream it from the roof tops. I want to throw a rototiller-retirement party. My goal of a no-till garden is finally becoming reality!
Daily Tasks in the Deep Mulch Garden:
I only spend a few minutes each day in my garden (mostly admiring my work, *ahem*). But here are a few things I check on a regular basis:
1. I check to make sure the mulch hasn’t blown/moved across the rows. This happens infrequently (which is surprising, considering the violent thunderstorms we’ve had), but you want to make sure the hay isn’t snuffing out any emerging seedlings.
2. I adjust the mulch or add more mulch to any area that seems sparse. Last year’s mulch is still going pretty strong, however, I added around two extra small square bales to this year’s garden, just to fill in some gaps.
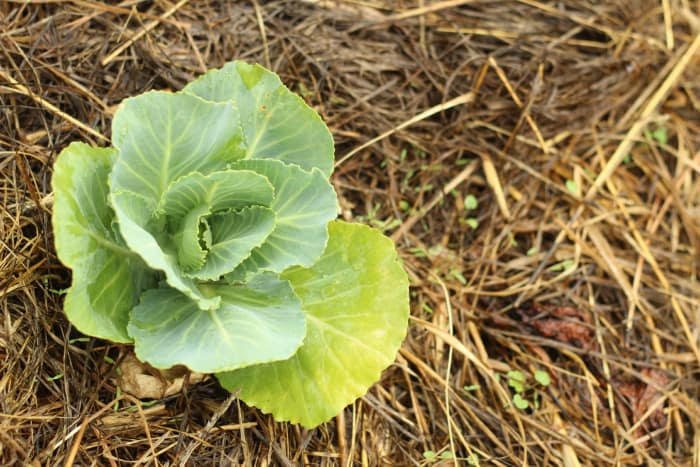
The above photo shows some of my sparse spots with the weeds that did pop up. It’s still pretty impressive, considering in the past I would have had a complete carpet of weeds by this time with my previous method. These are the areas I covered with fresh hay.
3. I water as needed, and pick/cover any weeds that are trying to pop up. The most “intense” period of weeding is while I’m waiting for the seedlings to emerge. During this time, I weed along the rows and between the new seedlings. However, once the plants get a bit bigger, I will pull the mulch around the plant, which reduces the weeding even further.
My Results so Far?
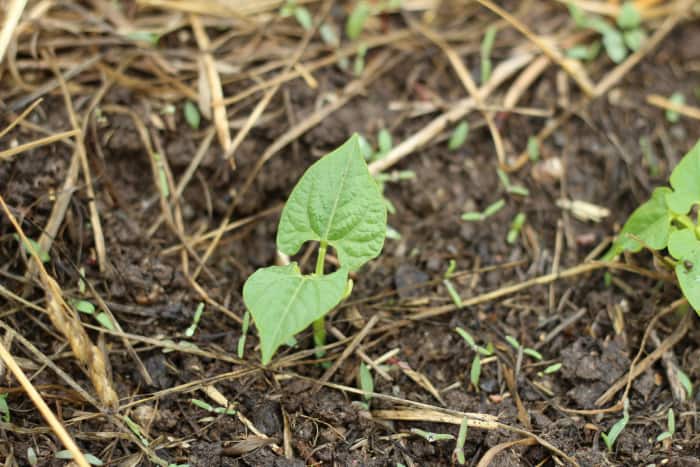
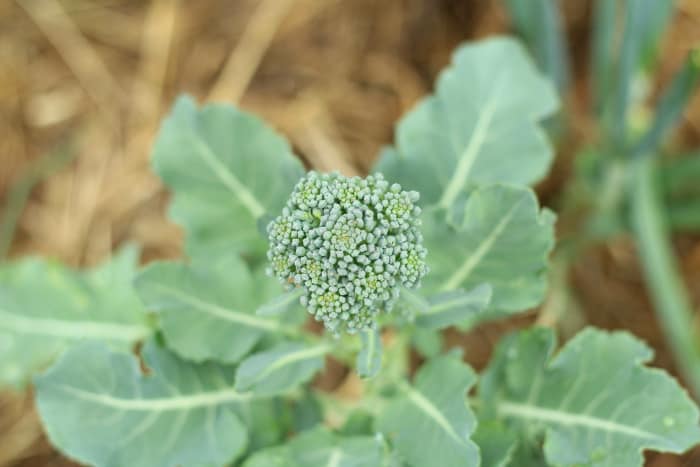
We’re cruising right along! It’s still early in the game, but so far, so good. My pumpkins, lettuce, kale, and beans are sprouting (we were late to planting this year, thanks to one of the rainiest springs on record…), the onion sets, cabbages, tomatoes, and broccoli I transplanted have all happily taken to their new homes, and everything else is right on track.
I’ll keep ya updated as the season progresses, but at least for now, I’m happy to report that my deep mulch gardening efforts appear to remain a success.
Wanna Dig Into More Deep Mulch Garden Info?
Grab my deep mulching ebook explaining the whole process– start to finish– for FREE. I included a ton of pictures, FAQs, and my best tips, too—>


Congratulations! This is fantastic! I’ve tried hay mulch in the past, but the hay seeds in it gave me a weed crop. Maybe I didn’t have it thick enough. Love how your soul was so workable. Never thought of putting the hay on in the fall. I’ve been using old carpet for mulch, but I’ll be interested in trying this again in another spot. My big garden concern is to keep my tomatoes from getting blight. All mulch helps keep those leaves from touching the soil. May your garden be a huge success this year!
I use both hay and carpet. The carpet is especially good for veining crops like winter squash and pumpkins.
We do not have snow cover here during the winter but lots of rain. The rain passes through the carpet and hay and the worms work the soil all winter. The carpet keeps any seed in the hay from germinating during the mild winter weather.
I love this! We are seriously struggling with our first ever garden. This gives me a few ideas, and some hope that next year might be better. Thanks for sharing the success along with the failures 😉
Thanks for sharing! I am sold on the idea. Did you bury your seeds with dirt first, or did you just cover with hay? My garden is over run by weeds and you have given me the idea to just go throw in a bunch of hay between rows.
Yes, I buried the seeds in the dirt as usual. You can definitely put some hay between your rows, just make sure you use plenty– otherwise the weeds will still pop through and you’ll have a mess. 🙂
YES! This method is awesome!! This is my first year, but I followed Jill’s instructions to a T and I am LOVING it!! I had said heart palpitations as we spread 2.5 round bales over our garden this spring. My husband kept questioning my decision…which made me sweat even more, but it is truly working so well.
We have had loads of rain, which I am sure would have resulted in a flooded out garden, but not this year.
I can enjoying playing in the garden with my son and pick a few stray weeds here and there verses spending EVERY nap time weeding away. As a bonus, my garden looks so beautiful with the plants tucked into the hay.
I also really LOVE the fact that there is no bare dirt-that just goes against our pasture-based farming methods.
Thanks for sharing Jill!
Wahoo! SO happy it’s working for you Ashley!! And yes– my husband was definitely skeptical at first, which unnerved me a bit too. But he’s changed his tune now. 😉
I have done this for a few years. If you are starting with grass or a weed filled plot, you put down cardboard first, then layer with straw. It kills everything and rots it into some nice worm-filled soil! Where we are the weeds are so crazy. I have to weed my rock garden (weed cloth and 6 inches of river rock!) every week. Dandelions, plantain and those aggressive vines poke through but I go through and weed them out every so often. This year I put in trellises to save space. Growing indeterminate tomatoes, cantaloupe, small watermelon, squash, cucumbers and vining zucchini on them. With all the rain (hot, then cold weather) we’ve been slow to start, but hopefully things will pick up! Now if only I could do something about those bunnies and squash borers….
We’ve been slow to start here too– has been a cold, rainy spring. I am working on a solution to the bunnies– stay tuned!
We live in the city so we don’t have nearly as many rabbits as some of you probably, but we found that if we planted hot peppers as a bordern and spaced periodically throughout the garden the rabbits stay away. Our neighbor had a family of wild rabbits every year and the only time we had issues with them were when we planted the peppers by themselves. We plant way more peppers than we use just to keep them away. Maybe im crazy but it has worked for us. I also read to put aluminum foil around the base of your squash plants and the borers cant get in. I was skeptical and scared of using it but so far my plants are borer free. I have seen one borer and wasn’t able to kill it, so im pretty happy so far. We have had more zucchini in the last week than we did all season last year. Hope it helps someone else too. 🙂
A good cat works too, but really sad when you walk out to dead baby bunnies on your front porch.
Good tips Christina! Will have to try the pepper idea. 🙂
Looks great! Love learning from your adventures!
Was wondering about doing this in a hot, humid climate. I live south of Houston, and I’m not sure if the hay would develop mold that would harm the plants.
Also, are you using hay or straw? I’m trying to find round bales of straw, but it’s impossible where I live. I’m worried the Bermuda grass hay would just reseed and then I’d lose my garden all together!
I don’t have any experience gardening with humidity, so hard to say for sure about mold. However, I’ve never heard of that being an issue for others. I use hay– I don’t have issues with weeds as long as the layer is thick enough. (8-10 inches to start)
I also use this method and LOVE it! Ruth Stout was a great visionary for deep mulch style, her book is great, as is her “snarky” attitude. I am so grateful that you are bringing this style of gardening to the forefront. It is truly effortless and you still get the enjoyment of all of the fresh vegetables! I spend a lot of time in my garden “watching” the plants grow verses stressful weeding. I encourage ALL to convert!
I agree Cheryl! Isn’t watching so much more fun than weeding?! 🙂 I also love Ruth’s snarkiness.
Am now reading “The Ruth Stout No-Work Garden Book” and am loving it! Other good reads on deep-mulch gardening and the all-natural way of raising crops are “Sepp Holzer’s Permaculture” with GREAT photos and explanations, and “The One-Straw Revolution,” a tiny book by Masanobu Fukuoka of Japan (it’s in English!). Wonderful gardening pioneers all!
I’ll have to check those out for sure!
Are hay or straw interchangeable for this purpose or no ?
No. Wheat Straw dosen’t have the weed seeds Like hay dose. You can use hay but you’ll introduce a wide range of weeds into your garden. I’ve used both. Straw is much better!!
Yes– I’ve used both. I personally haven’t had issues with weed seeds in the hay, as long as my layer is thick enough.
Thanks for sharing. I have not used hay. Just straw, however I want to use tree mulch, as presented in the Back To Eden documentay. Glad it is working well for you. Looks great.
You might look for some books by Ruth Stout, the origninator, decades ago, of deep mulching and not tilling between years. She gardened into her late eighties or into her nineties.
Yes. 🙂 I have Ruth’s book and that is where I got this idea from. I mention her book heavily in my previous posts. 🙂
Do you have problems with mice? When I was researching about this method, I ran across several comments about mice burrowing under the hay and eating the roots and such – does this happen to you? Additionally, doesn’t the hay rob the soil of nitrogen to decompose? Do you give your garden extra nitrogen to offset this?
Ruth Stout sprinkled cottonseed meal over her seeds when she planted to add nitrogen. You can hear her tell about this on YouTube in a 22:57 minute video called Ruth Stout’s Garden. (It’s at minute 10:22 of the video.)
No mice problems so far. Which is interesting since we’ve had a BAD mice year in our house/shop/yard, but no mice damage in the garden that I can see.
My mulch is home to garter snakes which eat the mice. I do have moles which increase the cultivation of the soil during the winter but seam to prefer to move out into the field during the summer.
I was wondering if you have issues with attracting Voles or field mice to your garden when you leave hay in it over the winter? I also live in Wyoming and have the same issues with the dry, inorganic soil needing to be amended every year. So, I thought about trying your method but if I already have a Vole problem now wouldn’t this just make it worse?
Nope. No voles or mice so far. Which is interesting since we’ve had a BAD mice year in our house/shop/yard, but no mice damage in the garden that I can see.
Very interested in this method. One concern, however. What about snakes! I worry that my garden will be full of snakes that tunnel under the hay to cool off and there I am picking vegies with snakes literally underfoot! I live in northern Mississippi and we have snakes everywhere. Have you had that problem?
We have bull snakes and rattlers here, and I haven’t seen any more snakes than normal in our mulch, so far. 🙂
Jill,
I used Ruth Stout’s deep hay mulch method for one year, years ago and got snakes in my garden under the mulch and one was a big bull snake. This was the only year we had snakes in our garden. I am terribly (like petrified,) afraid of snakes and didn’t want to even go in the garden, so I quit hay mulching. I know people would say some snakes are beneficial to a garden since they eat bugs, but I’d rather have bugs, at least I can get rid of them with organic spray. Now I’m starting to deep mulch hay again this year since my husband has arthritis real bad and can’t rototill. Do you (or anyone) have a solution that really works to keep the snakes away completely that would be safe for my organic garden?
This sounds like a great idea…but my biggest problem would be my chickens! Any place I put down straw (like covering my garlic, strawberries and asparagus for the winter), they see it as a direct invitation to come and scratch, looking for all the lovely worms! (Yes, the chickens are fenced, but they don’t always stay where they belong…)
I have seen the Ruth Stout video and would like to give this a try. My garden has great soil already, but I like the idea of not weeding and just admiring (mostly).
Congratulations on your success with this!
I have the same problem, but the Snow Fence (orange plastic fencing) supported by step-in posts around the garden keeps the chickens out.
YES– you definitely have to fence out the chickens… they make a mess of the mulch!
I am loving the looks of this.. but it appears your first year , you still cleared the garden area completely of weeds. Such a job, we can no longer run our roto-tiller… too hard on us oldies for the back, etc. Wondering if it would help alleviate some of the weeds if we just THICK mulched over the ground (weeds included) what do you think? Also, wondering why your choice of hay versus straw? If you check , there are a lot more “seeds” in hay than there is in straw. That’s why there is straw bale gardening, not hay gardening.. Just wondering if there was a reason for that as mulch over the straw. Thanks
I have been playing around with this and using chipped wood for the last five years. If you have a lot of weeds, cut them to the ground, use boxes to kill the weeds then deep mulch. I also live in Wyoming – Rock Springs – my dirt is just gravel. Sheep sorrel, grass, and thistle haveno problem growing but nothing else. A layer of boxes then a layer of mulch will kill most any weed. We have a recycle center where I can usually find moving boxes which are large and easy to use. After a winter it truly amazed me how different the soil was under the boxes and mulch. To border my garden I also tried using the straw bail gardening technique. Mostly to keep my dogs out of the garden. It is working well with the exception of some funky growth from some cheep potting soil. Looking forward to spreading the straw around this fall as compost.
Here is another idea I have heard of, you can spread a layer of clear plastic over the weedy area for a sunny day or so. Not too long because you don’t want it to become so hot it kills the good biology int he soil. the heat will kill annual weeds and then you can cover with the mulch – cardboard first if you like. I like throwing some manure on first before I put the mulch down. The annual weeds break down. The solarization will kill the foliage of the perennial weeds and hopefully the deep mulch will be enough to keep them from sprouting if they think they are buried.
Yes– we rototilled one last time last year because our garden had so much grass/weeds it was literally like a layer of sod. If your weeds are that thick and mature, it might not work to just keep mulch over it. I have seen some other methods that put down a layer of cardboard first, though.
I use hay b/c it is more readily available for me. I have to hunt to find straw. I don’t have weed seed problems as long as my layer is thick enough.
My weeds came through the mulch last year. I didnt get the mulch down before they started growing and I was hoping the same thing but they just kept growing. I didn’t want to use cardboard as I’m really scared of spiders and was scared they would get under there. Needless to say I put cardboard down this year in most of the garden and haven’t had a problem with weedsin those areas so far.
My husband and me love the fact that our deep mulch garden relieved us from the endless, back breaking weeding of quack grass and bind weed, but now we have another problem, despite of using neem, diatomaceaous earth etc., maybe earwigs (had this problem before) or slugs (who love to multiply under the mulch) or any other ferocious leaf devouring critter – we never were able to pinpoint what it is – destroyed my basil, fennel, is working on my zucchini plant and the tagetes and starts eating bean leaves…
Any ideas how to combat this – we hate to give up the deep much….
Hmmm… that is a bummer! I am currently using DE to battle my bugs. I wish I had more ideas for you, though!
I’ve always used mulch in some form. I have had weed seed problems with straw/hay. Last yearI had no access to straw/ hay I used excess wool. Worked well in the hot climate here in south australia. I had started on the deep mulch using wood chips (aka back to eden) whenever I could get my hands on the chips. then had a major bushfire go through. Whole garden gone, however interestingly enough I had given the deep mulch a good soaking the day before knowing it was going to be hot. The mulch of course went up in flames but the only fruit trees/ veggies that survived were those where the deep mulch was. The trees coped a battering but survived. The ones with no bark didn’t come back at all. So spent the last 6 month in fire clean up and one of the top priorities is getting the garden rebuilt and getting the deep mulch down. The blessing of the whole thing is I’m doubling the size of the garden now.
Deep mulch is the best, whether it’s straw, hay, wood chips even wool!just get whatever you have at hand and get your covering on!
Oh wow…. I am so sorry to hear about your fire… At least you get a bigger garden now, though. I would have never thought of using wool. That is one thing we don’t have a lot of around here, ha!
Hi, i am trying to download the free 3book on Mulching. Everytime i enter my name and email address the response is that i am already subscribed.
How do i then download if i am already a subscriber?
Your response will be appreciated.
Regards
Coral
Hi, i am trying to download the free book on Win the War on Weeds as i am a subscriber.. Everytime i enter my name and email address the response is that i am already subscribed .
How do i then download if i am already a subscriber as you state that subscribers get the free book.
Everytime i enter my details to obtain access, i am told i have registered.
This makes no sense to me!!!!
Your response will be appreciated.
Regards
Coral
Hi Coral,
Send me an email at jill(at)theprairiehomestead(dot)com and I’ll make sure you get a copy.
Jill, thanks so much for getting so many of us started on this method of using straw/hay. Like you, we’ve been gardening large for about 6 years now and every year we kept trying something new in efforts to NOT have grass and weeds take over. This year we cleaned up the 1/2 we are using and covered it in Feb. with thick hay, no weeds till planing time, and now we only have a few grass weeds I have to pull up now and then. Even better, it’s a nice dry area for me to walk around the garden, no mud or dirty shoes anymore. The other 1/2 we let rest and planted Buckwheat to nurture the soil for 2 months, then tilled it into the dirt and last weekend covered it with thick hay so we can use it next year. I’m so excited with the new method, gardening will be a breeze now, Thank you from the bottom of my heart!
I am SO happy it’s working well for you Lisa– way to go!!
Hi Jill
Can you tell me if the weeds in the above picture are Bindweed. I am also mulch gardening and have a Bindweed infestation in part of the new yard. If yes, could you tell me how you are dealing with it?
I’m pretty sure (in my uneducated opinion) they are bindweed. I have just been mulching heavily over them, and it’s doing the trick– as long as my mulch is thick enough. In this pic, I had some thin spots, which is why it popped up.
How much watering do you have to do with this method?
it’s the only way to go. less watering, no weeds, no hard soil, increased worm population. This was my first year with wood mulch and I’ll never go back.
I am SOOOOOO nervous about this… But I think I am finally ready to give it a try.. Next year 😉 I too am freakishly good at growing weeds, lets just say it’s a good thing I appreciate Lambs Quarters in my salad and smoothies… If I DO intend to start next year, should I start by mulching at the end of this year?
So we tried this method this year and I know we must have done something wrong. So disappointed. We have weeds coming up through our hay, we also have hay growing. What should I do? Everyone who doubted this method is having fun at my expense now. Did I just not put enough down?
How much hay did you put down Stacey? I had at least 10 inches on mine the first year.
Well I know what I am doing next year! It has been the rainiest summer ever here in IL and I am losing my war on weeds (they are loving all the water) my garden is starting to have more grass then the yard, and I am just about ready to mow the whole thing under plants, weeds, and all.
Hi, I was wondering if pinestraw would work instead of hay?
I asked that question also as I have an unlimited supply of pinestraw but was told that pinestraw is very acidic and would not be good for quality of the harvest.
Hmmm… I don’t have any experience with pine straw… However I did find this blog post where someone tried it for mulching beds and had some issues. So, not sure how it’d work in a deep mulch setting. http://www.gardenofaaron.com/2013/03/eating-my-words-on-pine-straw.html
Hi there! So I took a leap of faith and got a bunch of straw and hay that was moldy and unusable.
I laid it out in thick flakes around and inside my raised beds. I still have a lot to spread but am winterizing the whole farm so it’s a slow process.
I’m a little concerned that the see’s in the straw is already sprouting. I live in zone 8 Oregon so we don’t have hard freezes. Should I flip the flakes now or wait until spring to do something about all the seed sprouts?
It probably wouldn’t hurt to flip it, if you can.
So – we just moved to a new homestead so I am planning out a brand-spankin’ new garden as will be trying the deep mulch method with hay (VERY excited). I think I want to till the ground since it is not currently tilled and then put our thick layer of hay (and NOT till that in) – does that sound right?
I use the mowed grass from our yard as mulch. It has worked fine, but have to wait to get enough for the whole garden. Have you used straw as mulch? I love reading your info!! I would love to meet you at Convention in Sept.
Used used hay for years. Success, but you do have to battle slugs, voles, moles (eating the many worms) and cool spring soil.
We’re trying this method this year as well but with mulch (since it’s more easily accessible for us). I’m excited you don’t have to till the following year and hope ours turns out the same. However I was wondering how you amend the soil? Sincere plants are taking nutrients out of the soil, I wanted to add in compost each year. Should it just be added to the rows you plant, mix and seed?