I’ve been hearing some buzz lately…
…about these handy-dandy soil block thingies that people are using to start their seeds.
I’ve been pretty loyal to my nifty little newspaper pots for a while now, but being the nosy curious homesteader that I am, I just had to check out these new pots on the block. (Sorry… I couldn’t help myself) 🙂
My initial detective work led me to this soil block maker on Amazon for $30 (affiliate link). It has good reviews, and a lot of people seem to be having success with it, so it’s definitely an option.
But then the DIY-side of my brain kicked into gear and I started scheming about how I could make one of these oh-so-trendy soil block makers myself.
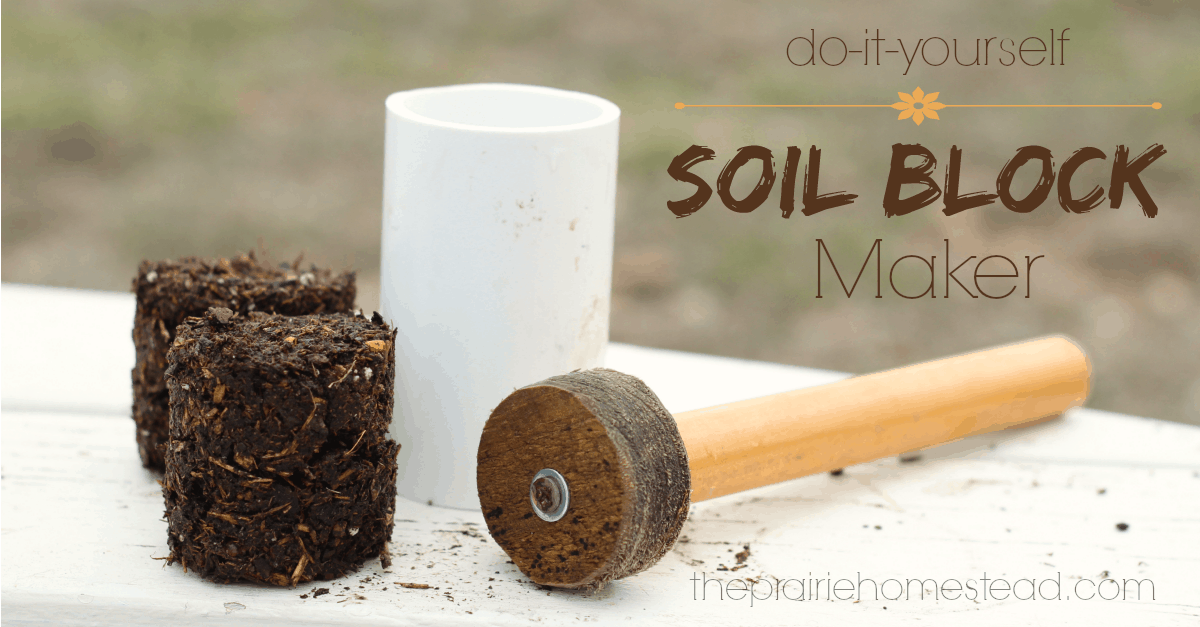
So that’s what we are doing here today–and there are two different styles you can choose from. The first one (the classy tin can model) was my project on Sunday afternoon. I like that one because it’s super simple and super cheap. But then hubby came along and decided he could make it even better, so I’m including his version as well. I actually like his design better, but don’t tell him I said that…
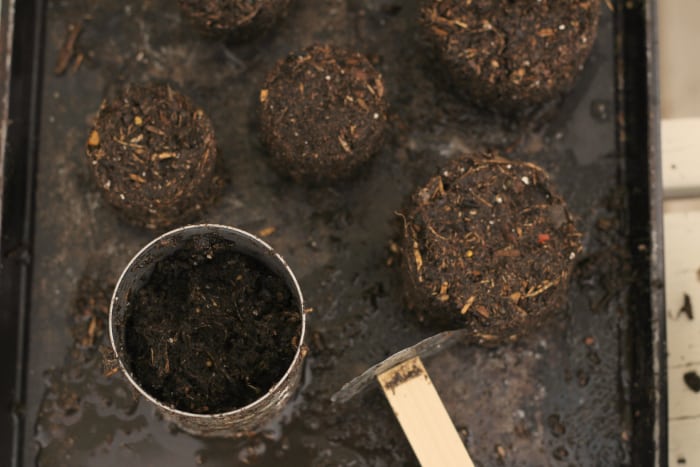
DIY Soil Block Maker (the classy tin can version)
You will need:
- An empty tin can (I think the one I used was the 15 oz size–or something like that)
- A chunk of dowel or a round/square wooden stick of some sort (scrap lumber is great)
- A screw (or two)
- Potting soil
- Water
- A pan/tray to hold the blocks
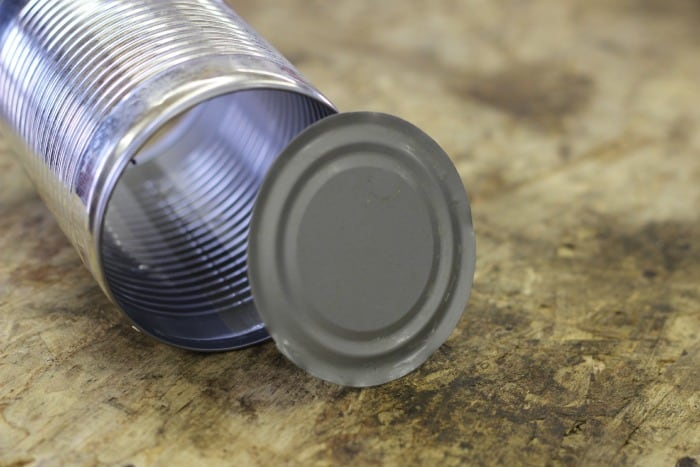
Remove both ends from the can. You’ll need to save one end, but you can toss the other one.
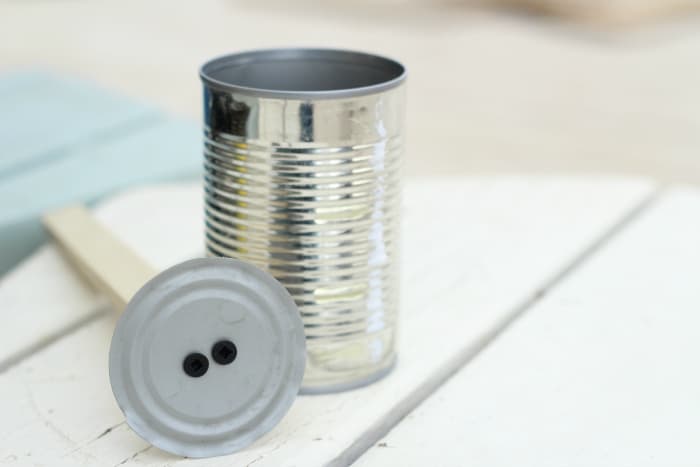
Attach the lid of the can to the dowel/stick with the screw. We drilled a guide hole first, and then screwed it together.
My one caution is to watch the sharp edges of the can/lid. It’s a good idea to wear gloves when you are using this version of the soil block maker to avoid cutting yourself on the sharp edges.
To make the blocks:
Mix the potting soil with the water– the amount of water you need depends on the soil, and it will take a bit of trial and error to get the right consistency.
You want the soil to be very moist and able to form a ball when you smoosh it together in your hand. If it’s too dry, the block won’t hold together. If it’s too wet, you’ll have a flood of water squirting out the bottom when you compress the soil. Just play around with it until you get a consistency that works.
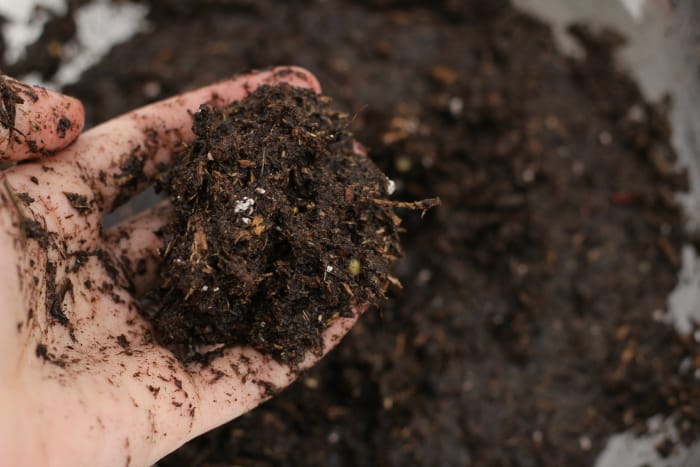
Once you’ve arrived at the right combo of soil/water, fill the can 3/4 of the way full with the moist soil. Use the plunger (aka lid and stick) to firmly press the soil and compact it into a block. Use the plunger to push it out the bottom of the can.
Congratulations! You’ve make your first soil block.
Use your finger (or the eraser-end of a pencil) to make an indentation in the soil block, and place your seed in the soil.
I plan on watering mine with a spray bottle, as I’m guessing pouring a bunch of water on top will cause them to disintegrate. Or, as the seedlings grow, you could water them from the bottom as well.
DIY Soil Block Maker #2 (hubby’s new-and-improved version)
You will need:
- A piece of PVC pipe
- A plug of wood (hubby used a holesaw to cut the circle of wood to fit inside)
- A dowel or chunk of old rake/broom handle
- A screw
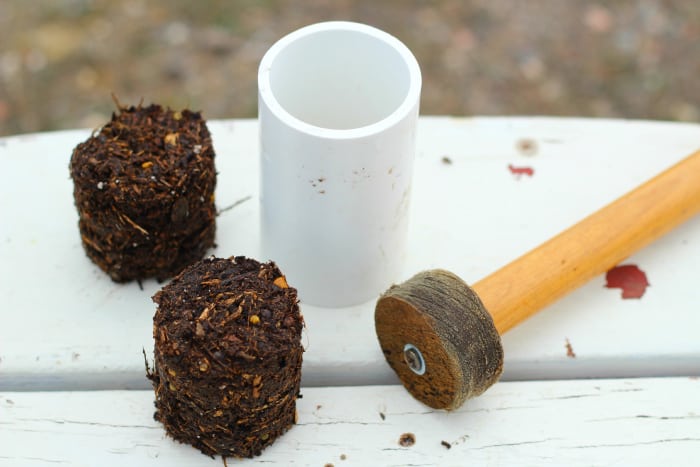
Cut the piece of PVC pipe to size (ours is 2″ in diameter and around 6″ tall, but this is very flexible. Just use what you have)
Screw the wood plug onto the dowel.
Follow the above directions to form the soil blocks.


You could attached an acorn nut to the underside of the tamper (ton can lid and stick) thing to create the dibble in your soil block while you’re pressing down.
Good idea!
You can make the hole for the seed by just stacking some washers between the screw and the wood, like a dimple.
Oh, I had forgotten all about these. Thanks for posting this. I had a friend who made these out of PVC and then she used a smaller diameter end cap on a stick to push it through. Same concept as your hubby’s. Thanks for sharing!
Hey, I hear those plug makers are made to utilize peat moss and the whole thing would indeed be quite spendy unless doing it on a very large scale like some of these commercial growers. I have been trying a new seed starting and potting mix using coir and homemade compost from my worm farms. I`m hoping the soilless aspect of it will help the seedlings do better, as the coir , or coco peat has neutral pH and peat moss has acid pH. Good luck!
This is such a great idea! I can see this saving money. Your husband sounds like mine in that he can make just about anything!
I am curious about the watering. Wouldn’t you need to keep the new seedling pretty moist after is sprouts? I’m wondering how long the soil block will last without falling apart.
Thanks so much!
Blessings,
Janet… countrylivingmama
Yes–they need to be moist–I think a squirt bottle would be the best bet to not flood them.
We made one of these last year and then we purchased one as well:
http://www.themessyorganicmum.com/2013/03/one-seed-two-seeds-three-seeds-weeds.html
Way too much work in the end. It takes a lot of practice to get your soil just right. Perhaps if you were doing it on a commercial scale but for us, our couple of hundred plants did not warrant this much work. The videos and reviews made it look pretty slick though. Good luck!
Good to know!
My hubby made one just like your hubby did, but left the screw out just a little bit to make an indent for the seed to go in. It worked well, if I had the soil moist enough, if not they just crumbled apart.
I like that idea!
I want to do this, but think I will try to use peat moss, maybe even a circle of tissue paper to put in the form before the damp peat moss to see if that helps hold it together better.
Johnny Seed company has a good recipe for mixing soil to create a blend that will stay together, and provide the right amount of nutrients etc.
I love both of these methods! I’m using DIY paper pots wrapped in TP rolls right now for my seeds, but the TP rolls are falling apart and not giving enough support for the soil block. I’ll have to try this out!
Pampered Chef can opener would give you lids that are safe and not sharp edges. Bur wouldn’t these eventually fall apart and what kind of support for the growing seed? It is a great DIY, but I will stick with the newspaper pots!!! Thank you for posting!
I’ve used soil block makers for a few years. Part of what makes them better than other methods is that there is nothing for the roots to get bound by–and they are “air pruned” as the roots reach the edges. After the seedlings are established, the roots hold the blocks together. I usually cover the tray of until the seeds germinate, and take off the cover when seedlings are an inch or so high. This is also when you should thin to one seedling per block. Watering with a sprayer or from the bottom work pretty well, especially in the first few days, but I’ve found a new method– I filled an empty mustard squeeze bottle with water and gently soak each one.
Thank you for weighing in Anita–I appreciate your tips and expertise!
Love these – especially the PVC pipe version. I’m going to try it tomorrow afternoon with my daughter. We still have a good eight to ten weeks before any planting can be done (we are way up near Yellowknife, NWT), but the longer sunny days are making us excited to get started!
Thank you for this. I made my own DIY version with a closet rod, pop can, and salt canister. I actually made two sizes so I could “pot them on”. https://www.youtube.com/watch?v=bpNr5T4IJ-g
As far as watering goes you can use felt in the bottom of your trays to water from the bottom. The felt holds the water and the soil block wicks the water up to the roots.
Vola!
Smart! 🙂
Love it!!! Thank you Tisha for mentioning that, and thank you Jill (& clever hubby too!) for all the great information!!! I’m in my mid 70’s, gardening all my life, & I love to learn all the creative, useful ideas everyone’s always sharing! Blessings!!!
Do you continue to use your soil blockers or have you returned to the newspaper pots? I have used the newspaper pots in the past but was considering making a soil blocker this year.
I did end up using newspaper pots last year– and those peat pellets too. Ended up being easier with the amount of seedlings I started.
Is there any way to make them ahead of time during the winter?
If you’ve ever heard of winter sowing, these would be great to use!
With these larger ones. Why not slide an old nylon stocking up over the blocker. Trim it to right height after pulling the blocker out. It would allow air flow and hold dirt together. Remove when roots are well established or before planting.
Ya’ll got me thinking about the plugs fallin apart. What if some natural, loose woven burlap was sewed into a tube shape and put in the blocks before the soil. It would have to be natural not synthetic. Natural burns and synthetic melts when put to a flame. If it was loose woven enough the roots will grow through when planted and the cloth disintegrate. Well looks good on paper!! LOL back to paper!!
I think I will stick to my small drinking cups. punch a hole in bottom for drainage, pack with soil and viola…ready to plant.
I made several home made soil block makers out of schedule 40 PVC of various sizes, The 1inch will slide inside the 1~1/4. By putting a piece of wooded dowel rod into the 1 inch piece, adding a screw in the end of the dowel rod this makes the hole for the seed to go into. Just measure the size blocks you want to make . You do this by putting your measuring tape into the 1~1/4 piece moving the 1inch to the size block you want to make. this will make an 1 1/4 inch soil block,21/4, 21/2, or 3inch ,what ever you want. Also made other 2inch, and 3inch ,and the 15 oz. tin can models. Hope the Share theses with my Garden Group Class I teach. Thank Y ou !!! Happy Gardening!!!!W