When I was meandering through the aisle of the feed store the other day, I almost grabbed one of those plastic chick waterers. I knew we were going to be needing one soon, since the coop is clean and shiny and the chicks are set to arrive in a couple weeks.
But of course, my craziness innovative, frugal mentality won out, and I decided I would challenge myself to create my own chick waterer from materials I had at home.
After several conversations with my scientifically-minded husband regarding the laws of physics, I scrounged up various plastic containers and began to conduct experiments.
Let’s just say I should have payed more attention to our conversations, as I ended some with some flooded counters and sopping wet dish towels.
Anyway. I do believe I have mastered the elusive chick waterer. I am excited to share my findings with you, in hopes of saving you several physics lessons and wet kitchen floors.
Homemade Chick Waterer
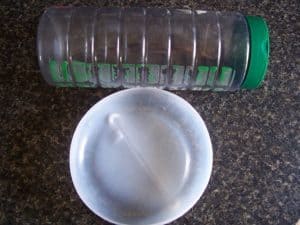
First off, here is what I came up with after treasure hunting around my home:
My intial idea was to repurpose this old parmesan cheese container for the top portion. I then cut the bottom off of a plastic gallon jug to make a “dish” that is around 3 inches tall.
However, after some trial runs, I found that the parmesan container didn’t work because the lid did not seal securely enough.
So I found a 48 oz lemon juice bottle instead. I highly recommend using a bottle that has a small cap, since it’s important that the container holding the water be airtight.
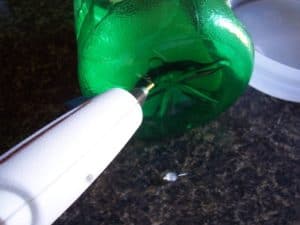
I then poked a small hole, about the diameter of a pencil, near the bottom of the jug.
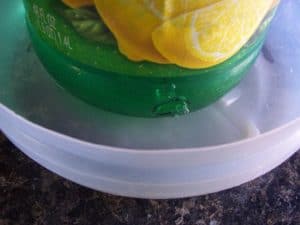
I used a hot glue gun to attach the bottle to the tray. I didn’t want to use any sort of glue that might leach into the water and harm the chicks.
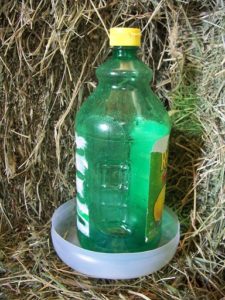
And now you are ready to fill ‘er up. The tray should fill until the hole is covered, and then stop. When the chicks drink, the bottle should slowly release water to provide fresh water at all times. A self-refreshing waterer is more ideal than an open pan, since it prevents the chicks from taking a bath or drowning. And we don’t want that.
Ready to make your own?
Homemade Chick Waterer Notes
- There are numerous options when it comes to raw materials. Dig through your recycling box, garbage can, or pantry to see what will work. The bottom tray needs to be several inches larger in diameter than your water container. Some ideas could include: milk jugs, yogurt tubs, gallon jugs, large plastic water bottles, etc.
- Make sure to thoroughly wash everything before assembly and don’t use any container that might have had substances that would be toxic to the chicks.
- The container that you choose to hold the water must have a lid and be air tight.
- Be mindful of where you place the hole. If it is too high, the tray will overflow. If it is too low, the water level might be unreachable for the chicks.
- If the water does not want to flow, try increasing the size of your hole.
Of course, these same principles could be applied to a larger scale to make a full-sized chicken waterer. If Prairie Baby was older, this would have made a great science experiment. But as of right now, she is more interested in trying to chew on the containers. Oh well, maybe eventually. 😉
Have you ever made a homemade chicken waterer? What materials did you use?


Cool! Way to go ~ what a neat idea.
that is so cute that you have chickens! You won the Real Food on a Real budget ebook email me So I can get that to you!
So cool. I’m also pretty frugal but it never occurred to me to make my own waterer. Great job!
Thanks -I didn’t want to waste money buying one when I knew somehow one could be made out of recycled materials…this is just the ticket.
We did the same thing for our chickens! Great job.
The waterer still got dirty, though, so we switched to rabbit wattering bottles. They are great! The chicks took right to them and no mess.
Great Idea, but my question is, how do you fill it? Do you put your thumb over the hole while filling it from the top?
Thanks for the design. Works great…I used a liter seltzer bottle and a old tupperware.
Awesome!
I love this idea. I am always looking for ways to recycle and repurpose things to keep them out of the trash. I am planning on getting chickens this year and will use this idea. Thanks.
1) Use containers that have sort of rigid sides or the vacuum inside will collapse the container when enough water flows out, and soon the floor will be wet again. 2) Consider making two so that a spare is ready when the other cannot be cleaned well enough any more. 3) Juvenile chicks may need more flow than a rabbit bottle with a beaded nipple will allow. Make sure you monitor the chicks’ efforts to keep hydrated to tell if you need to switch to a higher flow. If they don’t get enough water they won’t eat enough to grow well. bb
What am I doing wrong? I first used a smooth plastic bottle, then a rigid bottle, but the water does not want to flow! I even made a little hole up top thinking it was necessary for it to flow like a gasoline tank (the one you keep in your garage for the lawn mower, etc.)…… what should I do?
Hi Faith,
It’s been a little while since I played around with this, so I’m trying to remember…
Maybe try increasing the size of your hole a bit?
And if that doesn’t work, try slowing loosening the lid to see if it will increase the flow. Hope that works. Good luck!
I have the exact problem. The bottom container fills with water and continues beyond where the hole is placed until it overflows. Have I forgotten something? Or maybe it is because I have not glued the bottle to the bottom container? Just playing around with recycled materials right now…
It all works on vacuum so don’t put a hole in the top and if there is a lid seal it tight.. With that said a hole on top should cause all the water to dump out the lower hole. Like Jill said maybe make the hole bigger or move it up higher (almost but not quite to the lip of your pan)
Use a 2 liter, or a 3 gal jug. PVC piping. Works great.
I found (don’t judge) that the larger size vodka bottle has a special slow pour insert in the opening so when you hold it upside down nothing comes out unless you shake it. This seems to work as a nice slow release. Bungee cord it to the side of the run and it’s pretty easy to change/refill!
I only have 12 chicks but I trained them to drink from a rabbit bottle. The bottle has a shiny pipe and ball to keep the water in when not being picked at. I don’t have to mess with cleaning out stuff from the waterer and the shavings stay dryer.
Thank you so much for posting this! It really helped us out.
watch this short video. The hanging bucket has nipples screwed into the bottom of it. This is the best way by far on how to make a waterer for chickens. I have tried all the other ways….and after doing this wow the water stays clean, the bucket stays clean and the need to re-fill the water is only once or twice a week depending on the amount of chickens, and chicks learn early on how to use this too by watching the older birds.
Nipples are available at ebay or amazon…free shipping. I just bought 25 of them for only $12.95.
I use a smaller pail for my small coop, and a you can even use a larger pail with a heat tape wrapped around the outside of it for the colder winter months.
http://www.youtube.com/watch?v=SyjtzehQWWc
Thanks for the video link Ellen!
You’re quite welcome. Being disabled with chronic pain and fatigue i need to find the simplest ways to feed and water my chickens. I don’t want to spend a lot of time washing out feed and water pans. I made a homemade hanging feeder out of a metal coffee can and a solid hub cap too. I will take a picture and post it here. If pictures can be posted here.
Your design is a big improvement over the common one-gallon, two-piece, screw-on plastic waterer, because yours has a positive seal to prevent overflowing. I plan to make my own soon. There’s just one addition I’ll make: an overhanging circular “roof” made from a paper plate with a big hole in the middle. It keeps the water a lot cleaner. I use masking tape to secure it, and when the plate becomes too poopy, I replace it with a new one.
Only thing I could think of doin’ extra would be using small pebbles in the bottom of the bottle fer stability…Chicks aren’t known fer their gray matter
That’s a good idea Mike!
really helpful!!!!!!!!!!!!!!!!!!!!!!!!!
thanx a lot
On my parents farm when we raised meat chickens we had similar waterers. When the chicks were little we filled the “trough” with small field stones, so they could drink the water from inbetween the stones. It made it impossible for them to drown, and since there was less water in the troughs at a time it kept the water fresher too.
When picking up some chicks at this springs ‘Buy, Sell, Trade’ I came across a fella selling the nipples for waterers dirt cheap. So cheap, in fact, that my frugal self scooped up a handful of nipples (fighting off urge ‘to go there’).
I ended up making a chick waterer from a plastic mayo jar by drilling 3 holes in the bottom (using 5/8 bit) & screwing them in using a dab of silicone to seal then attaching a wire around the neck of the jar & voila, super cheap & easy way to keep their water clean & plentiful. They figured it out right away & the bonus is that I won’t have to train them if I opt to figure out a nipple watering system for the run & coop.
Oops…correction…think the drill bit was 5/16.
I like this simple water drinker, thank you for the knowledge shared.
Hi
I have not only made several waterers but several feeders too… following a similar principle except that you cut the bottle that will contain the feed halfway where the rim of the bowl meets up and in several places. The waterers I used nipples that I bought online for something like Aus$4 for 10. I drilled a hole in the lid inserted the nipple. Drilled another hole in the base of a 2 ltr juice bottle to fill it up. Then I suspended it upside down on the side of the coop. I did it this way because I found that my girls were a bit messy and would kick dirt and other wonderful chicken coop stuff into their waterer… this way it is sealed and 2 ltrs of clean water is always available. It is also very easy to refill and doesn’t require cleaning every time you fill it unlike the other type of waterers and in addition it saves water…a very valuable resource here in Australia. But I guess I cheated a little by not recycling everything I used to make it.
Mad Chicken Lady (as my son calls me) Aussie Style!!!
We got a 5 gal pail (they use them for frosting) from our local food store for free. Bought the nipples at Tractor Supply for about $5.00 for 6. My husband drilled holes at the bottom for nipples,& them at the bottom. I also got another pail & a veggie tray at $ Tree for their food. He drilled different size holes along the side of the pail & put holes in the veggie try & connected that to the pail with bolts & nuts. This works great for their food.
Hey Jill! Thanks for the easy, diy chicken waterer! I’m sure it will work great, but do you have any ideas for day old chicks? Thanks, Oliver.
I made my waterer out of a 5 gal bucket 5 inch’s from the bottom I cut it 8 inch’s by 4 inch’s and put a brick in the bottom of it in the center and use a office water dispenser. 4 gal jug fill it up with water and turn it upside down and put it on the brick. For my feeder used a schedule 40 pvc pipe and attached a 5 gal bucket lid to the bottom and drilled holes in the pipe about 3/4 inch at the bottom of the pipe. And my waterer is set up outside the fence so they don’t get it dirty. The stick there heads through the wire to drink.
This is one of the best homemade waterers I have seen. Great job!
This is really helpful. So smart to use the old parmesan cheese container for the top part of your system. Thanks for sharing.
This is interesting. Thanks for sharing this information. A 5 gallon jug–very innovative.
Such a helpful post. Thanks so much for sharing this information.
I love the use of the old parmesan cheese container. Using the plastic gallon jug was also ingenious. It makes sense that the parmesan lid wouldn’t seal, but glad you tried it nonetheless. Thanks for sharing this information.
i’m small scale so i use the bottom of a flower and an old bike water bottle works great
i’m small scale so i used the bottom of a flowerpot and an old bike water bottle. Works great!
That’s a great idea! Thanks for sharing!
Thanks for the great idea! We have a hen that’s gone a little broody (we only have 4….so far!)….and this is a perfect idea for her separate quarters! I used a 16 Oz. water bottle and a little plastic bowl…we’ll see how she does!!!
Thanks. I’m using a chick waterer for bees and I was looking for something that I could fill from the top. I’ll try this.
Doesn’t work. I made multiple attempts using different sized bottles and bowls. I also tried multiple different sized holes in the bottle bottoms. Despite trying over 7 different variations in bottle sizes, bowls and drill holes, I found this idea posted does not work as an auto waterer. The water won’t come out unless you manually squeeze the bottle.
Sorry to hear this didn’t work for you!
I made this today, great idea. However, everytime you take the lid off to fill it up, you break the vacuum and all the water runs out. I can’t fill it up and get the lid on quick enough. Maybe a bigger bottle would work – I’m using a 750ml bottle – but I have to be lightning quick to fill it!
Love the idea, but so far it’s not working until I figure out a filling system.
Thanks for sharing!