
I was so thrilled when Craig Fear from Fearless Eating said he’d write a post on making pork broth. I feel like I’ve pretty much mastered making poultry and beef broth, but have yet to venture into homemade pork broth. I’m ready to give it a try after reading Craig’s advice, though!
With the resurgence of interest in making real homemade bone broth from actual bones, pork broth is an option few people consider. In fact, I hardly know anyone who makes pork broth and I’m guessing you don’t either (including yourself).
Now truth be told until recently, I’d never made a pork broth. But it’s slowly becoming a staple in my kitchen for quite a few reasons.
Chicken and beef broth move over!
Here are four reasons (recipe included in reason #3) why you should start making pork broth:
Why Pork Broth?
1. Pastured pork bones are cheaper than pastured chicken and grass-fed beef bones.
Considerably cheaper.
A few years ago I could get almost any type of grass-fed beef bone in my local health food store for relatively cheap. Not so anymore. With the increased demand for bones in recent years, I’ve noticed the prices rising. And of course, pastured chickens are not cheap either.
But because so few people make pork broth, pork bones are a lot more affordable. In fact, it’s rare to even see them on display at meat counters or even in butcher shops themselves. So you’ll probably need to ask specifically for some pork bones.
Your local butcher will be glad to give you some! And of course, another good option is your local farmer.
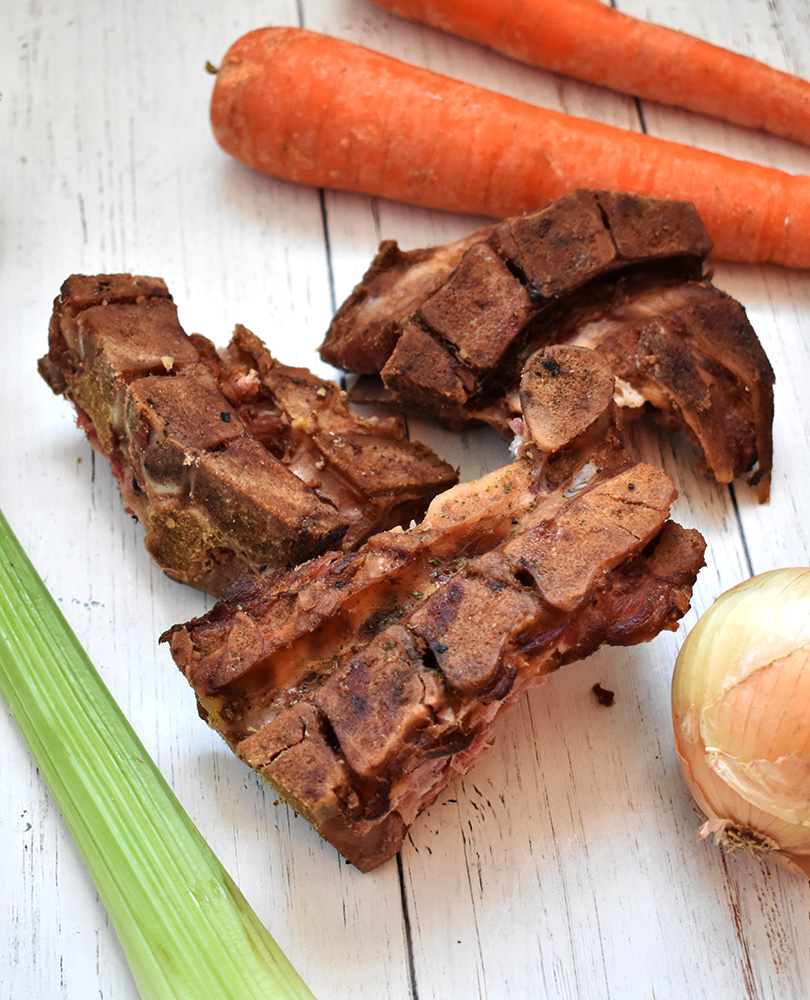
I picked up a five-pound bag of pastured pork bones for about $6 recently which included a nice variety including leg, neck, hip, and rib bones.
And yes, I highly recommend getting the best quality bones possible. Bones from grass-fed and pastured animals, raised on their natural diet, will give a more nutrient-rich and flavorful broth.
But there’s an even better reason to start making pork broth. Now if you’re new to the traditional food world, just a warning for reason #2. Prepare to cringe a little.
Or maybe a lot.
2. You can get a super gelatinous broth if you use pig’s feet!
If that freaks you out, don’t worry. You don’t have to use pig’s feet. But understand that traditionally, cultures used not just bones but all parts of the animals for a bone broth. Tails, heads, necks, and yes, feet were common additions.
And that’s because all those parts are collagen-rich. Well, collagen has lots of health benefits.
Collagen comes from the Greek word “kolla” which means “glue” and it’s literally the stuff that glues animals (including us) together. It’s made up of proteins that form strong yet pliable connective tissues, such as tendons, ligaments, cartilage, joints, skin, and even bones.
In a slowly simmering homemade bone broth, those proteins break down into gelatin which consists of amino acids like glutamine, proline, and glycine which have a multitude of healing and protective effects in the body, especially in our GI tract. It’s why bone broths are a key component in the initial stages of the GAPS diet and other digestive healing protocols.
It’s also why traditionally, before the age of Tylenol, cough syrup and Tums, mothers, and grandmothers all over the world made a simple chicken soup for things like the common cold, indigestion, and other types of common health issues.
You can actually see proof of a gelatin-rich broth when it cools. It will literally gel and jiggle like Jello. This is a good thing!
I recently grabbed two pork feet from my local butcher at about $5 each. I asked him to split one in half knowing I’d be blogging about it. Look at all that collagen in there!
Again, it’s totally optional to use pig’s feet. You can still make a great bone broth with just the bones which will be infinitely better than anything you could buy in a box or a can.
And you’ll NEVER get a gelatin-rich broth in a store-bought product.
3. Pork broth is super easy to make.
The process is no different than making a chicken or beef broth. Here’s a simple recipe using my easily memorized 5-step process (because each step begins with the letter S).
How to Make Pork Broth
Yield: about 4 quarts
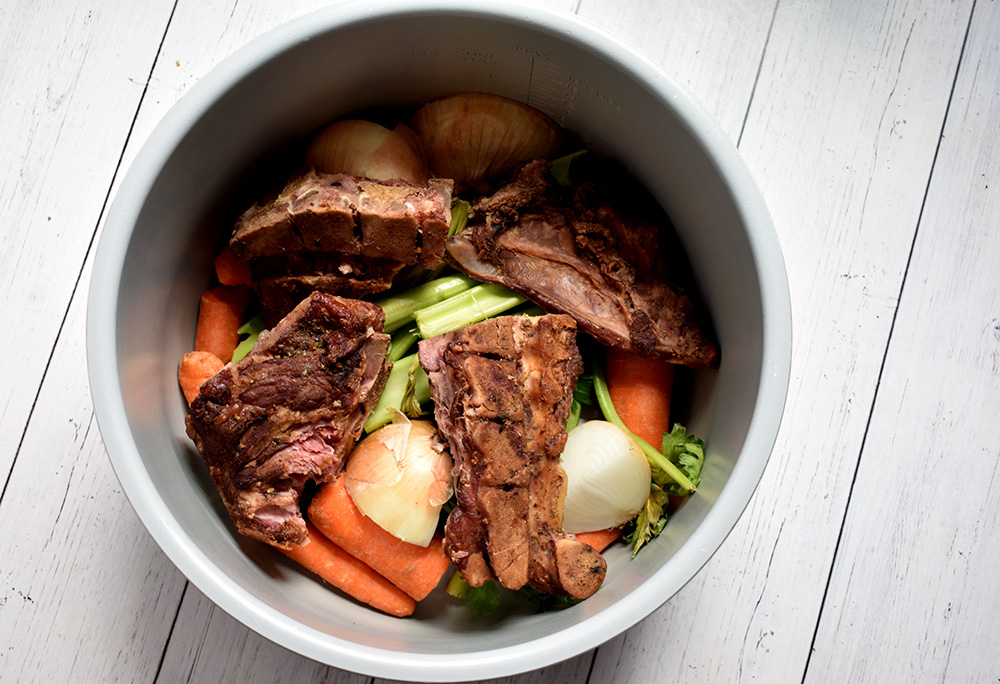
- 4-5 pounds pork bones
- Vegetables, coarsely chopped – 2-3 carrots, 2-3 stalks celery, 1 medium to large onion
- ¼ cup apple cider vinegar
- Filtered water to cover pork bones
Optional parts for more gelatin and nutrition:
- 1-2 pig’s feet
Step 1. Soak. Place pork bones and pig’s feet in the bottom of the stock pot and cover with water and add vinegar. Let sit for 30-60 minutes. This will help pull the minerals from the bones.
To develop more flavor, you can roast the meaty bones first. This is not absolutely necessary but highly recommended! Set in a roasting pan and roast at 350 – 400 degrees for about 45-60 minutes until browned but not charred. Then add to the stock pot and soak.
Step 2. Skim. Bring to a gentle rolling boil and skim any scum that forms on the surface. Add veggies after skimming.
Step 3. Simmer. Turn temperature to low and simmer very gently, covered, for 12-24 hours.
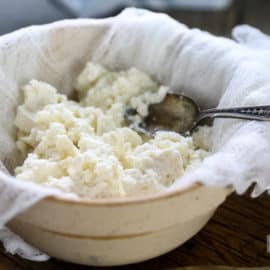
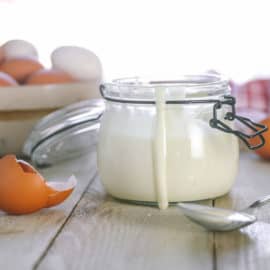
Step 4. Strain. Let broth cool to about room temperature. Strain broth from bones and veggies and transfer to storage containers.
Step 5. Store. Store in the fridge for up to 7 days. Freeze whatever you won’t use within a week.
4. You can make some KILLER Asian noodle soups
Or really any type of soup you want. Have a recipe that calls for chicken broth? Use pork broth instead. Same for beef broth. Personally, I don’t find the flavor of chicken and pork broth that different though others will surely disagree with that statement. As with all things that involve the taste buds, personal preferences differ. Bottom line: Try it and decide for yourself!
But pork broth is a staple in Asian cuisine and makes a great fit for many types of Asian noodle soups.
And I loooooooove Asian-themed soups. I make them ALL. THE. TIME.
Like an Asian pork chop noodle soup that’s included in my new book, Fearless Broths, and Soups: Ditch the Boxes and Cans with 60 Simple Recipes for Real People on Real Budgets.
My love of Asian noodle soups stems from my extensive travels in Asia and it’s why I have an entire chapter dedicated to them.
There are also recipes for:
- Thai Coconut Curry Chicken Soup
- Taiwanese Pork Noodle Soup
- Asian Beef Noodle Soup
- Vietnamese Pho
- Ginger Miso Sesame Soup
- Burmese Coconut Curry
- And many more!
Of course, I know Asian soups are not everyone’s cup of broth. If that describes you know that I also have chapters on:
- Creamy vegetable soups including a Sweet Potato Coconut Curry and a Creamy Carrot-Apple with Cinnamon
- Simple Sausage and Meatballs including a Portuguese Kale, Italian Meatball and a Sausage, and Sundried Tomato Pesto Soup
- Soups from the Sea (which use fish broth) including a Basic Ciopppino, Bouillabaisse, and Spicy Cilantro Lime with Seafood
- Broth for Breakfast for those rushed AM hours including 7 recipes for Savory Oatmeal, 6 for Congee (an Asian rice porridge), and 5 for Simple Eggs in Broth
And yes all of those recipes can be made using pork broth!
Do You Make Homemade Broth?
Making your own broth is a simple way to become more self-sustainable and a head start cooking from scratch. You can replace store-bought broth in so many different recipes. Cooking from scratch is a great way to homestead starting in your kitchen. If you are interested in learning more about cooking from scratch you would love my Heritage Cooking Crash Course.
The heritage cooking crash course is all about teaching you the basics of cooking from scratch. It includes videos and written instructions for you to use while you follow along. Click Here To learn more about my Heritage Cooking Crash Course!
More From Scratch Cooking:
- Rustic Sausage Potato Soup Recipe
- How to Cook from Scratch When You Have Limited Time
- How to Can Homemade Stock or Broth
- How to Make Your Own Sourdough Starter
Craig Fear is a certified Nutritional Therapy Practitioner (NTP). He lives in Northampton, Massachusetts where he works with clients with digestive health issues. In addition to his latest book Fearless Broth and Soups, he also created a complementary video course for bone broth making-newbies called How to Make Bone Broth 101.
You can connect with Craig over on his blog, Fearless Eating, on Facebook, Pinterest, and on Instagram
Great idea. I will definitely have to try this. I do have 2 questions though. Can a slow cooker be used to make broth and stocks? And if so do you know how long to let you cook? I live in Florida and is still in the 80s in December. So the slow cooker is a much more economical choice for me. It keeps the house cooler. Thanks, Diane
Yes– you definitely can use a slow cooker. I usually do my stocks/broths in the slow cooker for 12-24 hours on low. Works great!
I just got some pork bones and piggy feet from a heritage free range pork farm here in New Zealand, the meat is soaking now in the slow cooker, this is my first atttempt at a bone broth so very excited! Thank you for the simple and well explained recipe.
How much home made broth do you use for a soup recipe? ??
Just depends on the soup recipe. 🙂
Was reading your article on dehydrated eggs. Check this out.
Scrambled Eggs & Polenta
Dehydrated scrambled eggs by themselves do not rehydrate
well. They stay hard. The trick to making scrambled eggs that
rehydrate well is to precook them with polenta (yellow grits)
and then dehydrate them. Polenta’s ability to absorb water
helps the eggs return to a fluffiness very close to the scrambled
eggs you cook at home. The yellow color, mild flavor, and soft
texture make polenta the perfect ingredient to mix with eggs.
Another benefit of mixing polenta with eggs is that you don’t
have to carry a spatula, use butter or oil, or make a mess in a fry
pan on the trail. Cook the same as any other dehydrated meal:
Add water, soak for five minutes, bring to a boil for one minute,
let sit for ten minutes and enjoy.
How to Cook & Dehydrate Scrambled Eggs & Polenta
Ingredients:
• ¾ cup Polenta (use fine ground if possible)
• 8 Eggs
• 3 cups Water
• ½ tsp Salt & Pepper to taste
Combine polenta with water and salt in pot and bring to boil for
one minute. Remove from heat and set aside with lid on. Wait
at least ten minutes before you remove the lid and allow the
polenta to cool.
In a separate bowl, beat eight eggs together until yolks and
whites are well blended.
After polenta has cooled and all water has been absorbed,
combine the polenta and eggs and blend well with a whisk.
P a g e | 207
http://www.BackpackingChef.com © All rights reserved.
Above: Pour egg mixture into glass baking dish lined with
parchment paper. Bake at 350° for 30 minutes, stirring twice.
Below: After scrambled eggs cool, break into similar sized pieces
and spread on dehydrator trays. Dry at 145° for approx. 4 hours.
Preheat oven to 350° F.
Pour polenta-egg mixture into a glass baking dish lined with
parchment paper.
Bake for 15 minutes and then stir the mixture with a whisk,
moving the firmer parts from the outer edges towards the
center.
Continue baking another 15 minutes and stir again.
If all liquid has firmed, remove from oven and let cool. If not,
return to oven for another five minutes or so until entire
mixture if firm.
After mixture has cooled, scoop out in scrambled egg size pieces
and place in a single layer on dehydrator trays covered with
non-stick sheets, parchment paper or the fruit leather inserts
that came with your dehydrator. Try to keep the pieces about
the same size so they dry evenly.
Dehydrate at 145° for approximately 4 hours or until completely
dry and hard. Break any large clumps that are drying slower
than the rest in half.
Yield: Above recipe yields 3 cups dried.
A ¾ cup portion equals two eggs.
Came from a book I have.
Enjoy
Oh my– that sounds amazing!
After soaking the bones in vinegar and water, should I discard the vinegar? Or does that become a part of the stock?
The 1/4 cup vinegar just becomes part of the water and it all turns into the broth.
Our family is half Asian and let me tell you, a day doesn’t go by without a chunk of bone-in pork simmering in a huge soup pot, usually with a couple handfuls of legumes and a knob of fresh ginger. No one drinks coffee, tea or water at mealtimes-just a bowlful of soup broth or two!
I grew up Western Canadian with pickled pigs’ feet as a lunchtime treat. They are refreshing on a hot day and make a great appetizer if you pick the bones clean, chop or grind it with mayo on crackers.
Do you roast the pigs feet first as well? Or just the other bones? Also, how long does the broth last in the freezer for? (As you can probably guess, I am new to making things from scratch and freezing extras!)
Can you pressure can this broth instead of freezing it?
Can you make the broth in a pressure cooker? Seems like it would be faster and if you let the pressure come down on its own you would not loose any nutrients
Yes, you can definitely make broth in a pressure cooker– I do it frequently. 🙂
How many hours should you leave it on the stove if you use a pressure cooker?
Two to three hours in medium heat.
I grew up on pork stew. Leftover pork roast was served up in its own broth along with leftover veggies- corn, potatoes, carrots, green beans. One of my favorite stews and I always thought it strange that no one does pork broth.
I actually found this post trying to figure out why…wondering if I was missing something.
Yeah… it’s funny how it’s not as common as chicken or beef broth… no reason it shouldn’t be! 🙂
Jill I love your blog great post on pork broth.
What about pressure canning in mason jars?
Our freezer and frige are packed. How long will the broth last canned?
Yes– you could definitely pressure can this in mason jars. I’ve had home-canned broth last years. 🙂
Hi Jill, thank you so much for your blog about pork broth. I recently came accross some pastured pork bones (all pastured bones are hard to come by & expensive in my area) then I realized that there were no recipes out there at all for pork bones. I was having night mares of 20lbs of bones going to waste in my freezer and aweful tasting broth. LOL
I read all the comments, but I found one question that went unanswered. I have the same question. Which types of bones do you recommend roasting first? Should I roast the pigs foot?
Hi,I check your blog named “How to Make Pork Broth • The Prairie Homestead” regularly.Your humoristic style is awesome, keep it up! And you can look our website about love spell.
Hello, would you mind giving me a guesstimate of how many liters of pork broth this generates? Just for planning purposes. Many thanks!
Do you need to split the pigs feet to get all the collagen goodness?
I want to make this into a soup, maybe with some lotus root, dried squid, dried scallops, etc. I think I will use pork ribs for some meat and pig feet split in half lengthwise. I don’t think I should cook all of it at the same time. Would you simmer all the bones for many hours first, strain, and then add the rest of the ingredients? Also, would it be advisable to par boil the bones first?
Sounds good and unique. I would slow boil all the bones at the same time for 24 hours to get the nutrients, minerals, & collagen leeched out of the bones. no reason to do them separately. Use apple
cider vinegar to help that process. Add some roughly chopped onions, celery, garlic, ginger and carrots (optional) for the broth. Strain after 24 hrs and use broth for your delicious sounding soup. Freeze extra broth.
I had some bone broth disaster. I’m not sure went wrong. I used a combo of chicker, pork, and beef bones. The broth smelled great at first, but after 24 hours it started to smell like lima beans and tasted chalky. Totally gross. Any ideas on what may have gone wrong? Did I cook it too long? Can one cook bone broth for too long?
G-Reg, did you strain it and put the broth into the frig overnight to remove the fat? you want to simmer for about 10 to 12 hrs, strain into another pot to remove veg. and bones, then when room temp put in frig, next day skim off fat. You can then make soup or I use freezer bags and freeze ….lasts a long time. Hope this makes sense?
when I make a Pea or bean soup, I always use pork hocks as the stock base and other bones if available, (anytime we have anything with bones, I freeze the bones and when I have enough I make stock), I keep bags of bones in the freezer ..pork, chicken, beef, duck, turkey, lamb etc
I forgot to soak the bones before turning on the heat the 2x time I made it, but I will this time! I like using 1/4 c of ASV because it’s so good for you and I don’t taste it.
You only need to roast the bones once if you reuse them, correct? I’ve been using bones from ribs and a ham. Like the pig feet I am assuming, the ham bone made it very gelatinous the first time I used it.
I am not sure how long ago you wrote about not being able to find gelatinous bone broth in the stores because you can now, but I still prefer making my own. Easy and kind of fun. Cheaper too.
I also am going to try and add onion and garlic skins, egg shells, and the ends of celery because I hear they have lots of extra nutrients. And I add peppercorns, 2 bay leaves, and garlic because those are all really good for you too and taste good :-). If you have any more suggestions of what to add, I’m all ears!
How many hours should you leave it on the stove if you use a pressure cooker?
What if we wanted to cook it for 24 hours?
If I choose to roast the bones before soaking, should I roast the pig’s feet along with the bones, or should I put the feet into the water unroasted?
I forgot to soak the bones before turning on the heat the 2x time I made it, but I will this time! I like using 1/4 c of ASV because it’s so good for you and I don’t taste it.
You only need to roast the bones once if you reuse them, correct? I’ve been using bones from ribs and a ham. Like the pig feet I am assuming, the ham bone made it very gelatinous the first time I used it.
I am not sure how long ago you wrote about not being able to find gelatinous bone broth in the stores because you can now, but I still prefer making my own. Easy and kind of fun. Cheaper too.
I also am going to try and add onion and garlic skins, egg shells, and the ends of celery because I hear they have lots of extra nutrients. And I add peppercorns, 2 bay leaves, and garlic because those are all really good for you too and taste good :-). If you have any more suggestions of what to add, I’m all ears!
I did not roast the bones, just made a broth and not sure that was a good idea, wanted to put in carrots, turnip,onions and lentils but now I don’t know if it will be okay that I didn’t roast the bones
How do we know how many grams of collagen in a cup of broth?
So ham is pork, right? I got a great deal on a shank half city ham. I cut it into five steaks to freeze and the smaller muscles I sliced for biscuits, and cubed some for the freezer. I was able to cut the bone in two through the knee pretty easily to fit it into my pressure cooker. I also threw in all of the skin and rind too and pressure cooked it with water for 90 minutes. I ended up with three quarts of rich, red ham broth for next winter’s bean soups. Not salty at all either, which I prefer.
Useful tip I discovered – I chill broth overnight to let the fat rise and harden on top. I usually scoop it off with a spoon, but I wanted to see if it would be less wasteful (gelatin always gets scooped out along with the fat) to cut it and lift out in pieces. So I cut from the center to the edge of the bowl and started lifting up the cut edge… as it lifted more, it fell over and made a ‘cone’, so I kept on rolling it all the way around the bowl until it was a big cone of fat that was easy to lift out with a carving fork and a spoon. Easy!
I eat at a restaurant in Austin Tx that claims to render pigs feet fore 60 hours. It is the best thing I have ever put down my gullet. How do they do that?